Sep 16 2007
More Detail from Halloween Scrap Pages


I’m trying to show a bit more detail on the Halloween scrap pages.
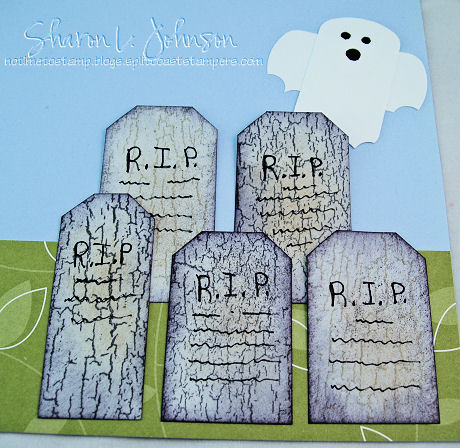
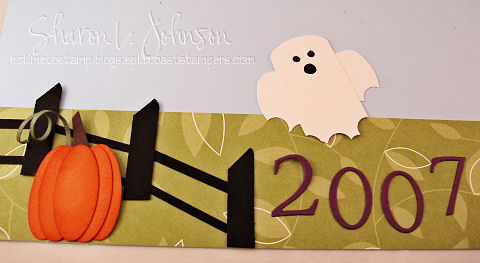
- Ghost: 2 punches with the Key Tag Punch. Clip bottoms to make jagged sleeves/hem with Word Window Punch. Form ghost by putting in + shape. Eyes/mouth done with Black Sharpie and Mat Pack.
- Pumpkins: Each pumpkin is 5 punches with the oval punch. Sponge edges and with sticky tape assemble into pumpkin shape. Cut stem from brown scrap. Cut just a sliver of green for vine, twirling it around knitting needle to get curls.
- Fence: Posts are Word Window Punch, cut straight on bottom with scissors and on the diagonal on top to form pointed post shape. Fence rail is 1/8″ strips of paper. Fence has more interest if it has some to movement to it, as opposed to a straight fence. Also, the fence runs into the second page. When doing 2 page spreads, I think it always looks a bit more interesting if some element from the first page runs into the second page, tying them together.
- Cat: First stamped directly onto the DP – he was not dark enough, in comparison to the fence. So I then stamped him on white and cut out. Although I love the look of this little cat — he probably wasn’t the best choice for this page. Those white artsy lines in him don’t really go with the style of this page — but he was my only cat — and I do love him — so he made the page!!!
- Spider:Legs are 4 punches from the side of the Round Tab Punch — can you see them — topped off with a 1 1/4″ circle punch for the body and a 1/2″ punch for the head. Eyes done with white gel pen.
- Tombstones: Office Max gray was stamped with Weathered in Sahara Sand and Going Gray (one or the other to get different colored stones). Cut into strips (about 1 1/2″ wide x 2+ long), tops clipped with Tag Corner Punch. Sponge edges fairly heavily with black and sponge centers with Creamy Caramel. Write with marker. The tops of the two tombstones that extend above the green grass are not taped down above the grass — by leaving them loose it leaves a bit more room if someone wants to put the corner of a photo behind the tombstones.
- Moon: Eggplant Envy 2.5″ circle sponged in same ink. Bats are the same as the spiders legs above.
I’m still learning this program — I wanted text by each photo, and couldn’t get it to work — be patient with me, I’m still learning!!! Hope these photos help to see the pages posted yesterday. Thanks for looking.
15 responses so far


Thats really cool. Love the ghost and the cat:) Oh and spider too (creepy!)
Fantastic work!!! I would have never, ever thought of using the punches the way you did, WOW, I love learning new things. TFS.
Fabulous pages….and I do so appreciate your attention to every little detail. You are so good at that! Cool application of the punches. TFS!
What neat ideas for some truly unique Halloween pages! Love ’em!
Sharon, thanks so much for sharing the directions to these pages. Those little ghosts are to die for cute and in these newest photos I can see all the detail. You’re so amazing! This looks like a project I’d love to do for my boys Halloween pics. Can you believe I haven’t scrapbooked any of their photos. I’ve got 17 years to catch up on. I keep telling myself when they’re gone, I’ll do it (and probably cry through each and every project).
Sharon, you are a GENIOUS! These are absolutely adorable! They would also make great card candy!!
Hey.. and your ghost, with a couple tweaks might make a GREAT OWL!!
Thank you so much for sharing you artwork with the punches. What a creative, fun project. Love them.
This is AWESOME! Thank you so much for sharing your great ideas!
I would love for you to come share this on http://www.theshakerbox.com in an online class.. would you be interested??? come to the site and look me up
AnneMarieZ
I am on the DT there 🙂
I hope you come and share your talents with us!!
THis is awesome. Thank you for the detailed explanation and the pictures. I know how long it takes to do this and I really appreciate the time you put into it!
love, love, love these — will keep these ideas for my scrap pages for this year. thanks for all your talented stuff!@!! have seen you of course on SCS and now will check out your blog frequently as well. thanks again!
WOW, Sharon this is an incredible creation!!! Awesome work!!!!
Your halloween scrapbook pages are awesome!!! And thanks for the directions.
Wonderful pages! I would love to see more of your layouts!
You can definitely see your expertise in the work you write. The arena hopes for more passionate writers like you who are not afraid to mention how they believe. All the time go after your heart.