Nov 02 2007
Stamp Simply Challenge #7 – Gift Card Holders
Challenge #7 – Keyword SSnotime07-There is no time limit. You can play this challenge and upload yourproject at Splitcoastand/or your Blog, anytime at all! You can play as many times as you like!!! The point is to keep it simple, quick and have fun!!! Please link back here.
Today’s Challenge is fun, useful, quick and easy!!! It is to make a Gift Card Holder. If you prefer, you can make something to hold a check or bills — as long as it can hold a gift of this type — gift card, cash or check. I made a ton of these gift card holders last Christmas, and it is amazing how quick and easy they can be — they don’t need a ton of embellishments to be attractive!!! Just thought I’d like to get a good head start for this year, and thought you might like to as well!!!
I have made 2 samples, one more fancy and one more fun. Both use the same measurements, but you don’t need to use this design — you can use whatever you like. But if you want to use this design, here it is:
- Use 1/2 sheet of paper – 8.5x 5.5.
- Score at 2″ and 6″ — fold as shown (Scor-Pal works great for this).
- Decorate with designer paper or stamps, apply ribbon or other embellishments, and you’re about done!!! More details will be included in my photo descriptions.
Thats it create away!!! No hard and fast rules, as long as it is a gift card holder. If you do use a different design, please share it with us, OK? My samples are shown below.
Remember when you upload to use the keyword above, followed by a comma.Please come back here to post (as a comment) that youve played, and provide a linkso I can check out your card right away. You can find all cards uploaded for this challenge by clicking Gallery Submissions Here.
Some wanting to play said they have never uploaded before. If thats you and you need help uploading, just go to my Challenge No. 1 and instructions are there.
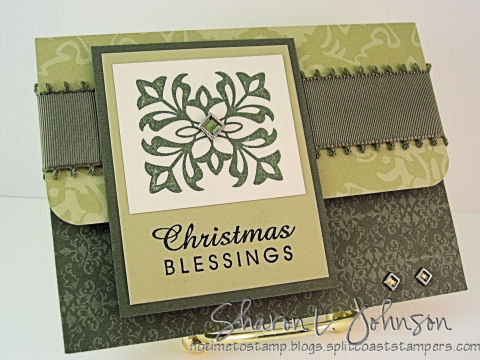
OK, this Gift Card Holder is a bit fancier than the next. I love the Holiday Harmony DP, so that’s what I used. When you score as above directed, you end up with 2 flaps — one is 2″ and one is 2 1/2″. For this holderI used the 2″ flap as the bottom, or the part that holds the gift card. Once I covered both portions with DP, I added my pretty rhinestone brads on the bottom right before sealing the edges with red sticky tape to create the pocket. Then I wrapped and secured my wide ribbon (Theater Ribbon Originals) on top and adhered my stamped image over it,usingDimensionals to give it a bit of elevation. My stamped image also has a rhinestone brad a bit larger than the 2 on the bottom. I love how the color in these rhinestones kind of takes on the color you are using — makes them very versatile! When completed, I added a sticky back Velcro closure under the stamped panel — photo will follow.
Hint: When inserting the rhinestone brads, the prongs are really large and sometimes the brads don’t want to lay quite right on your project. To remedy this problem, I punch a hole for them, larger than I normally would. I normally poke a hole with the piercing tool and then insert my brad, but for these I make a hole with the Crop-a-dile or the eyelet setting tool and hammer. Even the smallest brads in the lower right are large enough to completely cover up that hole, and everything just sits so nicely — I am a stickler that things sit and rest how I want them too — not only my ribbon tails, but everything — LOL!!! This surely works well for me!!!
- Stamps: Sweet Sampler, Star Studded Season
- Paper: River Rock, Always Artichoke, Very Vanilla, Holiday Harmony Designer Paper
- Ink: Black Stazon, Always Artichoke
- Accessories: Rhinestone Brads, Theater Ribbon Originals, Corner Rounder, Scor-Pal, Crafter’s Tool Kit, Red Sticky Strip, Dimensionals, Velcro
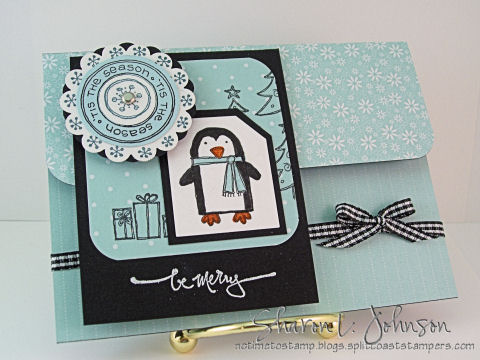
OK, this Gift Card Holder is a little more fun loving, and it actually coordinates with a 3-piece Hostess Gift I uploaded last week, seen here. I LOVE coordinated projects!!! This is made just like the one above, EXCEPT on this one, the flap that is 2 1/2″ was used as the bottom flap to form the pocket — can you see the difference? It makes no difference — you can use it either way — your preference! This was made pretty much just like the one above, only I ran the ribbon around the bottom portion of the holder rather than around the top flap.
Rather than using red sticky tape to hold your pocket closed on the sides, you could use either brads or eyelets. That would serve the purpose and also work as a design element.
Also, this Gift Card holder was made using scraps (we did that a few challenges back), and it was also made with left over component partsso that goes along withlast weeks Tag/Bag challenge, so this really went together quickly!!! It was practically done before I started!!!
- Stamps: Punch Pals, Warm Words
- Paper: Basic Black, Whisper White, Soft Sky Prints Designer Paper
- Ink: Black Stazon, Classic Black, Blue Bayou, Soft Sky. Marker in Only Orange.
- Accessories: Aquapainter, White Embossing Powder, Gingham Ribbon, Silver Brad, Scor-Pal, Punches in 3/4″, 1 3/8″ Circle, Scalloped Circle, Large Tag, Corner Rounder, Red Sticky Strip, Dimensionals, Mini Glue Dots, Velcro
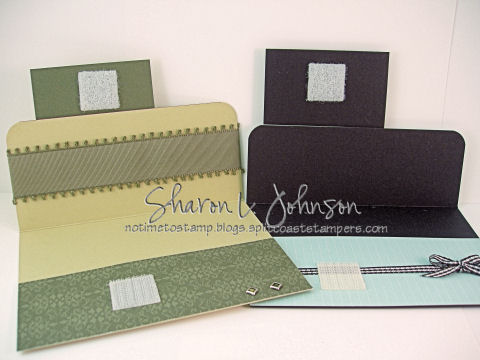
And this is the picture of the inside of both holders. There is nothing in either pocket, but I think you can see them. You can also see how I use the Velcro for a closure — it is fabulous — works so well and so easy when you buy the sticky back Velcro.
Now, if you’d like to see 2 more ultra simple Gift Card Holders using this same design, I’ll link these in my SCS gallery from last December. They use the Cuttlebug and non-SU papers. This one is Very Girlyand this one is Boyish. They have hardly no decoration, very simple, very quick, but I think they’re still cute!
Thanks for looking!!! Hope you can find time to play if you need some Gift Card Holders!!! I’ll have more SU! projects over the next couple of days, preparing for workshops featuring all the DP’s that will be on special — what a great deal that is!!! Have a great weekend everyone!!!
45 responses so far


Love your Blog…..Will be back.
Hugs,
Lisa B
Love these; thank you for the tips!
Sharon-These are so pretty! What a great idea…thanks!!
ooooooooooooo fun challenge again this week Sharon!! Can’t wait to make some of these. They look addictive!
Great gift holders. Your work is always so neat and tidy. tfs
Great challenge Sharon! I think we can all use a few of these laying around.
~Lynda
I’ve just discovered your blog and I love to do challenges. So I’m going to try some of yours this weekend. Thanks.
Those are both just adorable! I MUST find time to make one this weekend! Thanks for sharing your fabulous work with us!
Thanks for the challenge – I needed a holder for my step-daughter’s birthday this month. Here’s a link to mine:
http://berkerblog.blogspot.com/2007/11/question-for-you.html
Love your gift cards, BTW. Hope my “tails” are up to your expectations. :0)
LOVE these!! I just bought some velcro yesterday – ya know – just in case I might need it…. and now I do….YAY!
Just located your Penguin gift card holder on SCS and had to stop by your blog for a peek. These are so cute and such a great way to give gift cards to family and friends. I am defintely going to have to come back to see more!
I love these and I can’t wait to make some!
Very cute– can’t wait to make one!!!
I have 3 gift holders to share, but do not get my new scanner until tuesday. Also have 2 note cards made with scraps to share 🙂 Just love your gift holders and plan on making this design for my next workshop. Now I have your cards to print for examples too. TFS
These are darling! Hopefully I’ll have some time to stamp once the packers are done today! And yes, of course I kept some stamps behind! hehe! I do have a good excuse though (a ws on Sunday). Have a great weekend!
What a fantastic, amazingly simple project! I am going to make tons of these for Christmas!! Thanks so much for sharing!
Awesome and darling gift card holders!! Perfect for me to get these done for the boys teachers. (I like to treat them a little something even at Thanksgiving) The best part is that I get to play!! Thanks Sharon for all your inspiration!
Oh, these are both so wonderful Sharon!!! I have never made a gift card holder before, but I sure hope that I get some time to play this weekend. Thanks for always being so inspirational and for your wonderful instructions! Have a wonderful weekend:)
Hi there, Sharon! I just discovered your blog and I wanted to let you know how much I like it! So glad to have found you 🙂
Thanks for another great challenge, Sharon. Your samples are both gorgeous. Mine is much simpler. Here it is: http://www.splitcoaststampers.com/gallery/photo/711880?cat=10727
Here is mine….awesome holder Sharon! your samples are gorgeous and wished now that I did a more mellow one! Get your glasses on!!
http://www.splitcoaststampers.com/gallery/photo/712127?cat=3260
I am so happy that I found some time to play! Thanks for another fun challenge Sharon, I will definetely be making more of these fun gift card holders!!! Here is my wedding gift card holder:
http://www.splitcoaststampers.com/gallery/photo/712298?cat=500
Great challenge! You can find my gift card holder here:
http://blushblossoms.blogspot.com/
Oh! These are AWESOME, Sharon! Definitely going to try one of these later today!! Thanks for the inspiration (may just have to do a two-fer and use it for today’s IC! : ) )
I made a couple of these recently along with a tutorial. These booklets can hold anywhere from 1 to 5 gift cards. Here’s my first one that holds 5 gift cards
http://danniesdesigns.typepad.com/my_weblog/2007/10/teacher-gift.html
And here’s my second one along with a tutorial.
http://danniesdesigns.typepad.com/my_weblog/2007/10/gift-card-tutor.html
They were so much fun to make.
I just had to do another!! TFL!
http://www.splitcoaststampers.com/gallery/photo/712672?cat=500&ppuser=114666
Here is my 1st gift card holder, which is a horizontal pocket card design. This design was SC45 from July 04 and is still one of my favorites. Just perfect for designer papers 🙂 Thanks Sharon for the challenge.
My card: http://www.splitcoaststampers.com/gallery/photo/712651?nocache=1
Thanks for another great challenge. I feel like I have started my Christmas shopping. The holder was fun to make and I’m sure I will be making several more before the end of the year.
My card holder: http://www.splitcoaststampers.com/gallery/photo/712795?cat=500&ppuser=98803
Beautiful!! And how do you make those neat little bows!! I have a Scor-pal coming so will bookmark this page so I can try these little holders when it arrives!!. Thank you for the measurements and ideas.
I love both of your gift card holders, Sharon! The first is so beautiful with the elegant papers, gorgeous ribbon, and bling! Your penguin holder is so cute, and I love the colors! Awesome projects!
Here’s another one from me, Sharon. These are great fun! TFL http://www.splitcoaststampers.com/gallery/photo/713046?limit=last1
Here’s mine … thanks for a challenge that helps me get one more holiday card finished.
http://ingeniousinkling.typepad.com/ingenious_inkling/2007/11/simple-gift-car.html
Hey, Sharon –
Your gift card holders are AWESOME!! We are finishing up the last of the science projects this afternoon – after that I STAMP!! (hopefully.)
Thanks for the challenge – I’ll have to try to work this one in as it is that time of year.
Kay
Your blog is great! Just found it from browsing at SCS. Love your banner picture at the top, it’s amazing!
Here’s a gift card holder. I’m very happy with the design. Thanks for the challenge, Sharon!
http://www.splitcoaststampers.com/gallery/photo/713390?cat=500&ppuser=37504
Sharon, love both your cards! A late start again, thanks for the challenge, I needed a gift card for a shower coming up for couple at church. Here’s mine: http://www.splitcoaststampers.com/gallery/photo/713584?si=SSnotime07&perpage=48
These are great! You think of the best challenges. Here’s a link to my gift card holder … it’s really just a little card with a spot for a gift card, but it is quick and easy = ) !!
nancy
http://papersmiles.blogspot.com/
Hi Sharon!
Here’s mine! BTW, GREAT challenge!
http://stampact.typepad.com/my_weblog/2007/11/sharons-stamp-s.html
~Lynda
Here are 2 new Xmas motif horizontal gift card holders. Enjoy, Nancy
http://www.splitcoaststampers.com/gallery/photo/714274?cat=500&ppuser=18672
http://www.splitcoaststampers.com/gallery/photo/714665?cat=500&ppuser=18672
Finally! I had these done and ready to go but then started my paint and fix -up of the spare/craft room. I figured late is better than not at all. I will be posted a second set in another message. This was a great way to get started on holiday holders!
http://www.splitcoaststampers.com/gallery/photo/715319?cat=5645
Here is my second download:
http://www.splitcoaststampers.com/gallery/photo/715324?cat=500&ppuser=133151
I love your gift card holders, Sharon! The directions are fabulous and your creativity is inspiring! Here’s mine: http://www.splitcoaststampers.com/gallery/photo/716593?cat=5645 Thanks for all you do!
Hey Sharon! If you get this comment, are you able to tell me where you found that Christmas Blessings stamp on the green card?? I love it and would love to know who makes it and where I can find one!!
Thanks so much!
Rhonda 😀
[email protected]
Just got one up on my blog
http://jami.blogs.splitcoaststampers.com/2007/11/28/wintergreen-wednesday/
and will upload to SCS soon too. Your instructions were a lifesaver when I needed 9 of these quickly. Love them – so easy – so cute!
Your gift card holders are awesome! I’m a little late but thought I’d post my link http://jans-gonestampin.blogspot.com/ Thanks for sharing your creativity and awesome artwork!
WOW! These are great Sharon. thank you for posting the challenge. Sorry this has taken me such a long time to post but I followed your great instructions and they came out really well. Thanks for your lovely comment … means a lot :0)