Feb 14 2008
Index Card Box
Finally!!! I got my box made to hold the index cards I am doing for the Divine Design Bible Verse Challenge. Now, I’m all caught up and can just post with the rest of them on the 8th of each month!!! Here’s a photo of my index box with the 2 index cards in it that I’ve done already.
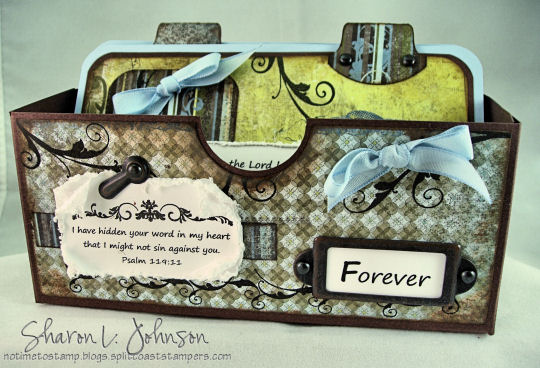
This is an open box, no cover — works perfectly to store my Bible Verses, plus it shows them off as well!!! Wouldn’t this be just adorable done in a kitchen theme and with recipes — hhhmmm, I do have some nice kitchen stamps!!!! Just maybe —
These index cards are 4 x 6, so my box is 6 1/4″ wide, 2 3/4″ high, and 2″ deep. You can make it with 1 sheetof cardstock, cut to 10 1/4″ x 7 1/2″. It is scored on the Scor-it. Here’s a picture of my template with the score marks and measurements on it:
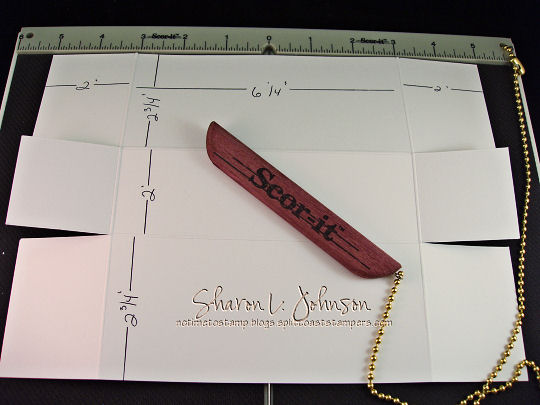
Lay your paper up against the ruler so the longest end of the paperis along the ruler markings. Score 2″ in from each end — very easy as you have a ruler on each side of center.You will be left with a 6 1/4″ strip in the middle. OK, now turn your paper so the shortest end is up against the ruler markings, and score 2 3/4″ in from each end. You will be left with a 2″ strip in the middle. That’s it for scoring — how simple!!! At this point I just like to fold it on all the score lines so everything is easily defined. Now cut on the two lines as shown in the photo, allowing your box to fold.
I used paper from a 6 x 6 pad of Periphery by Basic Grey, and being 6″ it works perfectly for this size box. To cover the exposed sides of the box, cut 2 pieces of DP 6 x 2 1/2. Cut 2 more pieces 2 1/2 x 1 3/4. These are for the 2 ends. I thenDTP’d (direct to paper – apply ink to paper directly from the pad) the edges of all 4 of those DP pieces first with ColorBox Chalk Ink in Ice Blue and then with Tim Holtz Distress Ink in Vintage Photo. Here’s a picture of the actual box as I am decorating it:
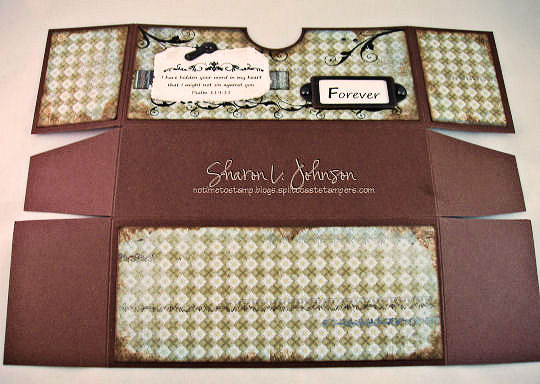
Before I go any further — do you see how I’ve cut those center pieces at slight angles on the sides? I like to do that just because it makes the box work better. There are no edges that might bind or no edges that might stick out a tad when you go to fold and adhere it together — it will fold perfectly, no binding, nothing sticking out — guaranteed!!!
OK, the 2 sides and back are ready to be adhered to the box, but the front first needs to be punched out. Punch the box itself, center front, with the 1 1/4″ SU punch, centered. Then punch the DP in the same position, but with the 1 3/8″ punch — you’ll now need to DTP the edges of the DP you just punched out. Now do any stamping you like on this DP piece. My Bible Verse is computer generated: I have hidden your word in my heart that I might not sin against you. Psalm 119:11 I thought this verse was very appropriate for a box containing verses for memory. The *Forever* in the copper label holder is also computer generated, and I thought the word *Forever* was appropriate as God’s Word is the same yesterday, today, tomorrow and Forever! I punched two holes with the Cropadile that I ran the ribbon through. Oh, the verse is on Paper Trey white, which I love because it *rags out* (LOL!! my own word) so easily and nicely when I want to distress and curl my edges. There is a strip of coordinating striped paper behind it, just because it needed *something* — LOL!!! It is also adorned with a photo turn on top. I guess that about does it!!!
- Stamps: Flourished Elements and Many Sentiments, both by Flourishes
- Paper: SU Chocolate Chip. Periphery 6 x 6 pad by Basic Grey
- Ink: Versa Fine Onyx Black, ColorBox Chalk Ink in Ice Blue, Tim Holtz Distress Inks in Vintage Photo.
- Accessories: Computer, Aged Copper Hodgepodge Hardware by SU, Cropadile for holes, Distressing Tool on Cutter Kit by SU, 1 1/4″ and 1 3/8″ round punches by SU.
These little boxes really are very easy, and FUN, to make!!! Try one out, whether it be for Bible Verse cards, recipes, names and addresses, oh!, a listing ofbirthdays by month, wouldn’t that be fun — whatever — they just look so pretty out on display!!! If you decide to try one, please link back here so I can see it — I’d just love to see what anyone else would come up with.
Again, thanks much for looking!!! I surely do appreciate it!!! Tomorrow I’ll have my Stamp Simply Challenge up — and it’s a little different than usual this time, but still super simple!!! And I’m using brand new uninked SU rubber to make my sample — can’t wait!!! See you then!!!
49 responses so far


Wonderful box! can’t wait to try one! thanks for the great tutorial Sharon!
This is just gorgeous, Sharon! I love the idea of the index cards. I’ve told my daughter about these and I think we will make them for the principal of the church pre-school at which she teaches. Thanks for the inspiration!!!
You are an inspiration…thanks for sharing this project! It is wonderful.
Sharon – this is wonderful!!! Thank you for the tutorial!!!
Hi Sharon,
I luv how you simplified this little box. I don’t own a Scor-It but I’m sure I can manage to make one with it. I love everything about this entire set and I’m planning one as a b/day gift for a dear friend. TFS!
Sheila
Gorgeous Sharon! I love this and such an elegant look! Thanks for all the measurments also!
Thanks so much Sharon for this great tutorial! Your box and Index cards are gorgeous!
Deena
I’m going to make this box RIGHT NOW! I love it and it looks so easy! Well, I’ll go apply for your blog candy first… :p
Thanks for the tutorial. Love this!
I am running down the stairs to make one of these as soon as possible. I love it. I love boxes… They are such a wonderful vehicle for so many things. Thanks Sharon and your challenge looks like fun too.
That box is so cute! Thanks for the easy directions! Love it!
This is such a beautiful box Sharon……..the papers are so gorgeous! Sure do appreciate your directions……..they are always well written and easy to follow!
Sharon this is stunning! Oh my gosh, you’re making me want to get one done immediately, this is just so beautiful. I love the idea of putting the verses on cards so that you can pull one up quickly when you’re in need of devine inspiration!
OMGosh! This is just gorgeous!!!!!! Thank you so much for addig a tutorial for it as well. You are one talented lady!!!!! TFS!!!!
What an awesome card box! I love how it turned out and I think i just might need one of these! I know a few friends that would love to have some too!!! Thanks for the awesome tutoria!
Sharon, what a wonderful idea and yes as you said, it could be adapted to anything you wish. Your box w/bible verses is awesome! You are so talented!
Pinky
You did a wonderful job!
It looks fantastic!!
Thanks for tutorial and measurements.
It’s beautiful..Thanks for sharing.
Oh my goodness, Sharon — this is just gorgeous!! Thanks so much for providing the pattern! I think I’ll make one for birthdays, and I’d very much like to start the Bible Verses as well!! Your inspiration is always amazing!! Have a fantastic day! 🙂
WOW, this is absolutely gorgeous. I am going to try this box out..Great job and tutorial….Thanks!!! Have a fantastic weekend. I always love your color combos.
Sharon your box is gorgeous! As I’ve been thinking of getting involved in the Divine Design Bible Verse Challenge, I really like your idea of doing the index cards and storing them in an easily accessible box like this. I hope you won’t mind if I case your idea when I get started. Thanks so much for sharing it and for your inspiration.
Thank you for the box tutorial and template. Now I have something else to add to my repertoire of gift ideas!
***THUD***
I just recently found your blog and I am so glad that I did! I just love this! I plan on making one for a very special friend who is turning 60 next week.
Thank you for sharing your talents!
Sharon, this is just gorgeous! What a great way to display and help you memorize more verses. Love it.
Thanks for sharing this project. I’m going to CASE this and put my cards in it for the Bible Verse Challenge!!!!
Oh my goodness…your box is fantastic!! I love it!!! Thank you for the tutorial as well!!
Sharon this is so beautiful! What a wonderful and inspiring idea.
Your box and cards are lovely, Sharon! This will be something to treasure!
What a wonderful box for your precious Bible verses!!! Love it!!!
Here’s my try at your box. Thanks for the awesome tutorial!!!
http://pforpink.blogspot.com/2008/02/bible-verse-challenge.html
Sharon –
I just found your blog this week and totally love the ideas!!! Could you please email me with some directions on how to “rag out” your cardstock. And do you only recommend the Paper Tray cardstock.
Thanks,
Amy
One other thing 😉 I plan on making one of these for myself as well as a couple of my friends. I really love the idea of a scriptrue box. Very beautiful.
this is gorgeous, Sharon!!
Sharon you are trully Blessed with Talent ~ & I am blessed to have you for inspiration. What a joy it is to be able to go to come to your website & get this kind of motivation & be inspired. Your work is awsome! I wasn’t going to do much with this Bible Verse challenge, even though I thought they were a beautiful idea. That is until I saw your box & my Scor-Pal arrived. Now I’m convinced I must do this as a year long class for others. And what wonderful verses you have chosen for your beginning months. My favorite of course- “What so ever state I am – There with to be content.”
God Bless you. Keep up the superb job you are doing on your blog. Bravo!!!!
~Sirstampsalot
Gorgeous!! 🙂 Thanks for participating in the challenge. Your box and cards are beautiful!
FUN!! Thanks for the tutorial. Can’t wait to try it!
How lovely is this! Thanks so much for sharing it.
I love that you’ve used it for bible verses too. I can only ever remember a few but this would help me remember a whole lot more and what a cool gift idea for a few of my christian friends too.
I will DEFINATELY be making myself one of these!
What a fabulous project! I can’t wait to make one of these for me…and one for a friend! I’d love to see your pages! Thanks for sharing such awesome instructions!!
Sharon, this box is fabulous — you are so creative! Thanks so much for sharing your tutorial and idea!
I finally got one done — I just love this idea!! Thanks, as always, for your inspiration! 🙂
http://flowersandink.blogspot.com/2008/03/box-and-blizzard.html
[…] http://notimetostamp.blogs.splitcoaststampers.com/2008/02/14/index-card-box/ […]
Oh my… what a great idea… and so easy to make… so beautiful! I have been looking for a project that blends in my bible study with my learning… thank you!
Love your box. Thank you so much for the tutorial!
This is very nice. I might have to come back and give this a try. TFS
A great idea!! My girlfriend enlarged the size and it made just the right size for storing larger cards as well. Thanks!
Love the box and great colors. thanks for sharing
Thanks for posting this! I made a box for my perpetual calender using your instructions. I just added 2 inches to the bottom of the box!
A happy family life is a wonderful asset for any one
This is just what I have been looking for – Your box design is beautiful. The tabs are a useful and a clever idea. I have 3 x 5 cards that I want to use and need directions for 3 x 5 box. I have look and can’t find directions for 3 x 5 size any where on the web. Can you help me out! I’m new to stampping and having so much fun using the computer for ideas and inspiration. So glad I found your site. Thanks for the tutorial