Mar 08 2008
MI SCS Demo
I was invited to attend the Michigan SCS gathering in Birch Run/Frankenmuth this weekend and to present *something* — LOL – so WHAT doI do!!! I decided to go with my most often asked question, which is how I tie my bows. OK, that’ll be simple enough! Standing in front of a large group and speaking is not really my thing, but I certainly CAN stand in front of a group and demo a card — so I prepped 60+ of this card, and this is what we all did:

I wanted to use the FlourishesLace Heart because it is so absolutely beautiful and easy to work with — that’s what I like, keeping it simple! And I needed to do something that went with the Chocolate Satin Ribbon from SU, because that’s what I had plenty of — remember their great sale a while ago — I stocked up — LOL!!! I guarantee you, I will NEVER run out of Chocolate Satin for as long as I live — LOL!!!
I also wanted to use designer paper on the card (I used mostly retired SU), to show how I start with a base layer that you don’t even see (cheap white paper) and adhere my DP to that base layer. The sole purpose of this base layer is to have something solid to work with as I wrap my ribbon around what appears to be the DP layer. I most often like to use two coordinating patterns of DP, and adhering them to the base layer gives me a nice solid sheet to wrap my ribbon around. Here’s a picture:
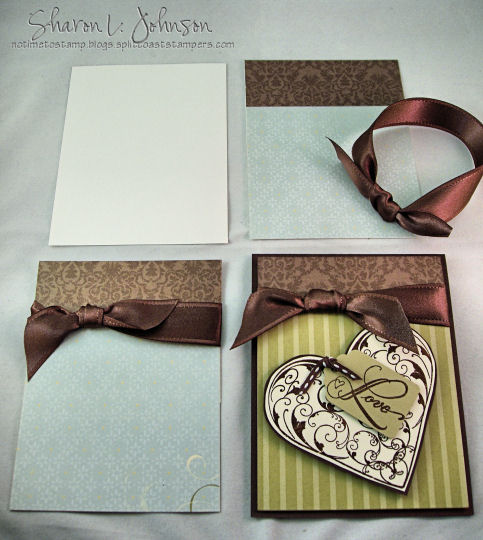
Here’s what I do. I start with the white sheet (cheaper paper), to it I adhere my DP. And see my ribbon — I tie my ribbon bow (knot actually) in my hands rather than wrapping it around the card to tie. I just find it easier. So now I have a loop — I just lay the knot on my card where I want it, and then cut the ribbon so I have ends long enough to wrap around the card and secure on the back side. The next photo shows it all attached. Then I adhere that panel to my card base, most often using mounting tape to give it a bit of elevation, then I added my heart.
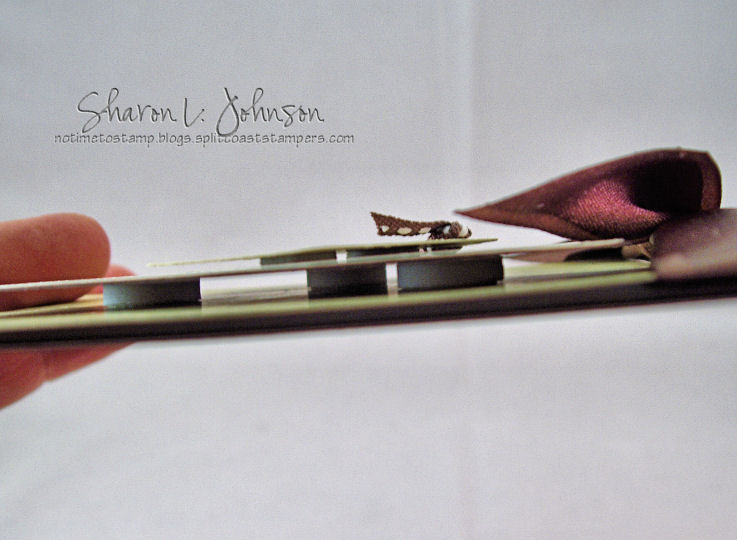
I had a hard time getting this photo, and it isn’t the clearest, but I wanted to show how I layer and add some dimension to my cards. It’s very hard to see, but that base layer I created to which we adhered the DP and tied the ribbon — that has strips of mounting tape attached to the back which adhere it to the card. I like to do this as it just adds a bit of elevation — sort of a *floaty* and rich feeling to the card. Then you can plainly see the big fat Pot Dots that adhere the heart to the card. I get these from Wal-Mart and they are called Pop Dots. Again it is harder to see, but I have the SU Dimensionals, which are much thinner than the Pop Dots, adhering the tag to the heart.
So when all is said and done, my cards do have a tendency to get a little *fat* at times, but that’s OK. I just pad my envelopes well and pay the extra postage!!!
OK, now I’ll tell you, I actually prepared this post while at home before leaving for the MI SCS event — so, here’s to hoping all went well!!! I’ll let you now tomorrow!!!
As always, thanks much for stopping in!!!
41 responses so far


This is just gorgeous! I love, love, love that heart! I have to get it out and play again!
Just BEAUTIFUL Sharon! This is such a classy card, I am sure they loved making this card, I know I would have! I have to admit, I never even thought of making the bow and then adhering…that is an AWESOME idea!
What a privileged group that will be to hear you present this beautiful card. I am sure they will all go home inspired. Sounds like alot of fun!! TFS
Fabulous project, Sharon, and obviously the participants were not disappointed! Now you’re making me regret not getting extra of that wide satin ribbon! Anyway, I must ask you, what do you use to adhere your designer paper to the cheaper white cardstock? I’ve thought about doing that many times, but have wondered how to keep all the edges nicely glued down. Linda
What a beautiful card……..and wonderful tutorial on how to tie your perfect knot and how you achieve the dimension on your cards. ALMOST as good as being there and seeing it in person. Lucky, lucky people at the Michigan SCS gathering!!!! Hope you are having a fun day.
I wish I had known! I love Frankenmuth and might have made the drive.
This is a great card, nice and classic. And I bet the in person demo was great also! Thanks for sharing with those of us who weren’t there too!
Gorgeous demo card! I love how classy you make everything!
Sharon this is gorgeous! That stamp is stunning! What fun going to a SCS event!
I would have loved to have been there! I was just a little too late in finding out about it and it was already booked. I went to last years in Okemos and thought they would probably do the same this year, but unfortunately found out it was much closer to me. Oh well…I hope everyone had a great time!
I read your blog on a regular basis but have never left a comment but after reading your bow tying technique I just had to respond!! Thank you, thank you for sharing. The only thing better would have been to be at the demonstration in person.
Beautiful as always! I’m ure it went very wel!!! TFS your little tricks as well.
Beautiful as always! I’m sure it went very wel!!! TFS your little tricks as well…veyr helpful.
Sharon, this is a wonderful tutorial! I love seeing how other stampers do things! The card is beautiful, of course! I do my ribbon sort of like you do, but I never thought to reinforce my DP-that’s very clever of you! I hope your presentation went well, but I know it did! I’m sure they were all hanging on your every word!
This is so beautiful.. That ribbon is sooooooooo rich !!!
Also, take a look at my creation for your fun flap challenge… Always a good time…
Have a great weekend.
Beautiful card! Thanks so much for sharing! Take care 🙂
Beautiful, beautiful card and fabulous tutorial! I hope you had had fun today, I can’t wait to hear the details. Did you meet anyone we might know??? TFS.
Lovely card!! Sure you did just wonderfully demonstrating your ribbon tieing — lucky they are to have you there! Had to laugh at your comment re: your supply of the choc. ribbon 🙂
Thank you for sharing this! I always have trouble working with ribbon an thin paper and now I know the trick…Thank you!
Gorgeous !!!
Sharon, this is just gorgeous. I’ll have to try to case this one ;-).
I do the same thing with cheap white cardstock and designer paper! 🙂 You gotta’ beef that paper up a little bit before you can really work with it! Beautiful card, Sharon! I’m sure you were a huge hit!
Sharon your card is beautiful and so elegant and rich looking! Thanks for the wonderful tip about making the dp easier to work with and tie bows to! I hope you had fun at the SCS gathering and I am sure that your presentation was a huge hit! Off to dig out my flourished heart and make a card:)
Great presentation and I think your group will adore you and your demo. Very pretty card
Beautiful!! Rich,and elegant,yet simple at the same time! How do you do it? Oh ya, you showed us that too! Thanks so much!
Wonderful Sharon…I am with you as I love this stamp and you would not believe how many cards I sold with this stamp. This card is just stunning 🙂
Your card is fantastic (as usual), but that last photo showing the dimensionals between the layers is EXCELLENT!!! It looks like you had a professional photographer take that!!! I’m so impressed!!!
Very Elegant Card!!
All elements to this card..so pretty!
Nice work…Thanks for sharing!
I was at that event and YES, it went as smoothly as you could ask for…. You were AWESOME, and it was such a PLEASURE meeting you. In fact I have put that card in a special little place where my little girls fingers can’t touch it. You are such a nice woman, and it makes reading your blog that much more enjoyable because having met you, I now have a personal connection to it. Thank you for your demonstration at the Michigan gathering. I for one truly appreciated you taking the time to do it. Have a wonderful Sunday…
Sincerely,
Amy B.
Great tutorial! I never thought to pop up the DP panel from the card base. And the ribbon, never thought to tie it first then cut it and adhere to card. Very clever! The card is lovely, of course, and I can’t believe you prepped 60 cards! That must have taken forever. Man, I wish I was there. I would love to meet you!! Hugs, michelle
What a beautiful card!! And thanks for the detailed directions :). I can see why you were chosen to demo the card.
SHARON! It was such a joy to meet you and spend some time chatting with you over dinner. You have been such an inspiration to me since I joined SCS last summer and I shall continue to follow your work closely. I really appreicated the time you took to spend some stamping time with us in Birch Run … what fun we had! Your tutorial was wonderful … yes, that chocolate ribbon is sumptuous! Hope you had a safe drive home and that I am able to spend some time with you again. Say hi to Deb and watch out for all of my cards with the special ‘Sharon bow’ attached! Hugs, Emma x
That card is gorgeous! How elegant! Thanks for sharing your talents with us!
I hope you had a great time at the get together! Did you use this ribbon for all 60 cards? I have the choc chip and purely pomegranite satin ribbon but I am very selective on when I use them. I hope SU comes out with another satin ribbon soon. I hope you had a safe drive home. Thanks for sharing the way to tie your ribbon.
Sharon it was an immense pleasure to meet you and to learn a simple, yet much needed ribbon/knot tying lesson from you!!!! We had so much fun this weekend and I am so grateful you able to attend! And if you’re not sure who I am, I’m the one who made all the nametags!!!! I hope to meet you again in the future!!!
{{{{HUGS}}}}
Ann
Fabulous! You did a fabulous job!!! It was an honor to meet you. You are such a gracious person. It was so nice meeting you and sitting near you and Deb at the event.
You did a fabulous job demoing this, and chose such a pretty set and papers for everyone! I can’t believe you stamped them all!! I didn’t take a packet because I didn’t bring anything along except my Copic markers. Of course now I wish I would have. 😉 It’s gorgeous!! It was so much fun meeting you, Sharon!!
I also pop my main card front up on dimensional foam tape. I have not tried your way of tying a ribbon, but will. TFS your fun and helpful tutorial! Sounds like you had such an awesome stamping trip.
Here is my ribbon card using your technique Sharon……worked great!
http://www.splitcoaststampers.com/gallery/photo/848348?cat=12789
Great card! And the instructions are very helpful! I think this wide satin ribbon is my favorite!
beautiful card!