Apr 21 2008
Display Board for Cards
I didn’t have time to make a card today, so I thought I would show you what I did spend my time on. I am making 2 matching display boards for cards — I know you’ve seen similar boards both in stores and in crafting magazines. Maybe you’ve even made one yourself. Well, once I was doing it, I took a few pics along the way, so if anyone would like to know how to do one, just follow along. It’s really very simple.Here’s the end product:
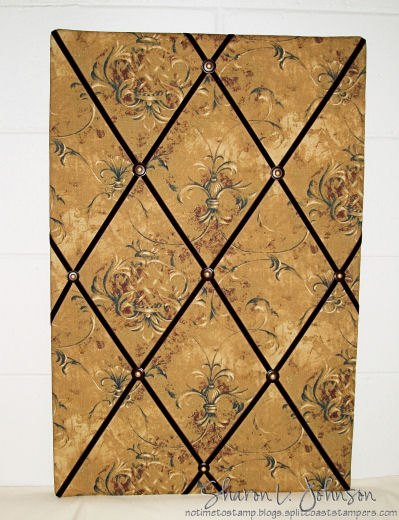
I made 2 exactly the same. I have visions of these being framed in a thick, white semi-ornate wooden frame; however, that part of my project involves my DH or DS so, for now, these will have to do as is. Here’s the supply list (for 1 board):
- 1 – Foam Board, 20 x 30 x 3/16
- Polyester Batting, 23 x 33
- Fabric, 26 x 36
- 7 yards of Velvet Ribbon (got my Chocolate Velvet from Flourishes)
- 9 Buttons
- Double Sided Carpet Tape
- Red Sticky Tape
- Large-eyed Darning Needle
- Piercing Tool, Mat Pack or Self-healing Cutting Board
- Heavy Hemp
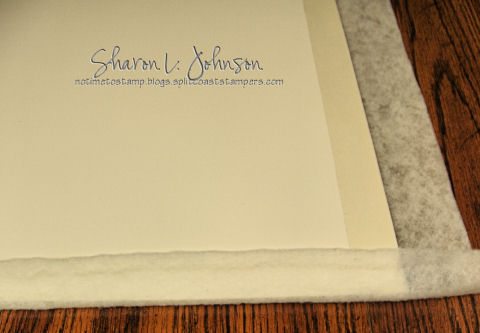
To start, lay your board on top of your batting. Completely cover the perimeter of the Board with Double Sided Carpet Tape. Then first pull up one side and adhere to carpet tape, then do the opposite side, then do the other 2 sides, clipping and folding in your corners neatly to avoid bulk as you go.
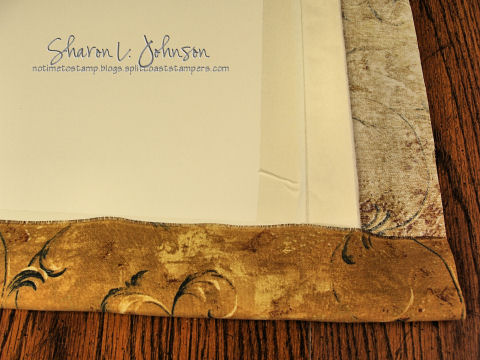
Next, cover the perimeter of the board with 2 rows of the same carpet tape. The first row will be going right over your batting, and the 2nd row will be going just inside from the first. Now, just as above, very neatly pull up one long side and then do the opposite side, pulling tightly as you go. Thento do the next 2 sides, view the photo below —
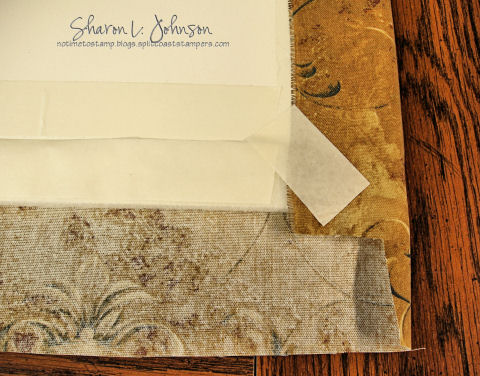
Before folding up the 2 shorter sides, cut out the corners as shown above to reduce the bulk, and then apply a piece of the same carpet tape on the diagonal in the corner to hold the corner down as it is folded. See below —
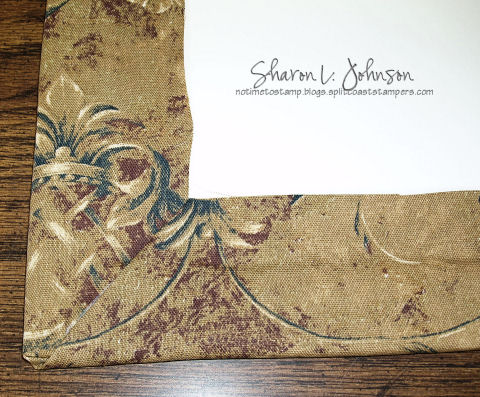
By cutting out the corner as shown above, you will be able to neatly get a corner, similar to this. Now, flip your board over and continue as below —
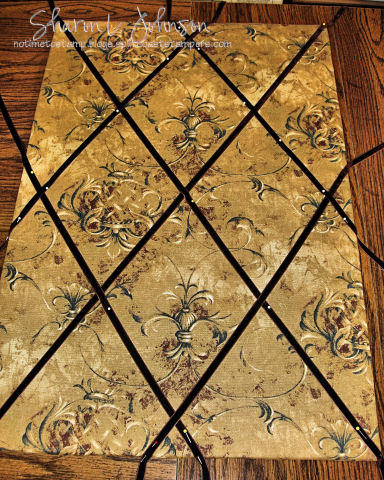
Take your ribbon and lay it out as you feel it looks best, or suits your needs best, and secure with common pins. Once all ribbons are secured, flip it over, apply Red Sticky Tape to all the ribbon tails (I left 6″ tails everywhere) and secure them tightly on the back. Everything on this is held very firmly with the tapes I have mentioned. Next, you’ll need to sew on the buttons —

This was really very easy to do, using the right supplies. You’ll need a large-eyed darning needle and sturdy hemp string. I started by taking my piercing tool, with the mat pack underneath, and poking a hole right where I wanted my string to come up from the bottom. By poking a hole all the way through, you can now look at the bottom, see your hole and insert your needle with hemp and it’ll come up exactly where you want it. Once it is up, string the button on (these buttons have a shank), and then take your needle and go back down through the layers. Once all strings are on the back, securely tie them off. This is what the back looks like when done:

I’d like to cover it neatly with fabric just to clean it up, but I first have to wait to see if I have any fabric left over once completing my other projects. If I don’t have any of this fabric left over, I can use another, since it is just the back!!! But I would just like to clean it up a bit!!!
That’s it — a relatively simple project and a fun and attractive way to display cards, and also very easy to change them out when needed. If anyone should try making one of these, I’d love to see it — please come back here to link so that I can see it!!!
Hope you all had a great weekend and are looking forward to a good week ahead!!! Thanks so much for stopping in!!!
34 responses so far


What a beautiful display board, Sharon. The fabric is just gorgeous. You are so creative. The frame that you would like to have in the future sounds really good too.
How cool is this….great way to put your cards up without marks of any kind. Love your fabric.
Love it!! I have lots of fabric and quilt batting…just need to get the foam board! Your fabric is beautiful!
Neat idea and thanks also for all the instructions!! You are always so good to take us along with you as you make something. Are you using this at your upcoming show? Another showstopper especially if you display some of your cards!!!
It’s beautiful! I made one of these several weeks ago. I used a ready made frame (28×30) and an artists canvas as the base. I love it and use mine exactly as you plan to do……to display cards in my studio.
Oh wow…great look and thanks for showing us the steps, someday when I get my new little studio, I would love to make some of these! This is just beautiful!
Fantastic Sharon! I have seen these in stores and thought about buying one, but now after your tutorial, I’ll try and make my own someday soon! What a fabulous idea! Thanks for sharing it with all of us!
I have never thought about making one of these, until I have seen your beautiful board. Thanks for sharing the “how to’s”.
this is beautiful, thanks for sharing the details.
Beautiful! and thanks for the photo tutorial. I’m sure I will do this after I move this summer.
Sharon:
This is so great! Thanks for providing the how-to details, too. I’ve always wanted to make one and now I can do so with confidence.
Take care – Regina
SO lovely Sharon! I’ve been wanting to do one of these myself for a while now. I just can’t seem to decide on a fabric that I love!
Thanks for the constant inspiration….
Many Blessings,
M.
I bought one of these boards to exactly what you have done, only mine is sitting undone behind my office door! I have to get moving on it now!
Beautiful Sharon! What a wonderful tutorial!
~Lynda
This is gorgeous, Sharon, and a perfect display for Flourishes! We’re so lucky to have someone of your many talents doing this show. What a lot of work, but you should be so proud of all you’re accomplishing. Good luck!
This turned out fantastic, Sharon!! I love the fabric you used, and thank you for all of the details!!
Thanks for the great step by step!! I love this idea!
How simple………I can do that!! Especially since you gave such a great tutorial on it. This is a lot better than those “science project” boards and using that tacky gunk that never holds the cards!! lol!! Now off to buy the supplies. Thanks for showing such a great idea! Barb S.
Very cool! I have some old canvasses that I haven’t used yet. I am tempted to see if it would work for this! LOVE what you did. It’s so ‘YOU!’
Hope all is well!
Wow, Sharon — gorgeous! You’ve jogged my memory. One of my dearest friends is becoming a grandmother for the first time. I think this, covered with a beautiful boy-type fabric would be a great gift for her to have to change out all the pictures of the baby! Thanks for the inspiration!
This is FABULOUS!!! Thanks for including all the pics and instructions!!! I’m going to make one of these in the near future!!! You are soooo clever!
I have been wanting one of these but wasn’t sure how to do it. I’m so glad you did one and shared! Yea you!!
Oh Sharon, this is absolutely gorgeous! Love your fabric choice, and those buttons are perfect!…Is this the next blog candy you’ll be offering, ‘cus I’m in! Just kidding, although I’m still pouting that I didnt win your boxes.
Beautiful!
Sharon,
This is totally gorgeous, beautiful and perfectly finished! It looks very professional and doesn’t even need a frame! I love everything about it!
Stunning!!
Virginia
These display boards are gorgeous! Love that fabric, so perfect for Flourishes! You’ve done an outstanding job Sharon and I know Jan Marie must be tickled pink!
Wow! I am psyched to have this tutorial! This is the most beautiful display board ever! I so want to make one! TFS! 🙂
This is so beautiful! What a wonderful gift idea for my Mom at the nursing home!
I love your fabric choice, I have made alot of these for presents. As I use MDF wood I use a staple gun to attach my fabric and ribbons. It is great fun to match up the fabrics to the person recieving the gift.
Just love everything you do !
Thank you for sharing, I did make one, and it came out good!! as soon as I can get a pic will send you one! if you would like one!
Love and hugs always!
Germana
[…] No Time To Stamp? ” Display Board for Cards […]
Thank You so Much for the Tutorial! This Looks a Fun Project to Try.
Thank You again for Sharing!
Jill
A setback or disadvantage of each mutation is favorable with the same or larger seeds.
I dont get it, why do people do not get rid of their timeshare fast?