Jun 11 2008
May I Suggest…
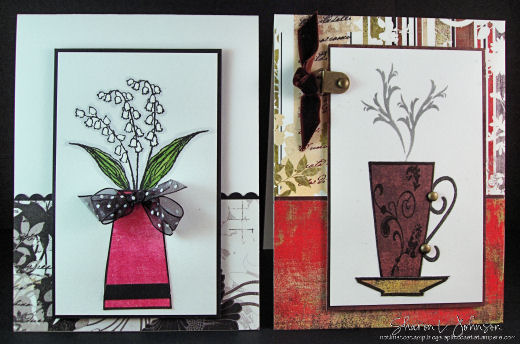
Since today’s May I Suggest… is being combined with yesterday’s 10 Minute Tuesday, what I would like to suggest is that you… Stamp Simply. Yes, of course!!!And I’d like to suggest paper piecing as well. It gives your card a lot of punch for very little effort. And here are two simple cards that fit this Stamp Simplyconcept well:
These two cards are made pretty much the same, using Coffee with Friends,and a very simple plan of attack! We start with
- A simple design.
- Use of designer paper for interest.
- A large main image panelwith a simple image, paper pieced, and elevated for dimension.
- The addition of ribbon or an embellishment.
- In this case, the omission of a sentiment, though we would often add one.
I rely on this simple layout a lot. I love playing with designer papers, putting them together in coordinated pairs. And sometimes it’s just fun to make your card base, even if you don’t have time to stamp. To make these card bases, in line with the Stamp Simply concept, I adhere the designer paper right to the card base to avoid any extra layers. And I really like the look of minimal layers at times.These are the card bases with only the designer paper adhered.
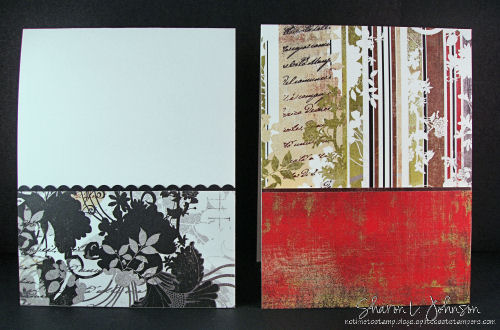
If you have time to make bases like this and just keep them on hand, it’s a real time saver when you’re in a rush. To make these I cut my bottom strip 2.25″ inches high. I just like that measurement — it works for me!!!The card on the left only has a bottom piece, topped with a scallop made with the Long Rectangle Nestabilities, as shown on this post. The card on the right has the bottom piece topped with a strip of solid paper. On this card, I cut the top piece 3.5 inches high and I adhered it to the card first. Then I overlap the bottom piece when I adhere it. All the designer paper above is from Scarlet’s Letter by Basic Grey.
OK, with your bases made, now you need your focal image, and for both of these cards the white panel was cut 2.75″ x 4.5″ and the framing was cut 1/8″ larger, giving you a very narrow frame. I used the simple tall coffee mug image from Coffee with Friends to paper piece both of these images.I love the look of paper piecing. For very little effort it adds a whole lot of punch to your card! Let’s take the card on the left first.
The Lily ofthe Valley from Peony were first stamped ontothe panel, making sure you stamp high enough to allow room for the vase. I colored the flowers with the Inkksentials Opaque White Pen and it sure does a wonderful job on these — the white just pops, even off of this white base. The leaves were colored with 2 green Copics and then I outlined the entireimage with the Cool Gray Copic.
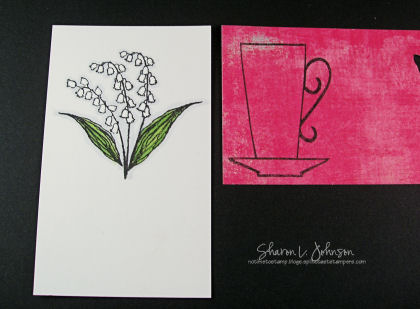
Next you have to make your vase. Stamp the tall coffee mug from Coffee with Friends onto your designer paper, then cut out ONLY the portion that would be the vase — not the handle or the saucer. Then, as you can see, I turned it upside down for this vase — the narrow part is on top. I did a card yesterday making a vase with the narrow part on the bottom — it is versatile. Then for the stripe on the vase — I just picked up a scrap strip of paper from by my paper cutter, cut it to width, and adhered it. I run all these small pieces through my Xyron X — really handy! Attach your vase to the panel, frame the panel with black, tie a little bow with the Black Dotted Sheer Ribbon and attach it witha little glue dot.
All that’s left is to attach your newly created main image panel to the card. I do this with either mounting tape on a roll or mounting squares. It adds just a bit of elevation to the card and it just gives an air of elegance, I think, when that main image just kind of floats above the card — love that look. (I get these products at Wal-mart, it’s my only shopping source here.) But it may be enough to pop you up into the extra postage category, so that is a consideration! Here’s another view of the same picture from above, just so you don’t have to scroll:
Now for the card on the right with the coffee mug fromCoffee with Friends— this, too, is paper pieced, using 2 colors. You’ll have to stamp it twice on designer paper, stamping the mug on brown andstamping the saucer on the greenish/goldish color. Then you can stamp a flourish from Coffee with Friends onto your mug. In this instance, you have to stamp the coffee mug onto the main image panel, and you can also stamp on some steam. Now, take your mug and saucer pieces cut from the designer paper and adhere them over your image stamped on the white panel. Instant appeal — isn’t it great? I added brads on the handle and a photo hanger to tie on a piece of Chocolate Velvet Ribbon. These colors and the visual weight of the mug just demanded a heavier weight ribbon up there. Ok, attach this main image panel onto the card basewith mounting tape, as above, and you are done!!!
And you’ll notice there are NO sentiments on these cards. I like to have cards made up ahead that I can grab when needed, no matter what the occasion, so I often make my cards in this generic fashion. When you decide you need to use one of these cards, you will have room to add on a small circle or oval die cut sentiment, or you can just use the inside for your message/sentiment.
About the Basic Grey 6 x 6 pads — they often work together very well for mixing and matching — though each pad has it’s own design line, the sheets of solidcolor often transfer wellto another pad. My pink vase is from Sultry, while the black/white bottom is from Scarlet’s Letter.
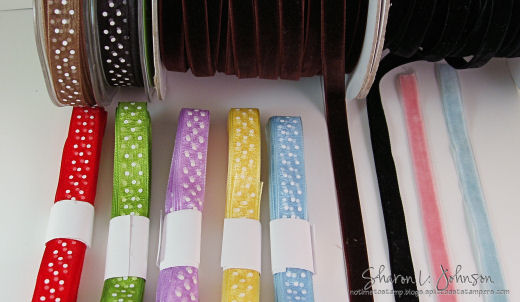
About ribbons — two of my stand-by must have ribbons that I’d like to suggest to you today are the Dotted Sheers and the Velvet Ribbons. They both come in a wide range of colors and are so easy to work into your projects. I LOVE the bit of fun and whimsy that the Dotted Sheers add, and nothing can beat the elegance of velvet. And even on the coffee card above, I used the velvet not because I necessarily needed elegance, but because it was the weight I was after — and I needed such a little piece, but it was perfect!!!
About Coffee with Friends — I’ve had so much fun working with this set this week. It is a paper piecers dream!!! Perfect for piecing — fun and easy!!! These images also can easily be colored in by any means you prefer. And I love the versatility of the tall coffee mug — as you’ve seen I’ve made it into a couple different vases — and I have one more idea up my sleeve with this mug that I’ll save for another day!!! (Unless someone out there beats me to the punch — LOL!!!) I also need to move on and play with the small cups some more — I have ideas for those as well!!! Just LOVE the simplicity and ease of working with this all-purpose set!!!
Gosh, I feel like I’ve rambled on, so what DID I recommend today? Let me see —
- A simple card design, using Coffee with Friends (and Lily of the Valley from Peony)
- Paper Piecing using Basic Grey designer paper
- A large main image panel with a simple, pleasing image, elevated for prominence
- Using ribbons as embellishments
- Making your cards sentiment-free, allowing for versatile uses when needed
Yes, I guess that would wrap it up. Hope those of you in need of some quick and simple designs will give this a try!!! It can’t get much easier!!! Oh, and enjoy a cup of coffee while you’re at it — LOL!!!
Thank you all so much for stopping in today — I truly appreciate it!!!
25 responses so far


Your cards are so beautiful, and I love the idea of having card bases done ahead of time! Never thought to do that. I also just love the new releases from Flourishes! Congratulations!
Thanks Sharon for all the detail explanations. I really like the idea of having a certain size already in your mind for the bottom panel. I sometimes struggle deciding how wide to make it. Now, I have a plan!
These cards look beautiful as usual and the paper piecing idea is a great one.
Joan
I ordered my set yesterday along with the peony set, so can’t wait to play! Love your ideas here! TFS!!
…and this set just gets better and better! I LOVE this Sharon! How absolutely beautiful they both are! Very creative! TFS and for such a fabulous new stamp set! 🙂 Congratulations to you! 😉
The cards are beautiful! Thank you for all the wonderful suggestions and information!!
Wonderful designs. Love them!
How wonderful! Your work is fabulous, and I’m loving all the new sets. Been eyeing the Lilac set and have to think about some of the new ones! LOL! Thanks so much for this wonderful creative help…always struggle with layout ideas, and this is so great. Thanks so much…you are fabulous! TFS!
these cards are so pretty,love the papers and how you used the cup for the vase. thanks for the ideas.
These are great and I especially like the lily of the valley card. That red vase is so vibrant against the black and white. I immediately ordered both these sets yesterday. Thanks for all the ideas for how to use them. And I really like your suggestion to have card bases ready to go. One of the most time consuming things for me is to decide which paper to use, etc. That would easily solve that! Love your “May I Suggest” posts!
Thank you for the wonderful tutorial, and for the tip about making card bases ahead of time. Why didn’t *I* think of that? I fell for the Coffee with Friends stamp set immediately, and it’s on it’s way to me (along with a couple of others.) I can hardly wait to play.
Oh the versatility!! Over The Top with your creativity! Must have these stamps!! Thank you for showing us WHY we need these stamps!! Not to mention helping me “stamp simply”. I have such a hard time designing cards that are NOT time consuming.
Very helpful ideas! Simple, very elegant and quick! Thanks so much.
Sharon I just want to say Congratulations again on your postition with Fluorishes AND…BRAVO on your first set. I am loving the coffee set! Wonderful!
Wow—wonderful cards—wonderful tips! Congrats on your new stamps—they look fabulous–cannot wait until I get settled in our new house so I can figure out what to buy!
Congratulations!
Fabulous cards, Sharon! I love that big cup used as a vase and the idea of making some card bases with the wonderful designer papers. I may actually use more of what I have that way instead of stacking them up and forgetting about them.
Such mega talent! The cards are great! Congrats again on your new stamp line, they are awesome! Best, Curt
Thanks for sharing your fabulous cards and the steps you take to create them.
Love getting tips from the “pros”. Thanks for sharing your talent and tips 🙂
These are so beautiful!!
These are so gorgeous. I’m aching to get the set and make some up, but I’m up to my eyeballs in making cards for a silent auction at our church to support our Mission Team. I love the new stamp sets, though, and can’t wait for things to settle down so I can order them and start playing with them. Stamp simply …… great concept!!!and they’re so very attractive. I love anything that reminds me of coffee, so great set!
I love both of these cards, but I especially love the lily of the valley card! So clever turning one of your coffee mugs into a vase! And I love this flower, it always reminds me of my great grandmother, she had them growing along the side of her house. I was only 6 when she passed away but I remember that very clearly! So, your card makes me happy. 🙂
Your cards are beautiful and your tips and tricks are wonderful! Thanks!
smiles, Deena
I really like this set but you know what some people drink from those big lovely cups? Tea! It would have killed you to have just one tea sentiment included? 🙂 May I suggest… a companion set with tea sentiments?
Love your paper pieced coffee cup images and simple designs. Gosh, I never thought to have a few cards partially made up for a quick last minute type of card. Great idea to share with my hostess club. BTW, if you just lay a piece of copy paper over a ribbon or other embellishment when you mail your card it will go thru the mail without extra postage as long as it is not too heavy or way too thick. Your cards I am sure would go thru just fine. Happy stamping my friend, Nancy
P.S. Can’t wait for my new Flourish order……..Nestibilies….finally 🙂
[…] Remember when we talked about making up card bases ahead of time? Click here. […]