Jul 30 2008
Mailing Cards with Bulk

One of the most often asked questions I get is, “How do you mail that?” The card I posted yesterday prompted many more similar emails, so I thought I’d show you all how I handle mailing bulkier cards. I love to make cards with dimension and I never hesitate to do so based on the issue of mailing, I just bite the bullet and pay the extra postage. If that goes against your grain, then you can save those bulkier cards for occasions where you will be present to deliver the card, such as a wedding or party you may be attending.
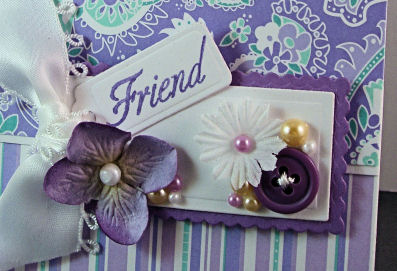
Here is a close-up view of yesterday’s card so you can see the type of bulk I am referring to; however, many of you, and I on occasion, make cards much bulkier than this:
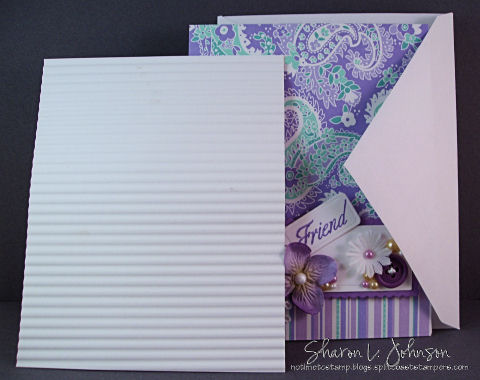
Merely putting this in an envelope and mailing would probably mean that it gets to the recipient in a somewhat damaged state, due to the lumps and bumps in the envelope. To avoid those lumps and bumps, a trick I learned from Linda Bullard quite a while back, was to crimp a 1/4 sheet of cardstock and place it in front of the card in the envelope to act as a corrugated cushion, and it works amazingly well. This is very suitable on cards with a low to average amount of dimension added.
The cost to mail the above card in this fashion would be $0.59. I use my 2 small kitchen scales to weigh my envelopes and small packages. The small scale goes up to 1 pound and the larger scale goes up to about 7 pounds, and they ARE amazingly accurate when compared to the scales at the Post Office, so I’m sticking with them — no high tech digital postal scales for me — LOL!!!
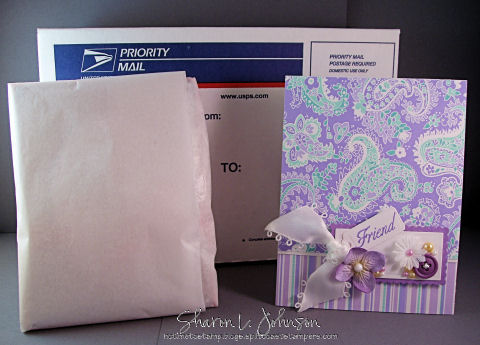
Another option if your card is a bit too bulky for the above crimped cushioning, is to go to a purchased bubble wrap envelope as shown below.
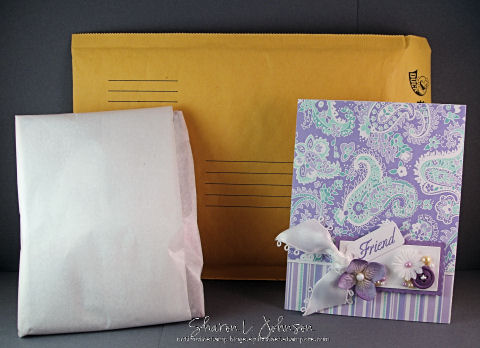
When inserting a card in this type of envelope, I like to wrap it in tissue for an extra layer ofprotection and also so that when the recipientpulls it out, it’sjust a bit nicer to have tounwrap the tissue thanto pull a card out of this unattractive envelope. We put so much time and effort into our cards, let’s try to present them in an attractive fashion, even though that can be difficult when dealing with postal issues. The cost to mail the above card in this bubble wrap envelope would be $0.59, plus the cost of the envelope. I get my bubble wrap envelopes from Wal-Mart and this size runs about 45 cents. (Editing to add: Please read the 6th comment down by Karen Witter for a source for white padded envelopes which would be more attractive than the one shown, and at a decent price — Thanks Karen!)
Another option which does a great job of protecting the card and which I really prefer to the above bubble wrap envelope, is to put the card into a clear box, and then wrap the clear box in brown postal wrap.
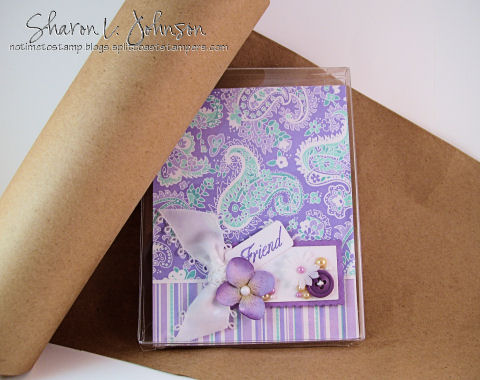
I love these clear boxes and I was turned on to them a year or so ago by Val Stangle. They come in a variety of sizes and are great for enclosing gift sets or, as here, for protection while mailing. Even though the outer wrapper is standard brown wrap, oh, what a pretty box/sight when the brown wrap is removed!!!! These boxes make a lovely presentation. The cost to mail the above card in this fashion is $1.34.
And last, but not least, is the most expensive option, which is reserved for extremely bulky cards, but I have been known to use this option — a USPS Priority Box, called a video mailer.
Now, of course, the card shown above would not require this type of mailing, but I have both sent and received some cards that do. When using this type of box, again, I wrap my card in tissue paper, place it in the box and nicely fill all empty space in the box with gently crumpled tissue paper, again, making sure that this highly unattractive box at least has a pleasantly presented surprise inside!!! As long as this box weighs less than 1 pound, the cost is$4.80.
So, that’s it — that’s how I mail my cards!!! Hope this was helpful to someone!!!!
Thank you so much for taking the time to look, and I hope you are having a wonderful, summer week. I have taken some much needed time off this week and have been enjoying the pleasant temps and warm breezes on my front porch with visitors!!! Hope to visit with YOU again soon!!!
Oh, before I go — check this out!!! My friend, Julie Koerber, is in theTop 10 in the Paper Crafts Gallery Idol contest. She created a gorgeous card using a vintage Santa image. Take a look, and if you like it, take a moment to cast a vote for Julie. Instructions are posted along with her card here. Voting runs until noon MST on Thursday, July 31. Julie’s work is FABULOUS all the time and she is certainly a winner in my book!!! Thanks!!!
20 responses so far


What great information on mailing cards with some extras on them. I love the crimped cardstock protection idea and will surely share that with my stamping buddies. I usually just pay whatever I have to because when I make a card for someone it’s done with special feelings, and how can you put a price on that! Thanks for promoting DD Julie in her quest for winning to the final 5. She is a talented girl and one I couldn’t be more proud of. Pat
P.S. I have blog candy so stop by for a chance to win.
this was excellent information and very very helpful. i’ve been using a piece of thin cardboard as a protector, but i like the idea of the corrugated c/s even better! and all the other ideas you included with your info. thanks sooooooooo much. i’ll be sharing these ideas for sure!!!
Thanks for going postal! This info is a big help.
This is so helpful, Sharon! Thanks! I always struggle with this. Love all the different alternatives too. I just made a card that is bulky and have decided to use it for a friend’s birthday next Monday. Will deliver it. Love your daily blog and never miss it! TFS!
Sharon, this is very helpful. What a great idea to crimp the cardstock, I hadn’t thought about that. Thank you for providing the link to Julie’s gorgeous card. I saw it yesterday and printed it out as I have that Santa stamp and, well, you know me, gotta try painting him. . . LOL . . . ! I love Julie’s blog and utilized the link she provided to cast my vote.
Thank you, Sharon, for sharing this. It was very helpful! I agree with wanting even the containers for our cards to look nice, so you might want to try white padded envelopes and maybe even stamp something on the envelope. I do that with my regular envelopes. One place that has the white padded envelopes, although you have to buy in bulk, is Paper Mart. http://www.papermart.com/templates/17-0-10.htm#GO_17030 I discovered them when planning my daughter’s wedding. It looks like you have to buy 250, but the cost is only $.16/per envelope (they’re under Padded Bags.) I’m sure several stampers would have no problem splitting an order. There are probably other places that sell the white ones, although our friendly, neighborhood stores don’t seem to have them. Anyway, just a suggestion, and thanks again for covering that subject.
Thanks Sharon for the great information. I just wanted to add another postal tip, if I may. When using the clear envelopes, make sure you adhere the postage stamp to the outside of the envelope. I wasn’t thinking the other day when I mailed a birthday card to a friend. I placed the stamp on the inserted white mailing sheet. The post office returned my card stating they could not cancel the postage stamp. Of course my card was late reaching my friend 🙁 Just a little reminder especially for first time clear envelope users.
Wow! what wonderful information! Thanks!
Oh – forgot to add this…..but you could also turn your card inside out before placing it in the envelope to protect your your image. I would give credit where credit is due, but I have forgotten where I saw that. Have a great summer week!
Great blog post, Sharon, and very helpful! The mailing issues for handmade cards have certainly become more challenging. I usually put the cards in a clear envelope when using a bubble mailer, but I really like your idea of wrapping in tissue paper. BTW, that’s a gorgeous card, and thanks for the mention. :o) Linda
I pay the extra too Sharon or I use bubble wrap. But what a great way to show everyone how you do it. Have a blessed day.
I just buy the .17cent stamps, (plus.42 cent stamp) and the post office hand cancels the card so it does not get crushed. They will do it right in front of you is you if you take it to the post office. I have learned to trust my post office and I just bought a roll of stamps and put the card in my mail box. None of my friends or family have said that their cards have been damage.
This was so helpful Sharon. Thanks for all the info.
Also wanted you to know I’ve given you a bloggers award because I
Love the work you do!!!!
Stop by my blog to pick it up and for all the details.
Thanks for the inspiration!
http://www.jhaddad59.blogspot.com
The crimped cardstock might not work in all situations if you are just basing it on the weight of the card. One thing to be aware of is that there is a depth/thickness restriction on the envelopes for regular first class mail. The reason is that the sorting is automated and the cards are speeding along on these machines at great speeds. If I have a problematic card I take it to the post office and make sure they know I want it to AVOID the machine. There is an extra cost involved but it is worth it to not have the card destroyed in the process.
Wow Sharon thanks for the amazing tips! The crimped paper one sounds great! I will try that next time I am mailing a special card. Thanks too for the shout out about the contest! You know I think you are a rock star and to have a compliment from you — well — it’s pretty darn cool!! 🙂 Take care lady!
Why do you wrap your clear boxes? I tape the ends and mail them as is – the pretty card shows on one side and a piece of paper to match my card is on the other side for the adress. I also use clear acetate envelopes and everyone always ask me about them because the card showing one side looks so pretty.
When I have a really bulky card I use the styrofoam plates that I get when I purchase meat products at the grocery store. I place my card between two of them, tape them closed and place in an envelope. They are lightweight so that helps to keep the postage down and my cards arrive safely to their destination.
Thanks Sharon for your tips. I usually just put a sheet of copy paper over the front of a bulky card and then into the envelope. It keeps ribbons, buttons, etc. from breaking thru. If your envelope will go thru the slot on your paper cutter and is not over weight you can just use one stamp. If not you have to pay the extra postage or just add an extra stamp if you are in a hurry (or do not want to drive to the post office). I do like the idea of the crimped paper….could do that on copy paper for less weight. TFS
Thanks for sharing Sharon!! This is really helpful. I was just asking someone else how they mail the new little fancy favor bags the Sizzix die makes. I was looking for your pencil box directions when I stumbled on this!! THanks again.. very helpful.
[…] #split {}#single {}#splitalign {margin-left: auto; margin-right: auto;}#singlealign {margin-left: auto; margin-right: auto;}.linkboxtext {line-height: 1.4em;}.linkboxcontainer {padding: 7px 7px 7px 7px;background-color:#eeeeee;border-color:#000000;border-width:0px; border-style:solid;}.linkboxdisplay {padding: 7px 7px 7px 7px;}.linkboxdisplay td {text-align: center;}.linkboxdisplay a:link {text-decoration: none;}.linkboxdisplay a:hover {text-decoration: underline;} function opensingledropdown() { document.getElementById('singletablelinks').style.display = ''; document.getElementById('singlemouse').style.display = 'none'; } function closesingledropdown() { document.getElementById('singletablelinks').style.display = 'none'; document.getElementById('singlemouse').style.display = ''; } The Eras of Postcardsas the sending of private messages. TodayGalveston’s High-Drama of September 8, 1900No Time To Stamp? […]