Oct 01 2008
How to Condition your JustRite Stamps
Sometimes stamps need a good conditioning to give you a good, crisp image. And taking the few minutes it takes to condition your rubber stamp is so well worth the time, you will certainly never regret it! This post will show you how to condition your JustRite rubber stamps and admitedly, this will certainly NOT be the most attractive post you have ever seen, as I prepared these samples this evening to try to make it easier for you to see the difference agood conditioning can make. So please just bear through these photos and my scribbles for notes as I do believe the information is well worth your time to read.
We are all familiar with conditioning our clear stamps (see this post by Leslie Miller), but all too often we don’t condition our rubber stamps, as most often they just don’t need it; however, the situation is different with reverse image stamps where you have a lot of surface area to cover with ink. These are the rubber stamps that most often benefit from a good conditioning. I know we’ve all had those reverse image stamps that just don’t give us a good image. Today I’m going to show you how to fix that problem and get beautiful, full and solid images from your reverse image stamps (stamps with a lot of rubber surface to be covered with ink).

The stamps I’m using for the samples today are from the Christmas Ensemble by JustRite made to be used on the Harmony Classic Circle Stamper III — that’s the large 3 1/4″ circle which, as you may know, is my FAVORITE of all the new products. Oh, how I LOVE those large circular images — so FUN!!! But a warning first, if you are one who loves a vintage shabby/chic type of look, then DO NOT condition your stamps. The way the solid image stamps in this set stamp straight from the factory is very much a shabby/chic look, blending so well with the Basic Grey and other more distressed looking papers — just a word of warning — LOL!!! But, if you want a cleaner, crisper look, read on.
The first thing we need to do is clean the rubber with a good solvent stamp cleaner to remove any films or coatings on the rubber from the factory. Once that is done, we need to give our rubber some *tooth*. That’s the reason some of the solid image stamps don’t stamp so well — there is such a large area of rubber and it is so smooth and almost slippery, when the ink is applied it just pools up and moves about on the rubber, yielding a splotchy and poorly stamped image. We need to roughen up that rubber surface a bit to make the ink stick. Here’s a few items I use to accomplish this:
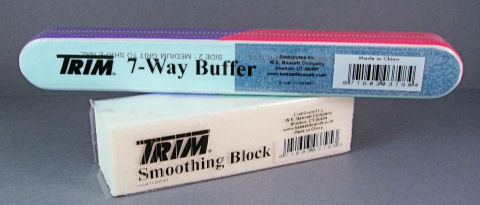
These are items from Wal-Mart, 97 cents each, in the fingernail file section, near the nail polish. That’s what they are — for filing your nails, but they work fabulously to give our rubber the tooth it needs. The file on top has 7 different grits of paper on it — all numbered in order — how handy!!! Below is a succession of 6 photos, showing you how the stamped image looks after all the different things I tried.

- Photo 1 shows the image as stamped with nothing done to the rubber. Just used it straight out of the box. I think you can see the problem — splotchy, uneven — rather shabby/chic — LOL!!!!
- Photo 2 shows the image after it was cleaned with a solvent cleaner.
- Photo 3 shows the image after it was then erased with a pencil eraser. On occasion, some of my monogram letters haven’t accepted ink the best — and a few times over the letterwith a pencil eraser always solved that problem on such a small image — however, it did not solve the problem on this larger image to my satisfaction.
- Photo 4 shows the image after I then sanded it with the white block. The paper on this block is quite coarse, so I sanded with a soft hand, but went over it a lot.
- Photo 5 shows the image after I then tried side #4 on the longer file. I still wasn’t quite satisfied.
- Photo6 shows the image afer I then tried side # 3 on the longer file. Now I’m happy! A nice, crisp image!!!
Please bear in mind, this was my experiement that I tried to photo for you. It’s not nearly as complicated as this may appear. Check out this before and after of Happy Holidays:

What a difference! Here’s what I’ve ended up doing on most of my solid image stamps to achieve this result: Clean with Solvent, sand lightly with either the white block OR the #1 on the file, then go over again with #’s 2, 3 and 4 on the file, the grit gets finer each time. That seems to do it for me!!! And it truly only takes a minute or two!!! Here’s another photo:

First stamping, then after doing the process as I just listed above, then trying it in black. I am satisfied with both thered and black. For this experiement I used a new pad of SU Riding Hood Red. The last one in black was Versa Fine Onyx Black. Papertrey Ink White is my white paper of choice — love that paper — but I will say I got a better result using these stamps on SU Whisper White. It is a smoother paper and I got a crisper, clearer, more solid image on this paper. It is not extremely noticeable, but since that is what I was paying attention to tonight, thought I’d pass that on.
Now let me show you something else. Remember the other day inthis post I showed you that I cut a monogram letter to make things fit properly. Well today using the last stamp pictured above, check out the first photo. See the ring — kind of a hickey mark from the edge of the rubber. Granted I did not have the outer border ring on the stamper, but still, I often use the centers without the borders, and I want them to stamp well. So, out come the scissors again. I just cut off the edges and the problem was solved, as evidenced in the next 2 photos. Here it is:

Once again, it’s OK to cut your rubber!!!
Before closing, I’d like to direct you over to the Blogs of Michelle and Taylor. They have both recently written some great posts addressing the issue of “Where do I Start?”. I know so many of you would like tomake your first purchase of JustRite products, but you just don’t know where to begin — well, check out both of these posts and it just may help!!! Michelle Wooderson, Taylor VanBruggen.
Thank you so much for stopping in again. I hope this was of help to someone out there. These stamps are so beautiful and so fun, we all need to make sure we are getting the BEST out of them!!! Hope you are having a wonderful week!!! And tomorrow is another fun Stamp Simply Challenge — check it out if you are so inclined!!! Thanks much!!!
A quick note on another subjet: Feedblitz totally missed sending out notices on 2 of my posts in the past week. I try to post 5 to 6 times a week, so if you want to make sure you see them all, just scroll down or click in each morning. Feedblitz is a wonderful service, when it catches them all — LOL!!!
31 responses so far


Yah! Thanks for sharing this with us Sharon!! I haven’t had any trouble with the 4 or 5 sets I own from JustRite but I do have more on the way and they may require this action 😉
I appreciate you explaining it so well! I’ll head to Walmart to look for one of those files soon.
Have a great night!
Sharon, this was most valuable information: well illustrated and beautifully explained! There is no doubt I’ll enjoy my stamps all the more with these wonderful tips helping me get clearer, crisply stamped images! THANKS! VA in AZ
Sharon, thank you SO much for this wonderful explanation. These are the things that make us all better stampers and I for one did not know this.
Thank you!!!!
Joan
Thanks so much, Sharon. I had been so looking forward to using my Just Rite Christmas stamps and was getting extremely frustrated because the image was awful! I’m definitely getting the “tools” you recommended for this conditioning project!
Sharon, I appreciate your teaching posts SO much. I save them so I can refer to them later. Thanks for taking the time to not only tell, but show, the concepts you share!
Sharon, Thanks for sharing these great tips…mysteries solved. Thanks for permission to cut the rubber, too. 🙂
Thank you so much for taking the time and illustrating how to get better images with clear stamps! I haven’t been happy using clear stamps and now I know why! Your article was very informative and I plan to follow through!
Sharon, your informational posts are so helpful! Thank you for taking the time to do this!
Thanks for this “report!” I had no idea the difference this could make! Thanks too for the Feedblitz warning – I missed a few of your posts thanks to it! 🙁
Hi Sharon,
You are amazing! One question is what solvent cleaner do you use? Something hand made? Would love to know.
Thanks for sharing! Your results are so professional.
Linda
Wonderful, informative post-will check out the “tools” from Wal-Mart. I always enjoy looking at pretty cards and projects but it is always great to have info like you shared-thanks so much. Between you and Leslie Miller I am learning a lot-if I can just remember it all.
Sharon, thanks for the wonderful info, I have the Christmas set and was getting results I was not happy with so I will head off to Walmart/KMart which ever one sells those tools around me and clean up those stamps. And I do cut stamps which I think shocked my DD but sometimes it makes it so much better. I cracked up with your term ” hickey mark”, it made me think of high school and those naughty boys. Pat
Thanks you so much for post this. I have been having so much trouble with alot of my clear stamps that I had just stopped using them. I used you technique and I finally got good results. Now I just need to do it to all of my clear stamps. thanks again
Super tips Sharon! I always forget to give my stamps some loving care to keep them crisp! Gotta get at them!
Super tutorial, Sharon! It’s *very* informative and helpful. I’m looking forward to being able to stamp the new Christmas Ensemble that I won, here on your terrific blog – yay! 🙂 I’ll be sure to follow your instructions! I’m already an old hand at cutting the rubber edges – been doing it for years, lol, -it’s the best way to ensure you don’t get those ugly stray marks. Thank you for sharing!
Thank you for such an informative article. I am definitely saving this one.
Sharon,
Thank you so much for the information on clear and JustRite stamps. I have had problems with the clear stamps stamping clear and I have just received several JustRite stamps. Thanks for passing on this “valuable” information and your tutorial was just great. I will be visiting Walmart tomorrow. Thanks again!
I’ve found I have to sand most of my JustRite stamps, as I do many of my rubber stamps–especially the ones with a more solid image. Gosh, what a great day it was when I learned about this! It made such a difference! Thank you so much for sharing this with all your readers, Sharon. It’s a wonderful bit of information!
Thank you so much for this tutorial! This is information that I really needed but never knew it. 😀
Thank you, thank you! I so appreciate this information! It will make my JustRite stamps even more enjoyable!
Oh wow, Sharon, it is so super-sweet of you to have taken the time to address this issue and take the great photos to illustrate!!!! TFS!!!!
Thanks so much for the great tutorial! Very helpful and easy to follow. What is a good solvent cleaner that you would recommend? Currently I use a home-made stamp cleaner that includes Simple Green, Glycerin and water and this cleans my stamps very well, but I have had difficulty with getting good images from solid stamps.
Shawn K.
you said “hickey” hee hee! thanks for all the detial and photos, you certianly did your homework on this post!!
Fabulous post, Sharon — thanks so much for all the detail, I’ll definitely be doing this!
Thanks for an awesome tutorial…I didn’t realize it made such a big difference to “condition” your stamps before using. What type of solvent cleaner do you use? I will be sure to do this on all my stamps now!
Still refering back to this post when I am having stamping issues with Just Rite.
Thanks so much again and again such a great demo!
R
Can you tell me what solvent you use for cleaning the stamps?
Thank you so much! I always love learning great stuff like this! You’re the best!
Sharon, I did not read this then, because I did not have any JustRite, so am reading now, thanks. I didn’t know to cut the rubber, nobody told me! and what type of solvent cleaner are you referring to? Thanks so much, I needed this info. 🙂
Sharon, love these steps for caring for the rubber stamps. I received my first set of Justrite Stamps a few weeks ago. I have been so upset the image is awful. I got a 3 1/4 round set and regardless if I use the center with the outer ring or both together the image comes out with so much ink on the outer edge. It’s almost like the image is not high enough on the rubber. Help. I have used your cleaning steps and am at a loss. I was so excited about these products — now I’m unsure. What am I doing wrong. I have tried all types of ink, different pressure, etc. Ink just get every where on the stamp. And it’s not just on in the set of six, it’s all of them.
Good Blog sir… your blog is very helpful.. I am happy to find this post very useful for me, as it contains lot of information.
Large rubber stamp