Oct 19 2008
Perfect Presentation – Part III
Today’s project recycles and transforms a food container (a can) into a gorgeous container for whatever type of bauble or gift itemyou please. I am going to keep vintage buttons in this container. Gosh, I hate to even call it a can because it is sopretty, but that’s exactly what it is — a can!!! I think it would be so much fun to make smaller versions of this and fill with buttons to use as a gift for a crafter. Here’s a look atthe finished product:
Isn’t that pretty for an old can? I thought so!!! Oh, but what FUN it is to turn just an old can into such a pretty and useful item, and for almost no money at all. Take a look at how this started:

That’s the can, but it was a nice one — shiny inside with a nicely finished lip and plastic cover. And next to it is the paper I used to cover it, after it was scored. Yes, that’s how I got the embossed lines in my paper, I scored it on my full sized Scor-It. I scored every 1/2″, and can you see how nicely that makes the paper take on a natural rounded shape? How EASY it is then to wrap the can and adhere the paper to cover it. And I LOVE the look of theembossed lines — they add so much texture and a lot of richness — I think so anyway!
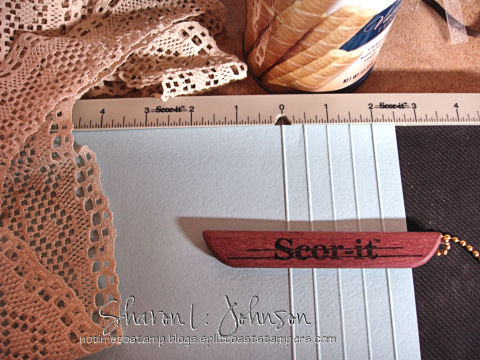
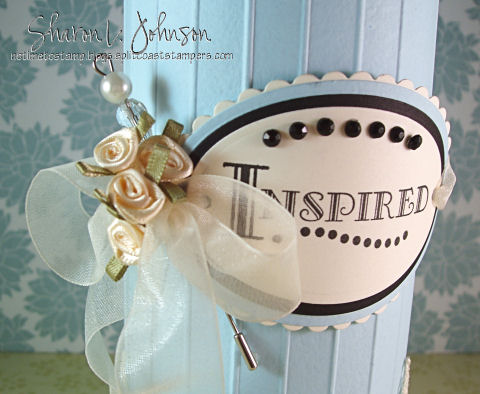
You can see just how easy it is to score your line, move the paper 1/2″, score, etc., etc. It only takes a minute to do the entire sheet, and I needed a 12″ sheet to go around this can. I also love the depth of theembossed line that I’m able to get with my Scor-It. This time I had the right side of the paper up, or showing, as I wanted the lines to beembossed on the right side. Now here’s a closeup of the main image sentiment:
I stamped the Inspired sentiment with the Harmony Classic Oval Stamper II Ensemble, which includes a total of 6sentiments and bordersalong with the stamper itself. It is cut, embossed andmatted multiple times using my Petite Oval Nestabilities by Spellbinders. A cropadile was used to punch holes for my ribbon to run through. The satin flowers are adhered with mini glue dots, the stick pin was added, and rhinestones dressed up the sentiment oval.
Editing: I’ve beengetting questions all day on where I get my stick pins — they are included in the Pretties Kit sold by Stampin’ UP — so all you need to do is find aStampin’ Up demo — not too hard to do around these parts –LOL — but if you havea problem finding one, email me and I can hook you up. And, YES, they ARE hard to find outside of the Pretties Kit. If ANYONE finds a source, PLEASElet me know – I would be ever appreciative!!!
OK, here’s the top of the lid:
This was stamped with one of my favorite sentiments included in the Harmony Classic Circle III Ensemble, which includesa total of 6sentiments, borders and the stamper itself. This time I used my Petite Circle Nestabilities by Spellbindersto cut, emboss and mat my image multiple times. I again used my Cropadile to punch holes for the ribbon, tied a bow, added a few satin roses, some more rhinestones and called it good! It’s hard to see, but I first colored any areas of my plastic lid Ithought may be exposed with a black Sharpie pen. I then wrapped the little side (the lip that hangs down) with a strip of red sticky tape and wrapped it with black velvet ribbon. I then adhered my stamped topper to the lid top using dimensionals (the lid was indented, so the dimensionals were needed). And after all was said and done, I really don’t think any of the lid does show, but I wanted to color it black *just to be sure* — always better to be safe than sorry!!!! Now for the back of the can:
My little bow reminds me of a bustle on a dress — LOL!!! This is the center back, where I started all my *pieces* as I adhered them on. I first ran red sticky tape, then ran that lace piece around, up about 1/4″ from the bottom, then ran the black velvet around. As you can see, this is where my ends met, and I had a little *tape issue* at the center back, so I just covered it up with the bow, and I think it adds so much. I’m glad I had that *issue* — LOL!!! After the bottom was all constructed, I then went around and added my rhinestones in those little openings!!! Love this lace — I bought it lastyear for a Christmas stocking project that never got made — so now I’ll get some more and hope for the best with the stocking project this year — LOL!!! Oh, and if you look closely right at the center back, you can see where my paper met and overlapped as I wrapped it around the can — it is so easy to conceal your seam when you have used the Scor-It to create theseembossed lines — I think it gives a very professional result.
Stamps: Harmony Classic Oval Stamper II Ensemble (includes stamper) and Harmony Classic Circle III Ensemble(includes stamper), both by JustRite
Paper: SU Very Vanilla, Black; Prism Perfect Baby Blue
Ink: VersaFine Onyx Black; Markers to color butterfly
Accessories: Scor-It, Petite Oval and Petite Circle Nestabilities by Spellbinders, May Arts Velvet, SU retired Organdy, Offray Satin Flowers, SU Pretties Kit, Kaiser Rhinestones, Cropadile, Dimensionals, Zots, Red Sticky Tape

And now before I go,remember how I always tell you it’s OK to cut your rubber? Well, check out how I’ve cut out these stamps. Again, I’ve usedthem without the outer border and when Iinkthem upthe rubber was just collecting too much ink, requiring me to wipe it off, and I don’t have a lot of patience for that (LOL!), soooooo — I just cut off the rubber — simple solution, problem solved, perfect image, EVERY time!!!! And another thing I’d like to point out, even though the one stamper is round and the other is oval, if you look at the images themselves — they need NOT necessarily be cut into that shape. Either of these images could be on pieces cut in another shape — square or rectangle — just pointing out some other options if you choose to use the center without the border.
If you’ve missed my previous posts on gift packaging, check them out here:
Perfect Presentation I – Boxes
And I guess that wraps it up for now!!! I’m so glad you stopped in again today!!! Thank you so much!!! Hope your week goes well!!! I’ll be back tomorrow with a card or two done Stamp Simply style — quick and easy!!! Hope to see you then!!!
63 responses so far


This is very pretty. Love the scoring and the stick pin accent.
Sharon this is awesome, and just the kind of project I’m looking for. You are such an inspiration, thank-you.
This is perfect! You’re right- the scored lines really make the can completely elegant. Thanks for the wonderful inspiration.
Just beautiful! I love the texture you’ve added with your Scor It– what a great way to add extra interest! The lace a extra special touches are just so pretty as well!
Oh my goodness Sharon!!! This is fabulous! I just love it and I am looking for another project and this might just be it. I think I even have one of those cans in the cupboard.
I love the colors, the satan roses, the pin, the velvet ribbon and especially that beautiful lace. Wow! It is just stunning. Thank you again for all your hard work and all the pictures you take to show us what you do. It really helps.
Joan
this is just exquisite! How you can take a cookie box and make something so beautiful is amazing! Just awesome!!!!
Absolutely beautiful! I love recycling and repurposing!
Simply STUNNING!!!!
Wow! Wow, wow, WOW! This is beyond beautiful! It’s stunning and romantic in an old world kind of way. I’m just in LOVE with this project. Oh, my, I’ve got so many of these kinds of cans I’ve been saving. Not this very same can, but many similar–with the lip that keeps the lid from scraping the paper–you know what I mean. I love the colors, the lace and ribbon, the satin flowers, the “bustle” in the back. It’s all just gorgeous!
This is fantastic! I love everything about it.
Wow! This is such a beautiful container. I love the style you choose. The colors are perfect and the stamps are just fantastic. I think I reaaly need them.
Heather
Wonderful,wonderful,wonderful
How wonderful! So, so very beautiful. Just a perfect container for those buttons.
This is soooooooooooooo beautiful Sharon!!! Amazing what you can do!!
Fabulous Sharon, so beautiful! A perfect gift for a special friend! Where do you get all these ideas from? This is so unique and perfect, elegant and functional, I just love it!
This is awesome. Sharon! Thank so much for sharing your wonderful ideas with us!
Just beautiful….you are so talented and creative. Thanks for sharing. Love the idea of scoring the background blue paper.
This is just gorgous! What a beautiful job you’ve done with this! I can’t believe it was a cookie can original from Aldi’s! It looks like it came out of a fancy, expensive store! Just love it! Great job!
Absolutely gorgeous! The colours are beautiful, and the score lines add such a sophisticated and eyecatching touch! TFS!!!!
This is gorgeous!!! I love the scored lines.
Sharon, this is a little work of art!
Oh my goodness, what a transformation!! What a gorgeous container (it is no longer a *can*)!!! Every part of it speaks of elegance!!! Thanks for sharing. Loved your packaging series 🙂
Absolutely fabulous! You are just amazing.
Sharon, how beautiful! This is such a romantic looking container, who would have thought it started as a cookie can? Love everything about it. Thanks so much for sharing your talent and creativity with us. You are the BEST!!
Big hugs to you 😀
beautiful…so nicely done . I’ve gotstah get a score pal…love your work
Looks beautiful. I have been saving some cans to do something with and this is perfect. thank you.
Wow–what a beautiful project–it looks just lovely. TFS! Darlene
Gorgeous atlered item….You are sooooo talented and I love your blog.
Oh Sharon…Sharon, Sharon! ***sigh***
That is so, so beautiful Sharon!!! I will be making this for holiday gift giving. Susan
For those who don’t have a Scor-Pal but have a crimper, use the crimper for a similiar effect. I love this idea and there are so many containers that can be used – currently I am using the containers for flavored drink powders and the ones I have are a solid pastel color – similiar to the flavor contained in the little container inside. I am trying to come up with a way to reuse the little cups so if anyone has any ideas. . .
Sharon~ This is so beautiful! WOW what a great gift! I love how you scored your paper to make it so pretty!
Hugs~ Kim
Oh my word Sharon…. This is so much better than the original container. hee hee Seriously you did a wonderful job and the lace is such an elegant touch that goes perfect with the buttons. Awesome awesome!
So very, very pretty, useful and just love your scoring. TFS
This is absolutely gorgeous! Thanks so much for sharing!
I was wondering where you got your stick pin…I’ve seen them on more projects, but don’t know where to find them. I actually thought of making some, but supplies (like the pin and cap) are also difficult to find.
Your blog is full of lovely creations!
Its beautiful Sharon.
You are so talented and so inspiring.
I love the embossed lines, so elegant looking.
I also love the stick pin.
I notice you always use the same pins with the cap.
I have looked for them where ever I go and has no luck in finding them.You must have a huge supply.
Where do you buy your pins?
I would love to know.
Fabulous! Need I say more???
I love this! Every little detail is just beautiful. Thanks for the inspiration.
Oh my!!! GASP!! I never say *this is the best thing I’ve ever seen*…so this is a first for me. This container, Sharon is, by far, the most GORGEOUS container I’ve ever seen!! I can’t tell you how long I’ve looked at this baby…and even told others they have to go check it out!! FABULOUS, doesn’t even come close to describing this beauty!! WOW!!
This is great!!! Love the scored paper!! Beautiful!!
Amazing job! You’ve taken the sweet and made it sweeter. When ever I see a can I will think of this! Great job – thnks for sharing the inspiration and directions too.
Sharon, this is a beautiful idea!! Now, I will give ya a tip…..I buy corsage pins in the bridal dept of our local craft store and the end caps for the pins are available in the bead and jewelry-making dept. I love my SU pins, am a rep also! But for all the gals in my classes, I buy the corsage pins!
This is sooooooo beautiful, Sharon!! Gosh, what can I say that hasn’t already been said? You are such an inspiration!! Thank you!!
This is a beautiful project. You can find hat pins and the end caps (clutches) at http://www.manyhorses.com, a jewelry supply site, but they are not inexpensive. Where did you find such beautiful lace?
This is very pretty! I love the score lines all the way around. Amazing transformation of a simple can!
Sharon, I have posted my can at:
http://joanscreations.blogspot.com/
Thanks for the great tutorial. Your method is so easy and I just love the scoring on the paper.
Joan
This is beautiful! I love the vintage feel to it!
wow this is just beautiful!
Gorgeous …You are a genious, simply a genious!!!!
Barb
Sharon, this is outstanding……..I LOVE it!!!!!!!!!!!!!!!!!!!!! Makes me want to start saving my empty cans!LOL
Pam
These projects are wonderful they would make a great gift with or with out the cookies. Many times you can get these cookies at Walgreens for $1 and the cookies are yummy. TFS.
Debbie/Phx AZ
How clever! and I just love the lace at the bottom. TFS!
Yes this is so pretty! I’ve been keeping the cans my husband buys of Slim Jim jerky sticks and wondering how exactly to decorate them…THANKS!!
Wow, Sharon–this is over-the-top lovely!
Wow-this is so elegant! Simply gorgeous!!
Oh, yeah, I am back to saving every can or jar that comes in the house. 🙂
My jaw just hit the table. That’s beyond stunning. Absolutely beautiful!
Hugs and smiles
Stunning! You are SO right. It almost hurts to call it a can, it’s that pretty! a cylindrical vision of beauty, heehee. Thanks for sharing all of your fantastic pointers for how to make it! :O)
Sharon, I’m just in awe over how you have taken what most of us would simply toss in the trash and created a most beautiful elegant container!!! I’ve loved your III containers/packaging projects….. thanks so much for sharing all those great ideas and tips.
thank you so so so so very much for sharing
your such a fantastic inspiration and so giving to share you knowledge and talent with all of us
thank you sharon
WOWZER!! What a gorgeous project!! This is amazing!! Thanks for sharing this!! 😉
I would not have thought to score lines for an embossing effect on an item like this. I LOVE this idea and am going to use it! What a great, simple way to give dimension.
Sharon –
This website has all kinds of stick pins. About halfway down the first page are stick pins with loop and clutch – very similar to the pin in this picture. Just did a google search and found many websites, but visited this one first. Hope this helps you!
http://www.manyhorses.com/store_hatpins.htm
Marilyn
Hi Sharon, what a great idea … this is definitely a better way to recycled old cans. Thanks for sharing but there are no pictures in this page? Just want to let you know about the issue. Have a great weekend!