Nov 06 2008
Stamp Simply #60 – Back to Nature
Keyword ssnotime60 -There is no time limit. You can play this challenge and upload yourproject at Splitcoastand/or your Blog, anytime at all! You (and that means anyone and everyone, blogger or not!)can play as many times as you like!!! The point is to keep it simple, quick and have fun!!! Please link back here.
For todays challenge we are going BACK TO NATURE and will incorporate natural elements in the making of our card, so go outside and gather up whatever you can find — twigs, needles, leaves, sand, flowers, grains, etc. The list is truly endless. Let your creativity run wild!!! Also remember that for any of the Stamp Simply challenges you ARE permitted to do any type of 3-D project. We are not limited to cards only.
Alternate: If you don’t have access to the *natural* items you’d like to use, you MAY use an artificial item (flowers, leaves, etc.), or you may STAMP the image if you don’t have access to either the real thing or an artificial item. See, EVERYONE can play this challenge!!! Just create away and HAVE FUN!!!
SPECIAL ANNOUNCEMENTS:
We’d like to thank Darlene Pavlick for playing with us and being our November Guest Designer! Thank you so much, Darlene!!! We loved your work and even more we loved getting to know you!!! Thanks much!!!
We’d like to welcome our new Guest Designer for the month of December, Cathy Tidwell, known as Cathy, or just CAT, orcatdidit on SCS. Welcome, CAT!!! Cathy played in our Stamp Simply Blog Anniversary Party in September and won this guest spot, and we are SO GLAD to have you CAT!!! Can’t WAIT to see all your wonderful creations. You can check CAT out at her blog, Cat’s Creations.
And we’d also like to welcome a new permanent designerto our Stamp Simply Challenges — AJ Otto — better known as just AJ, or willosmama at SCS. We are SO HAPPY to have you joining us AJ!!! It’ll be a treat to see your creations each week. You can all visit AJ at her blog, The Willow Garden.
As always, please bear with us as we are all uploading this Thursday evening -all samples should be here and up by Friday morning.
Check out Cathy Tidwell’s sample here.
Check out Julie Koerberssample here.
Check out Dee Jacksons samplehere.
Check out Jennifer Bucks sample here.
Check out Janine Orchards sample here.
Tammy Hershberger is taking theday off – have fun, Tammy!!!
Check out Becky Oehlerssample here.
Check out AJ Otto’s sample here.
You can see all Gallery Submissions here.
Are those great samples or what!!!! Thank you girls!!! Much appreciated!!!
Heres myproject for todays challenge:
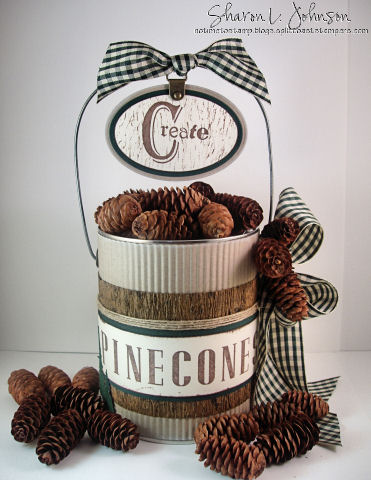
I know this is a bit more involved than my usual quick card for this challege, but it’s just where I ended up — and that’s OK!!! I have this garbage can full of pinecones in an outbuilding, thinking I should bring some in for use in holiday crafts. Well, before I knew it I was making a can to keep a few in on my craft counter. And how many pinecones will I actually put on cards — LOL!!! Well, probably NOT too many, but at least it is here to perhaps inspire me for some other holiday projects. Here’s how this project started:

A can of nuts that I decided to repurpose, some electric fence wire (yes, I know you all have that just laying around — LOL!), and my crimper. Do you remember many years back when the crimper was the big rage and we all had to have them? I do, and I’ll admit, my crimper gets used for only 1 purpose — and that is to crimp paper to act as padding and protection when I mail a card with bulk. And it does work really good for that!!! But I thought I’d try to use it on a project today. Just bear in mind, the crimper is only about 6″ wide, so you are restricted to crimping pieces to that width. My can was just under the width of my crimper, so it worked here. You’ll need to measure around your can. Mine measured over 12″ so I had to piece my crimped paper. Remember, you loose a fair amount of length when you crimp.
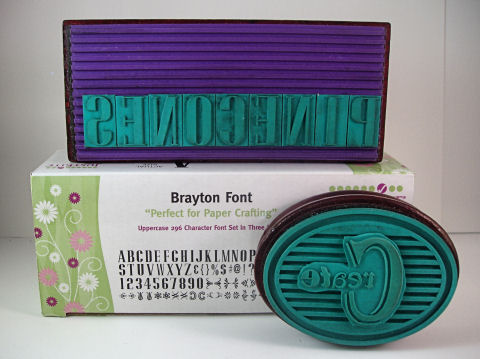
After wrapping my can with the crimped paper, I made my PINECONE strip, using JustRite 95 pt. Brayton Font. The 5varieties of font available by JustRiteare made to snap into their Harmony Rectangle Stampers, allowing you to create any word or sentiment you so desire. And because they are snapped into the gridded surface, all your letters are perfectly aligned, every time. This truly is the easiest way to create words and sentiments. And my CREATE hanging on the handle was stamped with the Harmony Classic Oval II Ensemble. As I often do, I used the center image and omitted the border ring. There are so many options with these ensembles. And as I’ve showed you before, I did cut all the excess rubber around the word Create. Doing this gives you a perfectly stamped impression each time, without any ink collecting on extra rubber. You can read about conditioning and cutting your JustRite stamps on this SCS tutorial, or you can read a much more wordy version of the same tutorial here.
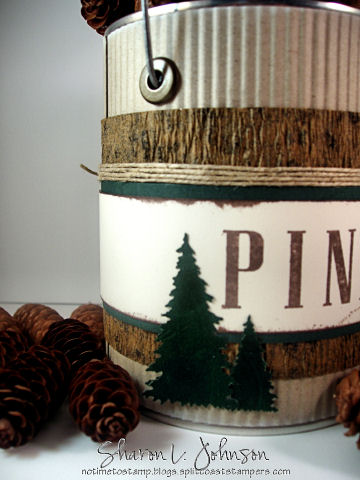
Next it was just a matter of putting it all together. My husband drilled holes in the can for me. I just inserted the wire, bent it on the inside to stay in, formed a curved shape and did the other side. Can you see in the photo how I have the grommets? Well, it may appear the grommet is actaully attached to the can, but it isn’t. Once my crimped piece was made and sized, I marked the holes on the can onto the crimped piece, and then I just attached my grommets to the crimped piece. This can has a really wide lip and I couldn’t get my Cropadile into the can to go thru the can itself, so this worked. Once you run the wire thru, it looks as though it is attached to the can itself.
And see that brown textured paper? It is tree wrap from the hardware store, to wrap around the trunks of little trees. A huge roll for practically nothing. I really like the texture and color!!! And the trees on the bottom were punched with some tree punches out of a velveteen paper, run through my Xyron X and adhered. Then I wrappedhemp twine above the label, just for a bit more interest and texture.
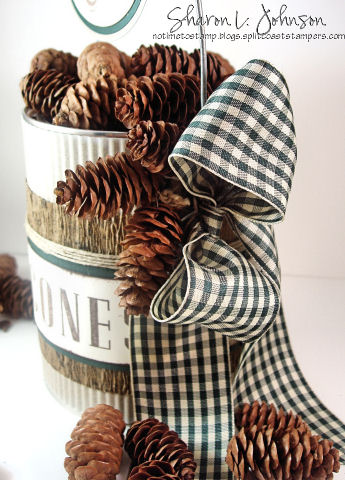
Here’s a nice big bow on the side. The ribbon is tied to the handle and the pinecones are strung on a length of button thread, kind of like stringing popcorn, then tied to hemp. But I also had to employ the use of glue dots to make them stay where I wanted them.

And here’s the Create up on the handle. In keeping true to this challenge (LOL), I created that somewhat different background on the Create panel by rolling mypinecone in a brown ink pad and then rolling it across the paper – a rather messy technique that I’m sure I will never have use for again – LOL!!! My Create is cut, embossed and matted using the Petite Oval Nestabilities by Spellbinders. I attached a piece of hardware and then hung it on the handle with a ribbon. Done!!! Now, I hope this inspires me to actually USE those pinecones on something — LOL!!!!
Stamps: Brayton Font (95 pt) used with Harmony Rectangle Stamper and Harmony Classic Oval II, all by JustRite Paper: SU Very Vanilla, Kraft, Handsome Hunter, Tree Wrap from hardware store, unknown Velveteen Paper Ink: SU Basic Brown and Kraft White Accessories: Recycled Tin Can, Electric Fence Wire, Wire Snips, SU Jumbo Brass Eyelet, Cropadile, SU Antique Brass Hodgepodge Hardware, Large and Small Pine Tree Punches by Emagination, Pinecones, Checked Ribbon, Hemp Twine, Needle and Button Thread, Petite Oval Nestabilities by Spellbinders, Large Glue Dots, Xyron X
Thank you so much for stopping in today!!! I hope you can find some time to CREATE something that you enjoy, whatever that may be!!! Wishing you all a wonderful weekend ahead!!! My next post will be some more of the quick and flat Christmas cards, assuming all goes as planned — LOL!!! Hope to see you back again!
33 responses so far


This is really neat! I love the crimping…it is perfect for this!
Hi Sharon…what a pretty project and one I think I will case for my stampin’ circle. My friend Dee collected a shoe box of small pinecones and gave them to me a few years ago because she thought I could turn them into projects with my grandkids. Well of course we came up with something and sent it to her for a St. Nick gift. The next year she brought me a plastic grocery bag full, followed by a large shopping bag full the year after. Last year the grandkids and I gathered a garbage bag full and returned the favor. I am a little afraid to see what will happen this year! She has a new condo with a wood burning fireplace so we might make her some “firestarters” with this years crop. This would make a pretty container to store them. I have a large 2 1/2 gallon tin that would look pretty done up this way. Thanks for the inspiration! Sorry to be so chatty.
I love this Sharon!! Your photos are toitally awesome!
LOVE this, Sharon! That ribbon is fabulous! The crimping is perfect! This is fabulous! 🙂 Thanks for the wonderful challenge! 😉
Yes, I have miles of that electric fence wire laying around and I was wondering what I was going to do with it! Seriously, Sharon, this is such an awesome project! I love your altered cans! You made this into the most perfect pail! Love that tree wrap idea. We get these itty bitty cones that fall out of some kind of trees we have — birch or alder? Little trees are always sprouting up in the garden from them. I’ve used them on 3-D projects before. You’re so creative, I know you’ll find uses for your pine cones. They look so warm and cozy in the pail–very decorative!
Sharon,
This is great! I love the different textures you used and your create tag is wonderful. Very, very creative!
Joan
Oh wow! How awesome is this?!! What a neat idea too, we love pitching a pinecone in the fireplace..this would look neat sitting by it! Beautiful Sharon!
Cute project!!!!
Just fabulous Sharon, I love it! So, so adorable! Hey, I have some teeny tiny pinecones that I’ve been saving, I’ll try to get something done Sunday when I return.
Sharon this is just fabulous!!! What a great project!!
Your sample is beautiful, Sharon and even more so IRL. Here’s mine, the pic isn’t too great but have to get to school. Thanks.
I love your project!! Just perfect, what a cool way to display the beautiful pine cones. I was laughing at your crimper statement because they really were the rage and I just had to have one, but I do still really like that look on some cards!! I must be old fashioned, LOL!
Today if I went outside to make a card from nature it would be ice and snow – it has hit!! Have a great day!
This is so cute, it would look adorable sitting on a shelf. Love the crimped paper, ribbon and hemp twine. Great job!
Hi Sharon! What a fun challenge you had for us today! Your project is so neat! Very creative and so many great elements! Love all the other samples, too! Here is my card:
http://www.splitcoaststampers.com/gallery/photo/1119829?cat=500&ppuser=143903
Not very original, but I’ve wanted to try stamping with leaves so this was a great time to give it a go!
Have a great weekend!
Carla
What a fun Fall decoration this is, Sharon. I love pinecones — I have a basket of them sitting outside my front door. My “back to nature” creation unfortunately is totally faux. I live in Florida — lots of bugs, and I didn’t necessarily want to transplant them into my kitchen, where I stamp. So here’s my card — http://www.splitcoaststampers.com/gallery/photo/1119832?cat=500&ppuser=72594
Well what can I say that the other ladies haven’t already said. Awesome use for discarded pine cones and I have tons in my yard along with crab apples. For some reason the squirrels are not eating them this year and that means I have to go out and clean up my deck. I did the challenge this week and believe me for something so “simple”, I had some difficulty with thinking up something creative. Pat
http://rubbermaid.blogspot.com/
Gosh, Sharon, you make simple pinecones look classy!!! What a great project! There are no pine cones in my immediate area – so I get mine from the store 🙂 TFS
OMGosh Sharon … what an AWSOME project!! FANTASTIC!!! Love this!! Okay, now that I have picked my chin up off the floor, I can link you to my creation: http://darscraftycreations.blogspot.com/2008/11/stamp-simple-60-back-to-nature.html. Not nearly as clever as yours … but still a little “clever” I think, LOL!! Hope you like it!!
THANKS AGAIN ladies for having me as part of the “TEAM” this past month … I had such an awesome time!!
Great project I love to be able to reuse items and thanks for the deets. Have a great weekend.
Debbie/Phx AZ
http://dolcedebsdesigns.blogspot.com/
You always create the MOST AWESOME containers Sharon!! You always leave me speechless and in awe!! I LOVE pinecones, and how you used one to create your bg on your sign!! *sigh*….you are AMAZING!!!
WOW — this is fabulous, Sharon!!
WOW — this is fabulous, Sharon!! I knew I shouldn’t have thrown out similar containers yesterday 🙁
Sharon, this is just a terrific looking!!!! I love how you beautifully recycled REAL products in nature. While all of your details are just wonderful, can you imagine how hard it would have been to line up a bunch of alphas to spell PINECONES and stamp eveningly had you not had the wonderful JustRite stamper? I cringe at the thought. Wonderful project!!!!!!
Your altered can is soooo beautiful, and perfect for your pinecones! I love your tag, belly band, and perfect ribbon!!
This is just beautiful Sharon, everything came together just perfectly.. this is a great idea for a food item gift, or just about any gift giving container.. I love it.
I love this! Don’t have pinecones around here, but I’ll see what I can find in my backyard for this challenge. 🙂
This is a beautiful gift idea. I can picture this with the pine cones dipped in cinnamon scented wax.oooooohhhhhh
Very nice! I love the rustic feel of this! Very creative!
Another beauty Miss Sharon! You are doing all these cool things with containers and I don’t normally do altered things. BUT… you’ve got me thinking! I love how all your altered projects have such a classy flair!! LOVE that about you!
OMGosh, I LOVE the tree trunk wrap! How CLEVER!!! And love how you attached the grommets to look like they’re part of the can! Very neat project, and a perfectly sweet holiday decoration!
Beautiful project Sharon…and great for inspiration! I love being surrounded by natural elements in my home and craft room! Love this!
This is the coolest little pine cone thingy ever! I love it….such fun to see something so special come from something not so special! You rock Sharon!
Back to Nature……hmmmm. I have access to 35 acres, so I probably should play, right?!? Your bucket basket is totally awesome. TFS