Nov 24 2008
How to… Double Emboss
I’ve received so many questions on how to do the double embossing I did on these cards, that I thought I’d just post it here for you all to see. Really, it is so simple — no mysterious technique!!! I am so NOT a technique person — if you see me doing it, you KNOW it’s simple!!! Here we go:
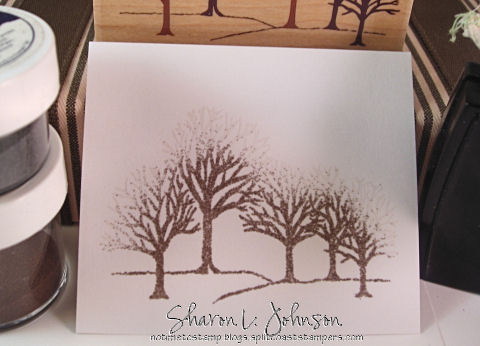
As usual, rub your paper with your Embossing Buddy, or comparable product, to reduce static. Stamp your image with Versa Mark. Sprinkle on the Copper Embossing Powder, but ONLY sprinkle it on the lower portion of the tree, or how ever much you want in copper. I am NOT real careful — I just dump it on the lower half, then tap off the excess back into my container.

Then take your Silver Embossing Powder and dump it on the top of the trees, and again, I am NOT careful. Yes, it goes on top of the portion that is already done with copper. That’s OK. The copper sticks to the Versa Mark and will not come off and get mixed in with your silver whenyou dump it back into its container. NOW you are ready to emboss with your heat gun, as normal, and watch the metallics POP — FUN!!!

Done! Now you can make your card. You can see the 3 cards I made here.
And if one were very meticulous about the placement of the silver and copper, yes, you could take a tiny, tiny spoon and sprinkle on the embossing powder ever so carefully to get it exactly where you want it and I am sure you would get a stunning, more realistic, result. I don’t do that. I’m happy with the quick and easy in this case!!!
Have fun with it!!! If you upload something with Double Embossing, please come back and link here — I would LOVE to see!!!
Also, I know from emails many of you are making the Accordion Tags like I did here. I’d LOVE to see those as well. If you provide a link to this post, I can easily find them and check them out.
Also, a template for a box for the Accordion Tag is coming in the next day or so, as are some more simple cards — maybe even later tonight — we’ll see. Just wanted to get this little tutorial up sooner rather than later. Hope it helps someone out there!!! Thanks for reading!!
23 responses so far


This is SUCH a NEAT effect!! Never thought of doing that – must give it a try!!! Hmmm… what image to use… 😀
Such a lovely job embossing…beautiful cards Sharon!
What a beautiful effect, Sharon!! Thanks for the details!!
What a fabulous card! I have never seen that done before. Love the trees, and loved your write up! 🙂
Beautiful.
Sharon, absolutely beautiful cards as per usual. Your talent is an inspiration and thank you for sharing your techniques so freely with us beginners.
Oh, I must try this!
A fabulous mini-tutorial Sharon, thanks so much for sharing. I’m with you, quick and easy embossing is my style!
Oh wow, Sharon, thanks for sharing this simply fabulous technique!!! I love it when I can get big results quickly!!!
I absolutely LOVE the look Sharon and think this will make some fabulous holiday cards that pack that WOW factor but be good mailing cards!!! TFS~!
OH WOW!! I was catching up on my blogs and see that I’ve missed some GORGEOUS cards!! I love the look of the trees and the white and gold cards are STUNNING (I usually tend to use silver more and now I’m wishing I had picked up some gold yesterday while out and about!!)
You are so good at making simple, simply fabulous!!! I love this two tone embossing! Gorgeous cards!! Have a great day Sharon!
smiles,Deena
Thank you Sharon for doing this tutorial and showing us exactly how easy it is to double emboss. It really helps a lot to see it done.
Joan
Thank you so much for the excellent tutorial on double embossing. I feel more confident now and I just may try it this evening. I offer you 6 camels and 3 rubies for your kindness.
Great little tutorial, Sharon! Very to the point and easy to follow. Thank you!
Your cards are GORGEOUS! Thanks for sharing this technique with all of us!! Very clever … yet pretty easy! I’m definately going to give this a whirl!!
Sharon, I just love your simple techniques, I think they make the most beautiful cards. Thank you for sharing. Marie-Paule
Oh that is a great simple technique! Thanks for sharing!
OH MY GOSH!! really of course I need to try that! THANK YOU SOOO MUCH for sharing I am in the dark no more! lol
Double emboss ing oh wow it look alsome!!!
great idea!!
Thank you for shareing,,,,
[…] trees a lot lately and this is the same copper/silver embossing that I’ve shown you here and here. The white paper used on this project is from Papertrey Ink, and the silver matting on my winter […]
I finally tried this technique. Here is how my card came out: http://www.splitcoaststampers.com/gallery/photo/1150282?cat=500&ppuser=156271. Thank you for being a constant source of inspiration!
[…] are Winter Woods by Rubber Stampede. If you haven’t seen how I do the double embossing, you can read about it here. And here’s how I made this […]