Nov 26 2008
Box for Accordion Project
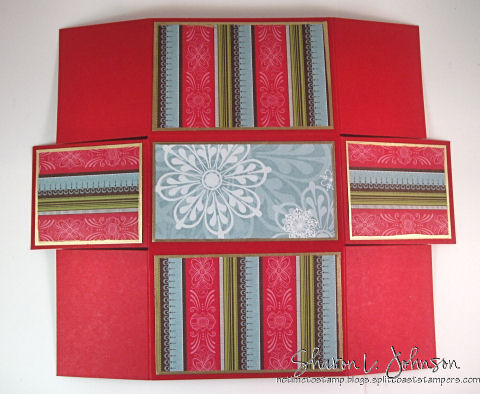
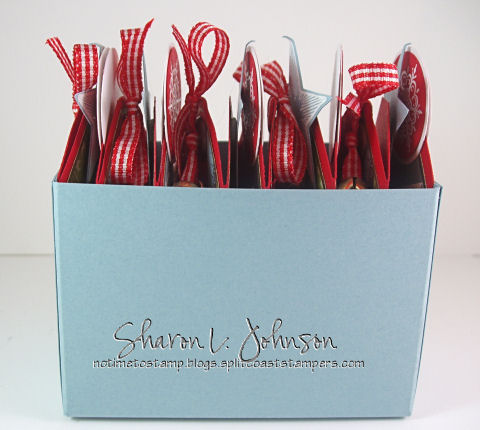
I got the box made for the Merry Christmas Accordion Tag that you can see here. You can find the full tutorial with photos and all measurements on the JustRite Blog here. Here’s a look at the box to hold it, making it a perfect little gift!!!
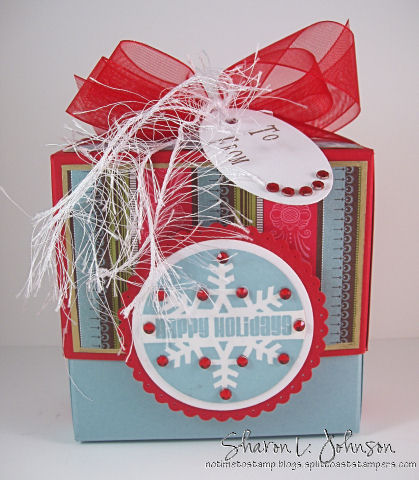
This box measures 2 1/4 x 4″ and the top and bottom are each 2 3/4″ high, but the waythe top rests on the project, the overall filled box is 4″ high. Here’s a lookat more of a side view.
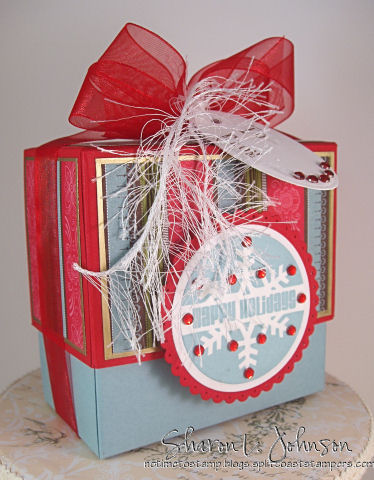
Just slip off the red organdy ribbon and you can lift off the top to reveal the Accordion Tag inside — fun!!! Here’s a look at the bow and tag on top.
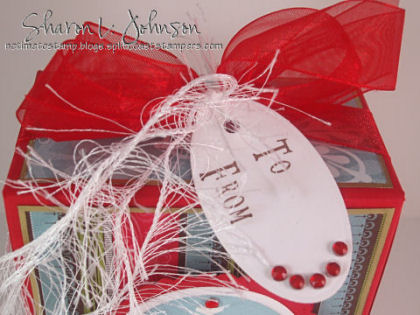
The To and From are stamped using JustRite’s Times New Roman Font and the small Harmony Rectangle Stamper. The tag is cut and embossed using Tags 5 die by Spellbinders. To get this fun bow that is really pretty and fluffy IRL, I first just tied a regular bow, making sure I had enough ribbon and left way too long tail ends. I then took those tail ends and just formed a loop, ran the tail end under the knot, did the same thing on both sides, then used the *hairy yarn* to also run under the knot, catching all the tail ends, pulled tight and tied a knot. It holds it all in place and it looks like I know how to make a fancy bow — LOL!!! I also used the *hairy yarn* to tie on my tag. There are red rhinestones on the tag for a bit of interest and sparkle!!! Here’s a look at the main image sentiment.
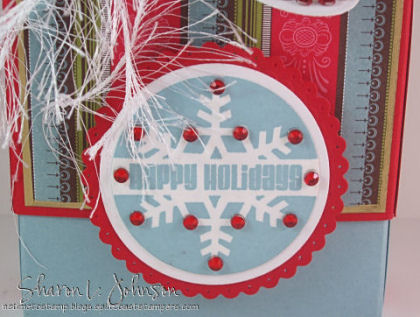
I used Baja Breeze ink by SU to coordinate with the paper and the Ski Slope DP, stamping my snowflake from the Christmas Stamp Ensemble by JustRite, using the Harmony Classic Circle Stamper III. I stamped this without using an outer ring, just the center. Then cut it out with a Circle Nestability by Spellbinders, matting and framing in the same fashion, then added all the red rhinestones for a bit of sparkly glitz!!! I also pierced the scallops. Now for the *How To* on the box.
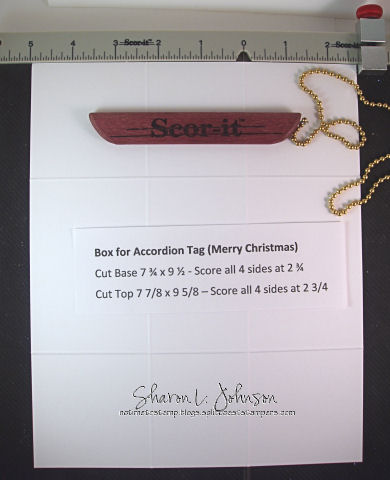
For your box base, cut your paper 7 3/4 x 9 1/2″. You then need to score all 4 sides of the paper at 2 3/4. I set my stopper on my Scor-It at 2 3/4″ as all scores for this box are at the same measurement. With my stopper set appropriately on my Scor-It, I am assured of getting each and every score exactly the same, which makes for a perfect box!!! The box top is made in exactly the same way – the only difference being in the cutting. The box top is cut 1/8″ larger, both ways. So cut your paper for the top 7 7/8 x 9 5/8. Again, score all 4 sides at 2 3/4″, and your top will slip easily over your bottom.
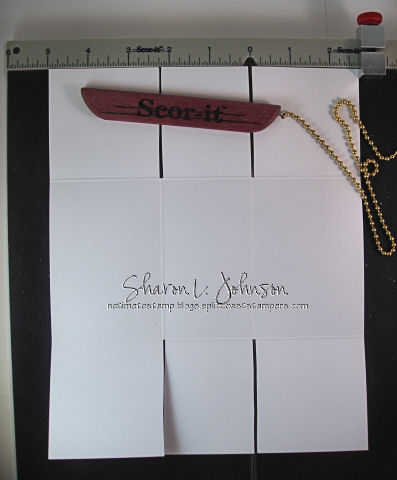
Next, cut your slits to form your box sides and tabs. As I’ve said before, I actually cut out a little sliver, rather than just a slit. It’ll make your box go together better. I cut out the width of the score line. Now, you would typically be able to fold your box together, but it won’t work on this box. Whenever your tabs end up longer than the width of your box, it won’t fold right without some modification. When you get there, you’ll see just what I mean. In this case, your tabs are 2 3/4″ and your box is only 2 1/4″ wide. So here’s what we do.
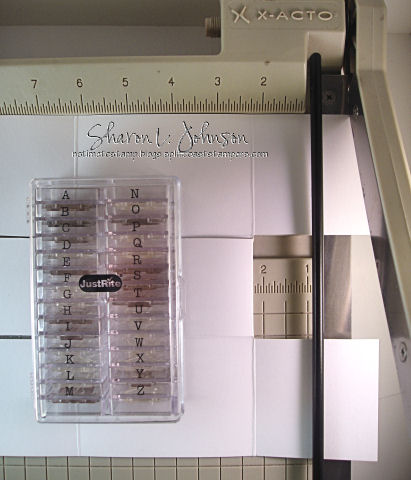
We need to make our tabs shorter so they’ll fold in nicely and neatly. Remember, our TABS are the 4 outer corners. The middle sections are the box sides. Do NOT cut your box sides. To prevent that from happening, fold them up and out of the way. I have used my JustRite Clear Alphabet Stamps as a paper weight to hold the box side down and out of the way. (These are the stamps I usedfor the lettes on the AccordionTag) Line up the score line at 2 1/4, or even a hair less works even better, lets say 2 3/16 or so. Then cut — pay attention that you are ONLY cutting the two tab ends and NOT the center piece, which is the box side. Repeat on other side.
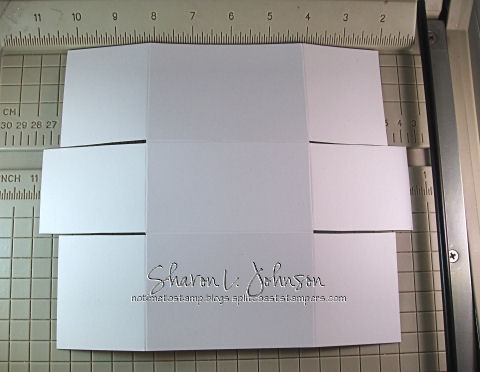
When you’re done, this is what it’ll look like. The box sides are longer than the flaps that fold in. If you want to cover your box with designer paper, the time is now, before you form it into shape.
So that my box coordinates with my Accordion Tag, I used the same designer papers and I edged themwith a gold paint pen, just asI did on the tags. I have covered the top and all 4 sides. There is no need to cover the tabs. Put adhesive on the tabs and form the box into shape. What you are looking at above is actually the box cover. On this project I did not cover the box bottom. I made it of blue cardstock and just left it blue.
Once your box bottom and cover are made and taped into shape, you are ready to decorate them as you wish. When you place your Accordion Tag into your box, the top sticks out.
Just slip the box top over, but do NOT press it down hard. Just rest it gently on top, then hold the box top on with a pretty ribbon. Hang on a tag and you are all set to give a gift that will get a ton of oohhss and aaahhhs!!! Guaranteed!!! Have fun!!!
Stamps: All by JustRite, Christmas Ensemble used with the Harmony Classic Circle III, and Times New Roman Font used with the small Harmony Rectangle Stamper Paper: PTI White, SU Real Red, Baja Breeze, Ski Slope DP Ink: SU Baja Breeze and Chocolate Chip Accessories: Scor-It, Red Organdy Ribbon, Red Rhinestones, White Fun Fur Fiber, Petite Circle Nestabilities by Spellbinders, Tag 5 Die by Spellbinders, Pop Dots, Mat Pack and Piercer
The Scor-It comes in 2sizes, full-sized and themini. You can read all about them on the Scor-it site, but you can’t purchase from that site. They do, however,provide a list of retailers. I also know they are usually available atJoan’s Gardenand Marco’s Paper. (Marco’s is also my source for the Mirricard (mirrored paper) I’ve been using so much!!!
Also, there is a huge sale going on at JustRite for certain product, the Christmas set I’ve used today is included. You can read more about it here, but the sale is over soon, so check it out quickly to take advantage!!!
Thanks so much for stopping in today!!! I wish you all a very Blessed and Wonderful Thanksgiving, hoping you get to spend some time with family and friends. I’ll have a Thanksgiving card for you tomorrow night — a day late — but it’s NEVER too late to be thankful for all our blessings!!! HAPPY THANKSGIVING, EVERYONE!!!
35 responses so far


Wow, this is so stunning, Sharon!!!!
You just blow me away with your creativity. Thank You so very much for creating yet another beautiful box.
Happy Thanksgiving and hugs,
Sabrina
Sharon, this box is soooo beautiful!!
Not only that, but you also gave us a great tutorial! YOU ROCK!!
Thank you so much.
Happy Thanksgiving to you, too!
Sharon, you absolute Angel!!! I’ve just started out making one of your fabulous accordian cards and the box couldn’t have arrived at a more opportune time! Indebted to you once again my friend!
Happy Thanksgiving to you, your family, friends and everyone who visits your wonderful “blog”.
Hugs – Marion, UK
Ever since you showed us how to create boxes, I’ve been making boxes for everything!! Who knew it could be so easy to calculate and design? Today’s box is just gorgeous and such an elaborate way to give an accordion tag as a gift! It just takes my breath away sometimes to see the stunning things you create! Thank you so much for sharing all of your creative talents with us here!! I’m so grateful!
Congratulations on all your blog hits, but I’m not surprised! I can’t wait to see what you’ve created next, so I’m a permanent stalker 🙂
Happy Thanksgiving to you too Sharon – may your day be filled with happiness, blessings, and joy!
Happy Thanksgiving to you and yours, Sharon and Congratulations on another wonderful project. For someone who has “no time to stamp” you surely do produce magnificent projects!!
Happy Thanksgiving to you and your family, Sharon. I love this box. With the beautiful accordian card it makes a great gift! I don’t go back to work until Tuesday, and one (two) of the things I plan to do during my time off is make the accordian card and box. (No Black Friday shopping for me!)
What a spectacular, drop-jaw, gorgeous project, Sharon. Thank you for sharing your process with us…your generous and selfless sharing is so greatly appreciated.
Fantastic box for that beautiful accordian project! Someone will be very lucky to receive such a gorgeous gift!
Happy Thanksgiving to you and your family Sharon! Enjoy your day! The box is lovely!! Think I need a scor it now 😉
What a fabulous finish to a wonderful card. I can’t wait to try it out. Ty for sharing your amazing talent.
[email protected]
see? now look what you’ve done…i have to go and make one of these too for my tag accordian! haha! sharon, enjoy your day and i hope you have a wonderful Thanksgiving! want some sweet potatoes?
This box is a beauty. I must make one, it is the perfect idea for a accordian style calendar that I am giving as gifts this Christmas. Thanks so much for sharing, now I can stop thinking about how I will wrap these. Hope you and your family have a wonderful Thanksgiving.
How pretty sharon! and what a nice idea! TFS and Happy Thanksgiving!
AACCKKK! Sharon, this is so fabulous! Oh my gosh, thank you so much for this box. I’m making one tomorrow and will forward you the pictures, it’s going to go with one of my sample projects (wink). You’re a genius girl!
What a beautiful box. I love the colours and all the wonderful embellishments on it! Thanks for a great tutorial! Happy Thanksgiving!!
I love this little box! You decorated it so beautifully!!! Thank you for the tutorial – the directions are very easy to follow.
Happy Thanksgiving!!
Wonderful gift idea! You always make the most fabulous.
This is awesome Sharon!! What a beautiful gift idea~ as always, thanks for the inspiration, and HAPPY THANKSGIVING TO YOU AND YOURS!
hey sharon i wanted to say happy turkey day and i am thank ful for you as my neibor and stamp goddes across the way and for running this awsome blog so thankyou for all the teaching and help in my new hobby you are awsome
This is fabulous! I just love those accordian cards and now a way to package them!! WOW. Great job…these are amazing and very beautiful. I can see these for alot of different things…Can’t wait to try my hand at making one. Thanks for sharing and Happy Thanksgiving to you and your family!
You are so creative and gifted with making 3D projects! I love your gift box!
Fabulous box for a fabulous project, Sharon — thanks for all the details!
Your box is sooooo beautiful!! I love the papers, bling, everything!! What a special project, Sharon!! Thank you for yet a another fabulous tutorial!!
I had to stop back, Sharon, and tell you that your tutorial for the accordian card and box were very clear. I was able to make both the card and the box with no problems at all. They are in the mail to my sister. We all appreciate YOUR efforts on OUR behalf! Thanks so much for the inspiration.
You are so amazing with boxes. I am off to print a copy of your custom box tutorial. Will be using for my next hostess club party. Love how you make our lives easier with your awesome tutorials. TFS
Fabulous!!!!! 😀
You’re so GOOD with your tutorials, Sharon! What a beautiful box. I love how you used the designer paper. Gosh, I wish I’d ordered this! What a wonderful idea to gift the accordian card in a box. So lovely! It can be tucked away with the rest of the Christmas decorations and brought out year after year. Truly the card that keeps on giving!
Thank you! This is great! I can’t wait to make them! I hope I can do them justice. You did an amazing job!
You were a Featured Tutorial of the Week at Card of the Week.com. You can see the original post here: http://www.cardoftheweek.com/2008/12/crafting-101-tu.html.
Thank you for sharing your awesome work with our site — please feel free to email me if you need me to change anything.
[…] can go on over to the JustRite Blog to see the entire project with instructions! And you can click here to see a box for this project. And they also just listed a HUGE SALE. You can click here and also here to read all those […]
The papers writing services propose information about this good topic, so buy essays or already written essay to find some facts about this good post.
http://www.office2010productskey.net/windows-7-product-key/windows-7-x64-product-key/genuine-windows-7-ultimate-x64-key.html
Excellent post.This was actually what I was looking for, and I am glad that I finally came here! This for sharing and keep up the good work.
I wonder how you got so good. This is really a fascinating blog, lots of stuff that I can get into. One thing I just want to say is that your Blog is so perfect!
[…] Happy Holidays Gift Wrap […]