Mar 21 2009
More From Sue’s JustRite Kitchen
I finally got back to my Sue’s Kitchen projects! And I had help on this one from Martha. I purchased a Martha Stewart Bag Set, but decided it needed a little spicing up (sorry, Martha). The set was on a 1/2 price sale at Michael’s the last time I was there (about 2 weeks ago) and it consisted of 15 of the square bottom cello bags with heavy DP inserts, pre-scored to fit (as you see in the bags), and narrow white grosgrain ribbon. Cute to throw together quickly — sure! But I KNEW we could do better!!! Here’s my finished product:

Aren’t they fun! And those are supposed to be delicious homemade cookies wrapped up in the tissue. I, of course, had no such thing on hand, but I know Sue will!!! Sue loves to make up gift bags of treats, so I made these especially with her in mind – not that I’m making up the entire set for her — oh NO — but I’m giving her the remainder so she can make them up herself, using these as inspiration and guidance. I hope she likes them!!!
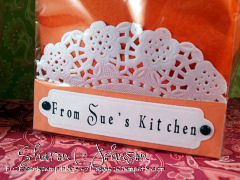
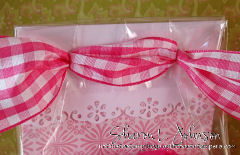
The bottom of Martha’s bag was plain, so I personalized it with my JustRite font sets and Spellbinders Double Ended Tags die. I also added the lace doily, cutting it down a bit to fit in the bag perfectly. And the top of Martha’s bag was rather plain, too, so I added the scalloped white lacy border, using one of Martha’s lace border punches. I think it adds a lot! And, of course, I thought my 1.5″ May Arts Gingham Ribbon was a huge improvement over Martha’s narrow white grosgrain – LOL!!! And now that I’ve been a bit tough on Martha, let me say that I KNOW she would have had beautifully baked cookies in her bags, whereas I merely have mason jar rings wrapped in tissue under the pretense of being cookies — LOL!!! Seriously, these ARE cute little bag sets to pick upand personalize for your own needs, and I’m sure that was Martha’s intent all along!!!
From Sues Kitchen was done on the smaller of the Harmony Rectangle Stampers with Times New Roman Font, both Uppercase and Lowercase (in 25 point), except the S that was done with Special Occasions Font. I LOVE mixing up the font sets for an interesting look! The Times New Roman LowercaseFont is available from JustRite on 4/10, but you can get those sooner if you like. Check out this post on the JustRite Blog for a list of both brick and mortar and online stores.
Stamps: Times New Roman Lowercase, Times New Roman Uppercase, Special Occasions Font, Harmony Rectangle Stamper, all by JustRite.
Paper: White, Martha Stewart Bag Set from Michaels (bags and scored DP)
Ink: Versa Fine Onyx Black
Accessories: 1.5″ Gingham May Arts Ribbon from My Ribbon Saleabove my Blog banner, Double Ended Tags by Spellbinders, Martha Stewart Lace Punch, Doilies, Brads, 1/4″ Hole Punch, Glue Glider.
Super Simple Ribbon Treatment
I’d like to take a minute here today and show you how to do this type of bow. I get a lot of questions about bow tying. Many of you feel you aren’t able totie a decent bow. Well, this is the perfect ribbon treatment for bow challenged stampers!!! I know many of you are very familiar with this treatment, but for those who aren’t, here we go:
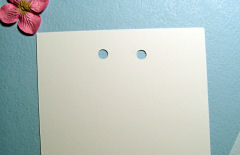

Punch holes in your card top. As I knew I wanted to use a 1.5″ wide ribbon today, I used a 1/4″ hole punch. The ribbon runs through each hole twice, so this is a perfect size hole for this ribbon treatment when using such wide ribbon. Cut your ribbon long enough that you have room to trim your ends when done. Cutboth ribbon ends at sharp angles tomake it easy to run them through the holes.
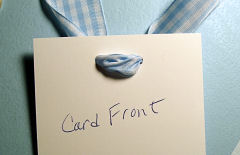
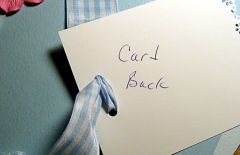
Run the ribbon through the holes to the card back, as shown. With both ribbon tails on the back side, now take one, cross it over, and run it through the hole to the front, as shown.

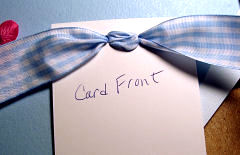
Now take the 2nd ribbon tail and cross it over and run it through the other hole to the card front. The 2nd photo shows what the card front now looks like.
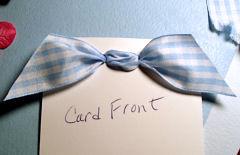
Merely trim your ribbon ends in whatever fashion you like, and you are done!!! This ribbon treatment can have different looks depending on how far apart you punch the holes. You’ll note the pre-punched holes in my Martha bag were farther apart, giving one look, whereas I punched my holes closer on this sample, giving more the look of a standard bow. This is a perfect ribbon treatment for those who feel they can’t tie a decent bow!!! It comes out perfect, every time!!!
Thanks for stopping in again! Hope you are having a good weekend. We really got dumped on with a heavy, wet snow again. I just wish spring would come, and STAY!!! Leaving you with warm spring wishes!!!
22 responses so far


I love how you “helped” Martha’s bags… thanks for the idea!
Good research. I like your article very much. Keep up the great work…
Im glad that your business is showing signs of success! Very informative site and beautiful design.
Love how you spruced up these bags!!
Hey Sharon… I love these… Yes I like Martha but she is too plain jane.
Love what you did here!!
Wow you did a great job of improving this! Martha would be proud, I think!! LOL I really enjoy buying card sets from Walmart and “improving” upon them and then giving them as gift sets!! Fun! TFS
These are adorable! Now…I know Martha makes some pretty cool stuff, but she can’t hold a candle to Sharon!
These bags turned out so cute, and thanks for the ribbon lesson! ð
Sharon, what great “treat” bags for Sue. She is going to love them for all her goodies. You really spruced up Martha’s bags…she would be proud I am sure.
Your ribbons really set them off and looks so springy. I love all your new colors too. Thanks for the bow tying lesson, you make it look so easy!!!!
Joan
oh YUMMY LOOKING gift, Sharon and the way that ribbon is tied gives it a NICE touch! thank you so much for sharing how to tie this ribbon ð … will be using it myself because it looks so good!
That is so creative, Sharon! Thank you for sharing this little trick!
Don’t you dare apologize for messing with Martha’s stuff! ð For years she has shown us up and made us feel our humble efforts aren’t enough. High time someone showed her up! Yeah!!! The bags are really cute but how did you punch the cello bag? I’ve always had a hard time with that!
Cute Cute Cute! There’s always room to improve Martha’s style, and these are just yummy!
Your bags are wonderful and I LOVE the colors!!!
Martha was probably going for a more formal look since she focuses on weddings; however, I LOVE your version! I must, must get some of your ribbon, it is sooooooooooo wonderful. TFS.
Martha could learn a thing or three from you, girl! You can be my neighbor anytime…I bake too! Love the ribbon!!
WOW!! I love it. You inspire me daily.
Thanks for the tip and for always sharing.
Sharon, Way cute bags. Bags and tags are a couple of favorite type of stamping. I will definately use your ribbon tutorial for your really cute ribbon treatment. TFS
Super adorable Sharon, those would make fabulous Easter bags! I can just see them filled with jelly beans or some yummy chocolate eggs, or my favorite, the colorful eggs with marsh mellow centers. I love the gorgeous gingham ribbons, they’re so perfect for Easter as well!
That’s a good thing, that you helped Martha out a bit here ;P. These bags are going to make any baked good look real GOOOOOOOD! Love it!!! You are just taking it up not just one but a couple of notches. Love that ribbon!!!! Hugs, Sabrina
[…] […]
I love how you’ve fixed these up with the perfect “Sharon” touch!! Love your ribbon!!
I can’t beilvee I’ve been going for years without knowing that.