Sep 23 2009
Quick Treats for Halloween
I have a couple of super quick Halloween treat ideas today. The first is a little basket that could be used for school treats, table favors, or a teacher gift as it’s cute for a desk decoration. The second is a small money holder for a dollar or two for your favorite little ghost or goblin! Here they are:
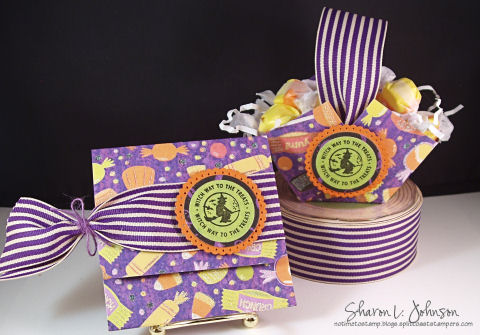
I used last year’s Halloween DP by K & Company that I got from Michaels. It’s very glittery and festive. Not sure if it’s still available. The only other paper used is Pumpkin Pie cardstock by SU for the scallop. The stamp set used is this year’s Limited Edition Halloween Set by JustRite, called Witch Way to the Treats. It fits on the 1 3/16″ Wooden Stamper, a fun size. I do have a limited number of sets left, but won’t be able to get any more once they are gone. I’ll tell you quickly how I made these and give you some closeup shots.
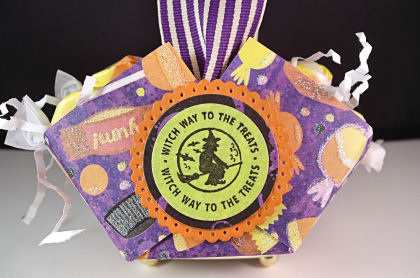
This little basket is so quick and simple. It’s basically a cube that has not been pushed all the way in to form the cube. The side flaps are only partially pushed in and adhered, if that makes sense? I’m thinking there is an official name for one of these, but I can’t put a finger on it. Anyone know? To make this, start with a square of paper, 6 x 6″. I then used my Scor-It to score 2″ in from all 4 sides. You end up with 9 equal squares. Cut the 2 score lines on 2 opposing sides. Now you can fold it up, just don’t fold it all the way in, and adhere into position. (I don’t have time to make a template and photo now to show you, but if anyone doesn’t understand and would like a template photo, just let me know and I’ll come back this evening and edit this post to include one.)
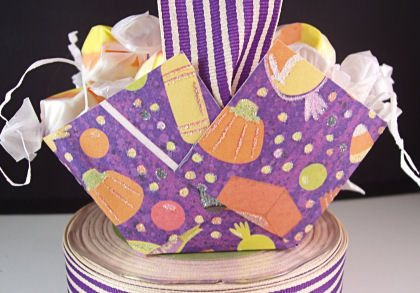
Here’s a view of the back. I think you can see how it folds easier on this side. My handle is made of 10″ of 1.5″ Striped Ribbon. It is just adhered to the inside of the basket with a heavy duty double sided tape, folded on the bottom where taped to create the little gather. It is then stuffed with shredded paper and some wrapped taffy. Finished it measures about 5″ at the widest point and about 5″ high.

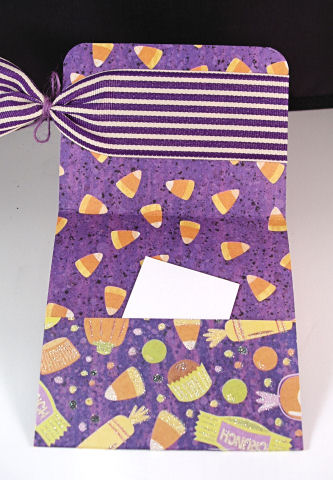
This is a little holder for a dollar bill or don’t some places like McDonald’s make coupons for Halloween? A fun way to present a little treat. Finished it is 4″ square. Cut your paper 4 x 9″. Again using my Scor-It, I scored 2″ from the bottom for the pocket and used double sided red tape on the sides to adhere it up. I then scored 3″ down from the top to create the top flap, and I rounded the corners with my SU Corner Rounder. Now it’s done, except for decoration.
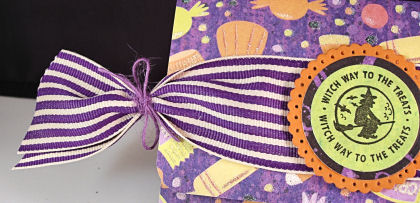
Again, I used Witch Way to the Treats and the same Grape 1.5″ Striped Ribbon. And I really like this ribbon treatment — so quick to do and fun! The ribbon is tacked to the flap with double sided tape so it doesn’t slip and the ends are just tied with a coordinating color of 100% Jute String. Can’t get much easier. And in this case I love how that ribbon flying off the end of the card mimics the motion of the witches broom in the image.
Here’s the inside — fun with the double sided paper! And just enough room for some little treat!
Nothing fancy about either of these projects. They were kept super simple with mass producing in mind for school or other events.
______________________________
Shopping:
Most items to make these projects, with the exception of the paper, can be found in the Stamp Simply Ribbon Store:
Witch Way to the Treats Set and 1 3/16″ Wood Stamper by JustRite
Petite Circle Nestabilities by Spellbinders
1.5″ Striped Ribbon and 100% Jute String by May Arts
______________________________
Thanks so much for stopping in today! Hope you are enjoying this Autumn Season! We are still having higher than normal temps and we are waiting for the leaves to change. It’s always so beautiful here in the fall. And speaking of fall, that reminds me of this week’s Stamp Simply Challenge — stay tuned! It’ll be up on Thursday evening, as usual. Have a great week, everyone!
10 responses so far


Love that stamp set, how cute. Like the basket idea, very nice work!
What wonderful Halloween ideas, Sharon!!!! I love the papers you used and the ribbon is just perfect!!! Awesome little JR stamp, too!!!
I just love both as they´re simple enough for, that the kids can help making them themself, as they´ll just love. Both are very very beautiful, even they´re simple made, but that´s what I like so much about them. TFS.
Great projects Sharon… I wish my kids were little again so I could do things like this. I still send them Halloween cards though..
Adorable Halloween project Sharon, a perfect ribbon choice. I especially love the little basket, too cute!
Love these simple but fabulous little projects! TFS!
Thanks for sharing these two tutorials. You had me at “quick” ð
these are both adoable! TFS!
michelle
ps… typo.. that was supposed to say….”adorable”…lol
Great projects Sharon! I might CASE these for a Christmas set! Thanks for sharing your talent every day.