Feb 24 2010
Box and Bow Tutorial
The Bow Easy is available at The Stamp Simply Ribbon Store — click here.
Today’s post is a follow-up to yesterday’s Stamp Simply Ribbon Store Blog Hop. If you missed it, there’s 6 links to some GREAT inspiration from the Design Team plus some active and open Blog Candy. Check it all out here.
I promised you a quick how-to on the simple box I made. And though I always receive a lot of bow questions, they seem to be coming in more heavily of late, so I’ll give you a few little bow hints as well!
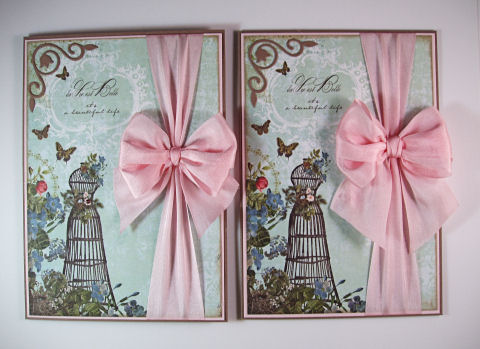
Let’s start with the box. This is the completed box:

This box was made to hold envelopes I get from Wal-mart and the cards I made to go with them. They are called Invitation Envelopes and they measure 6 3/4″ x 4 1/2″, large enough that you can insert a 4 x 6 photo easily. The actual box makes up in a few minutes, and the decorative top doesn’t take much longer. It’s the perfect way to finish off a gift of a few cards!

1) Cut your box base 8 3/4″ x 7″. Score 1″ from all 4 edges.
2) Cut your box top 1/8″ larger, or 8 7/8″ x 7 1/8″ (or it could even be just a sliver smaller). Score 1″ in from all 4 edges.
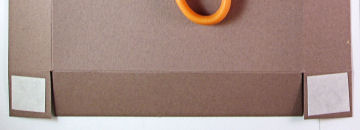
3) Fold on all score lines so you can easily see them, then clip on the corners as shown above so it’ll fold into shape. Rather than just making a clip with my scissors, I actually cut out a super thin strip, just the width of the score line. This allows your box to fold into shape more neatly.
4) Apply heavy duty double sided tape to all 4 corner tabs, fold and adhere into shape.
5) Repeat for box top.
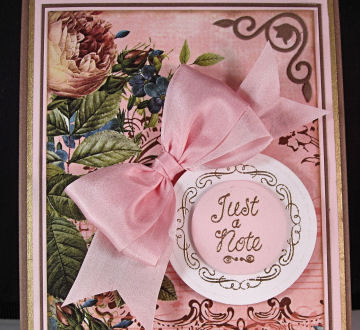
6) Make decorative top for box. I did this simply and easily by layering paper, adding a sentiment using Just a Note by JustRite, layering it onto a 2″ Wide Border mat, and popping them up on dimensionals. I then added my 100% Silk Ribbon Bow made on the Bow Easy and my corner flourish die cut on the Cuttlebug with my Vintage Dies by Cuttlebug (ProvoCraft). This set of dies are some of my favorite for corners! I adhere them by running them through my little Xyron X that you can pick up just about anywhere. The bottom most layer of my decorative box topper was edged with my 18 kt Gold Leafing Pen by Krylon. Once the decorative box topper was made, I adhered it to the box top. Done. Ready to fill with cards and give as a gift. My cards that fill this box can be seen here.
Depending on what you are putting on your box top, it is likely easier to decorate the box top FLAT before adhering it into shape.
______________________________
And now let’s move on to the bows. I get a lot of comments and emails asking me to *share my secret*!!! LOL!!! It is certainly no secret. I mention on every single post I write that my bow was made with the Bow Easy.
I call the bows I do so often with silk ribbon my Fun and Flirty Bow Treatment — because that’s just what it is!!! I’ve linked to this little tutorial dozens of times. That was with black ribbon, probably not the best choice for visibility, so I’ll redo it here today in a lighter color so we can hopefully see better.
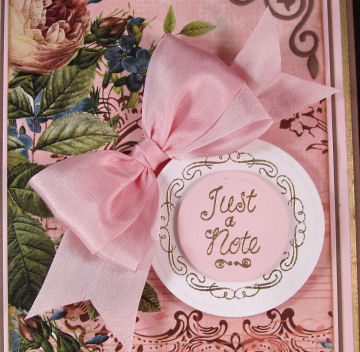
The completed card is on the left in all these photos for comparison. To start, once my decorative paper (availalbe here in Kit form or here individually) is adhered to a base to mat it, I run my length of 100% Silk Ribbon over the front and adhere it on the panel back with good two-sided tape.

Next I cut a length of either 1/4″ or 1/8″ 100% Silk Ribbon in the same color. Using a tweezers I run it under the first 1.25″ wide ribbon and then pull up the ends and tie them into a double knot, and this nicely shirrs up the ribbon. Pull those tails so the knot is nice and tight.

Then clip the tails of that knot quit close to the knot. Then using a pair of tweezers, grab the knot and pull it around so it is on the underside of the ribbon. Now it looks nice and neat.
Next I adhere my panel with ribbon to the actual card and add any embellisments I had planned on. The VERY last thing I do is glue on my bow. I don’t want it to get squished or dirty as I work, so it always goes on last.
My bows are made with the Bow Easy.
See my Photo Tutorial on how to use it here.
Watch Jerri Kay’s Video Tutorial on how to use it here.
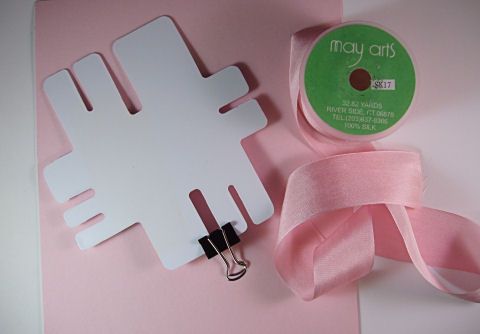
This photo shows a little tip I’m sharing that I haven’t shown before. I actually received this tip quite some time ago from 2 different readers and I’m so sorry, but I don’t remember who. If you are reading this, just know I truly appreciated it! THANK YOU SO MUCH!!! The tip is to use that little clip thing to keep the ribbon from sliding off as you try to get your tail through the hole. The legs on the Bow Easy are short — I really wish they were longer. I don’t believe these legs were intended for ribbon as wide as I prefer to use, but we make it work. And adding this little clip is a GREAT idea. You do have to remove the clip when it comes time to wrap the tail up and through, but up to that point it is a real help!
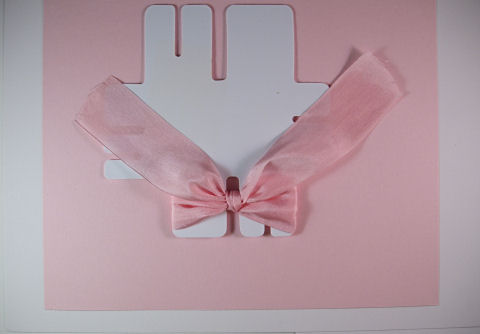
The bows I made for these cards are the 2nd to largest size, and that’s by far my favorite size and the one I use most often for my cards. They are also double bows, meaning the ribbon has been wrapped around twice. I most often prefer double bows when I use this extremely light weight silk. This shows the bow just as it is ready to slip off. I want to point out to you that the tails are both on the back of the bow. If you follow the directions in my tutorial, both tails will come on the back of the bow. The first tail you start with needs to be tweeked and pulled just a tad as you tighten your knot to get it in proper postion on the back, but I do it just without thought and it takes a mere second.
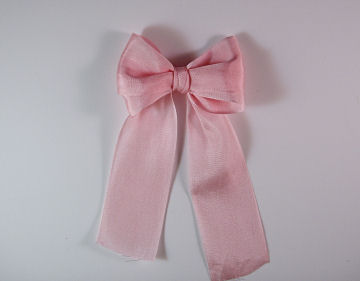
Slip the bow off the Bow Easy, turn it over and here you have a perfect bow with tails from behind. I still need to trim my tails.
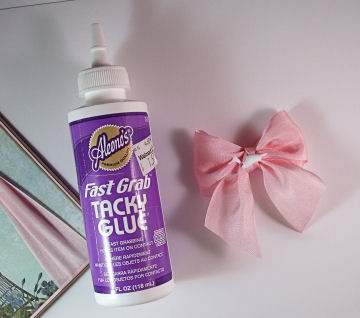
I adhere my bows to my cards with Aleene’s Fast Grab Tacky Glue from Wal-Mart. I’ve been very happy with it. I liberally apply glue to the bow back, then just stick it in place, holding the bow knot down firmly until it takes hold — several seconds. You can tell when it starts to stick. Once it sticks tight, it’ll never fall off!
And here we have our right card completed, just like the left that was done yesterday. See, I told you it was easy!
This bow is made exactly the same only I cut the tail ends into a V and merely glued the bow directly to my box top.
______________________________
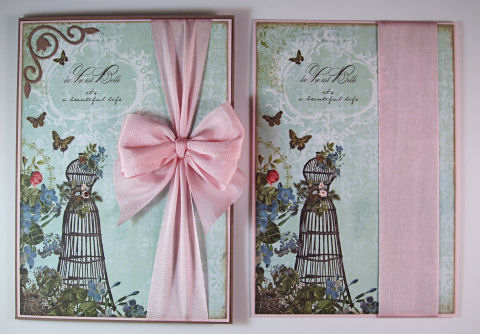
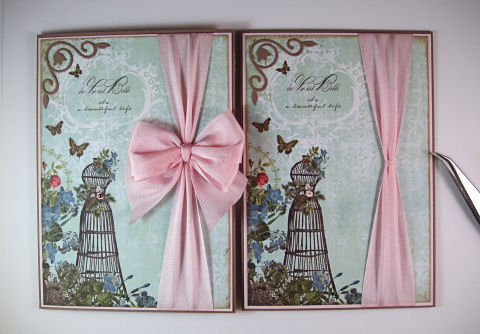
Here’s another way to do a bow. People often feel they don’t want to glue their bows on, and I was once that way, too, so I understand perfectly! They ask how they can prepare a bow on the Bow Easy with ribbon attached to the bow so they can attach it to the project.
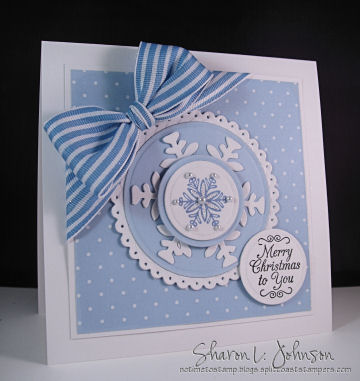
I made this card several months ago. (A Merry Little Christmas Set by JustRite) The 1.5″ Striped Grosgrain Ribbon Bow was made on the Bow Easy with long tails that are wrapped around the panel front and adhered with heavy double sided tape on the back of the panel. This is a quick and fun ribbon treatment!

Start with a longer piece of ribbon so you’ll end up with long tails. This time I used the largest legs on the Bow Easy and made a single bow. Since my ribbon was heavy, I was satisified with a single bow.
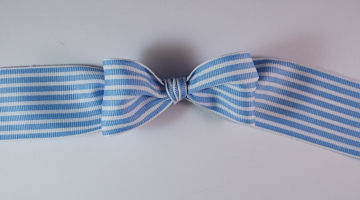
This is the bow made, with the long tails.
And here it is again, just wrapped around the corner of the panel, attached on the back of the panel with a heavy double sided tape. Easy and fun!
______________________________
And I have one more way for you to have a long length of ribbon on your bow that you can use to attach it to your card. My friend, Curt, created this nice photo tutorial showing you how he adds a ribbon into the knot area before he pulls the knot tight. His photos are nice and clear, so take a look. This step is near the end of his tutorial, and his tutorial is near the end of a Halloween post, so just keep scrolling down. Check out Curt’s Photo Tutorial here.
______________________________
Editing: Just spotted this *beyond cute* trio done by Michelle Woerner using the Stamp Simply Webster’s Pages Postcards from Paris Kit — check it out!!! It’ll make you SMILE!!!
Hope you found some of this information helpful! Thanks so much for stopping in! Next on the agenda is our weekly Stamp Simply Challenge — hope to see you then and wishing you a wonderful week!!!
25 responses so far


Sharon, your box, cards and bows are exquisite as always. I can not imaging bow making “without” the Bow Easy. It takes some time of just playing and practicing with the Boy Easy, but well worth your time. I know longer stress over my bows. TFS your gorgeous creations and making the Bow Easy available.
Love this info and I checked out Curt’s tutorial and it’s brilliant! Thanks Sharon! Hugs,
I absolutely found this information helpful!! You are no stranger to simple how to’s Sharon and this is just another one of your fabulous tutorials…Thank you for sharing!!
WAMA used to carry a box of 25 or 50…can’t recall which…of A2 white envies. Sometimes, I was able to find them in pastel colors. Then all of a sudden they just stopped. I have seen these invitation size, but never thought of making the card to fit the envie. Now I will and thanks so much for the box dimensions to fit that size. And your card….lovely as usual.
Sharon, thanks for sharing how you attached all those bows. they are so beautiful. I am going to have to play with my Bow Easy some more and start having better looking bows. love the box–gave me an idea of what to do for some friends as a gift. thanks.
Thank You Sharon for this awesome tutorial………..Also, I went to Wal-mart and did get the envelopes…they only had them in white and beige…..but I really did need them….. have made over 60 cards for kids…
I have never used the large ribbon on cards…….now I think I will give it a try too…
Thank you Again…….for all your hard work…..
Your designs are always over-the-top Sharon! Thank you so much for the tutorials, love the clip tip! Will definitely have to try that with my larger bows. Thanks for the link to Curt’s blog, loved his tip! Now, I need to start practicing so that my bows are are pretty as yours!
Sharon –
Thank you for taking the time to give us this great information. I love the box tutorial, the ribbon info! Just wonderful!
Elaine Allen
Thank you for the tutorial! It’s great and now I know how to make boxes.
Smiles~
Marilyn
Sharon thanks for sharing how you do your wondertful bows! The pink one with the gathered center is my fav! Off to practice. Have a great day.
Sharon-you are a wonderful teacher-I really appreciate the time you take to give these instructions. I have learned so much from you! I was wondering what size your cards are? in order to fit in the envelopes you bought from WalMart?
Sharon–disregard my question about the size of the cards! You told us in your previous post showing the cards that went in the box!Sorry!
Bless you, Sharon, for showing us all your “secrets”! I truly, truly, appreciate it, and I am going to check out Curt’s tutorial now!
WOW it is an awesome tool. Thanks for sharing with us
Sharon: I got my silk ribbon last nite and love all the colors – can’t wait to start making cards again (after income tax is finished). Just want to thank you for the instructions on the Bow Easy you referred me to – they were very easy to read and make bows. Love your work as usual. rosie
FAB projects and great info!!! You break it down so everything is simply explained!
Oh thank you whoever shared the clip idea on the bow easy with Sharon, and thank you, Sharon, for sharing it with us!
Your projects today are FAB-U-LOUS!!!!
Wow, the cards are beautiful and the tutorials very helpful.
Your tutorial is fabulous such great details. Looks like a Bow-Easy is in my future.
Thank you for showing all these neat tricks! I got my Bow Easy from you and some ribbons. I love it and it looks like I need to order more!
Thanks for the tutorial on the ribbon. Your bows are always so beautiful. And speaking of beautiful I love your sympathy card. I am keeping my fingers crossed for the blog candy!
Thanks for the tip on attaching the bow. I do a lot of scrapbooking and sometimes it is difficult to get the bows on correctly!
I love your tips and your work is magnificent!
I have cut some stiff card the same width as the ‘legs’ on the Bow Easy but longer and adhered it to the back. This really helps making bows with wider ribbon!
[…] look — just so pretty and vintage! The 1.25″ Wide Sapphire Silk ribbon treatment is my fun and flirty bow treatment that you can see here. Having a good pair of scissors that you keep JUST for ribbon allows you to always have nice, […]
[…] by JustRite - $24.95. I also used Pink 100% Silk Ribbon, and the bow was made on the Bow Easy. You can see a little *how-to* for this bow treatment here. Kaiser Rhinestones add a little glitz! When I need to make circles that are larger than my […]