Jul 10 2010
Stamp Simply Saturday HOP – Go-to Layouts
Today’s Stamp Simply Saturday HOP will feature some of our favorite Go-to Layouts. We all have them and a few of the Stamp Simply Ribbon Store DT girls and I would like to share ours with you. Take a look at my completed cards first, then we’ll back track:
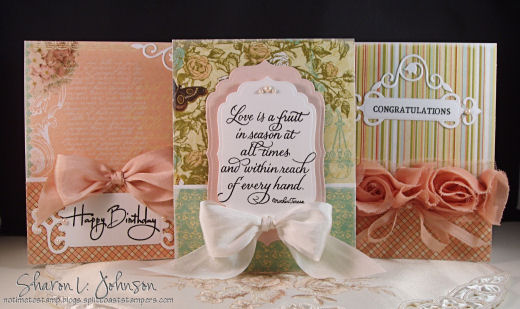
All three cards have the exact same base, which is my favorite Go-to Layout that I use time and time again. In fact, please don’t scroll back and check because sometimes I feel it’s the ONLY layout I use! LOL!!!! Here’s how I start:
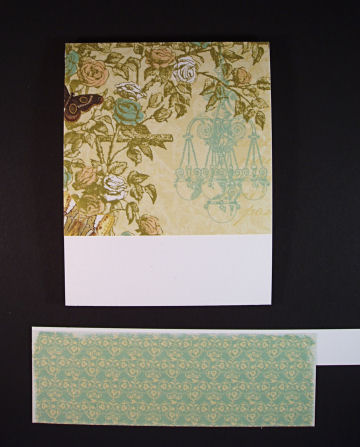
It’s a top fold card, A2 sized. Cut paper 11 x 4.25″ and score at 5.5″. Select 2 coordinating designer papers. The top piece is adhered first — it is cut 4″ high. The bottom piece is 2″ high. Cut a solid strip of cardstock 3/4″ wide and adhere it to the back of the DP piece as shown. For lack of better terminology I refer to this as my strip of piping (a sewing term). I like the crisp separation it makes between the 2 designer papers.
TIP: People always ask me how I cut things so exact that they fit so perfectly. Well, in this case, I don’t. My top piece of DP was cut 4″ high, but it was left the full 6″ wide as the sheet came. Tape is adhered to the card base, the patterned paper is placed on top, lining up the top and left edges, THEN I go to the paper cutter and cut off the excess on the right side. You can see what I mean on the 2″ bottom piece that is not yet adhered. I’ll adhere it as shown, then chop off the excess that’ll be hanging off on the right side. Easy, peasy and perfect results EVERY time!

This is the trio of card bases I made. I LOVE to make these bases. Sometimes when I feel I *should* be doing some stamping, but don’t feel overly creative or a little on the tired side, I just make up some bases like this. They are so easy to do and SO nice to have on hand when you need to whip up a fast card!!! All papers used on this post are from the Webster’s Pages 6×6 Combo Pack – Lullaby Lane/Lifes’ Portrait - $5.95. LOVELY papers! They can be seen here along with other papers I carry.
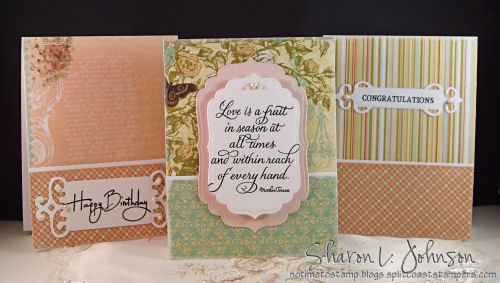
Adding sentiments is my next step. Ink used is my FAV for crisp images – VersaFine Onyx Black. All sentiments are from clear sets by Wordsworth and all cutting is with Spellbinders dies. Happy Birthday is from Everyday Greetings, cut with Fancy Tags. The quote by Mother Teresa is from Women’s Collection, cut with Labels Four Nesties. Congratulations is from Rose Border, cut with Fancy Tags. Kaiser Pearls in Blush were added to all sentiment die cuts.
All Wordsworth sets I have in stock can be seen here.
All Spellbinders dies I have in stock can be seen here.
And my last step is to trim them all up with some Silk Ribbon. All bows are made on the Bow Easy. And after the ribbon was added I went back and added Vintage Dies by Cuttlebug to two of the cards — just because they needed it!

Quite simple, as you can see. This beautiful paper begs to be seen, meaning we can create very simple cards, letting the paper shine through and do much of the work for us. Gotta love that!
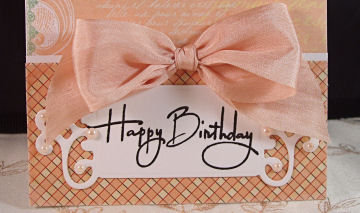
This silk ribbon is Champagne and the Kaiser Pearls added to the Fancy Tag die cut add a little class.
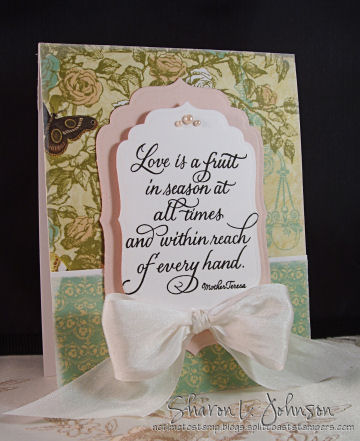
I’ve really been enjoying this quote by Mother Teresa, making for a versatile card. Again, once the card base is made, not much work to this one either. This is white silk ribbon.
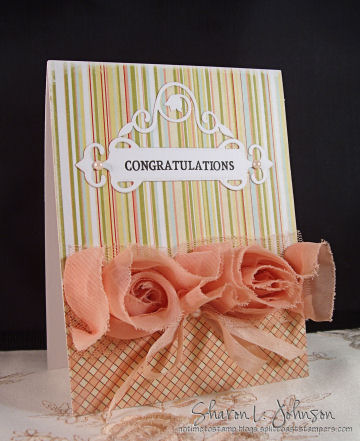
On this one I used the Webster’s Pages Bloomers Fabric Flowers that I have become so addicted to! They are adhered with a strip of Scor-Tape. If you’ve been following my posts of recent, you may remember 2 other cards with these peachy colored Bloomers on them. They all came from the same strip. I have one single rose left to use from this strip. Each strip on the card is 18″ long and even with my very liberal use of the Bloomers I got 4 cards out of this one strip. There are 5 strips per card.

As I said above, the Vintage Die addition was an afterthought. Once I thought I was done, it just needed it. Well, once the photos were all taken and done, I then realized that the Vintage Die cut needed pearls — so all other photos show it without pearls, but I went back and snapped this shot once the pearls were added. If only I knew what I was doing as I make these cards — LOL!!! — they just kind of evolve as I go — I am NOT a plan it totally ahead of time stamper — I just go with the flow and see what happens.
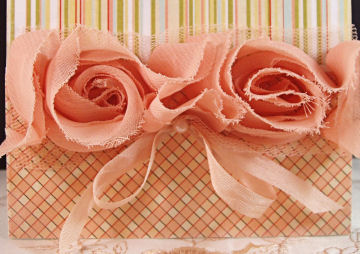
I just wanted to add a little silk under the Bloomers, so I made a bow of the 1/4″ Champagne Silk on the Bow Easy. A pearl trims up the center knot. And that’s about it for this project today!
Just email me at [email protected] to order, including your state/zip OR country.
___________________
The WINNER of the JustRite Catalog Blog Candy is Amy, #40 – here’s what she said:
I would SO love to have one of those catalogs as I have never seen one before. I use idea books to get my juices going and draw inspiration from them. As well, I would love to be able to purchase and mark off the new toyz and also circle up the new ones I would like.
Thank you for the chance to win.
~Amy Sabol~
HUGE CONGRATS Amy! Please get your mailing address to me. Thanks!
24 responses so far


Beautiful examples of your go-to sketch! Loving all three…so very appealing!!!
Gorgeous cards with your go-to sketch, Sharon! I love the papers and elegant details!
Sharon, absolutely gorgeous cards! I love the simplicity and the colors are just stunning.
These are all so gorgeous Sharon, I love that paper, as well as the ribbon. You’re such an enabler, now I want it all . . . LOL! Great layouts, love it all!
Ohhh Sharon, how beautiful. I am beginning to see that sometimes a simpler card can be more elegant. I love Webster’s Pages and the ribbon sets everything off perfectly. Thanks so much for sharing Sharon, your work is always stunning!
All the cards are just gorgeous and so inspiring. I just love the colors, layout, and the soft colors with all the beautiful ribbon.
Beautiful, fast, simple layouts! I’ve always loved your cards, I did notice you do this alot but hadn’t noticed if all of them over the years used the same layout : ) Whatever works, at least you’re crafting and stamping. The end result has always been beautiful! Thanks for sharing this, it’s inspiring me!
Hello my friend! Long time no visit … sorry! Your cards are gorgeous as always and I am still always in AWE of your techniques … so easy but so perfect!! I hope you are doing well and the rest of your family as well! It’s been a crazy, hot summer here in Ohio so far but we’re doing well! Take care and keep those beautiful creations coming … you are such an inspiration!
LOVE the new header Sharon!!! Just beautiful!
Thanks for the details on your go-to layout — love it! I have lots of designer paper waiting to be used so have bookmarked this for the future.
WOW! Thanks so much for this idea. I can’t hardly wait to get started.
I dont comment- but check your blog every day! Thank you for this simple “go-to” lo! I have made several cards with it already and will be posting them soon! OMG…I AM HOOKED on this! LOVE IT! ð
Thanks for reminding me that Simple is usually best. I get too carried away trying to CREATE and lose sight of the reason for the card. Thanks ladies. We appreciate ya’.
Stunning cards Sharon. I’m convinced, I have to have that Webster’s roses ribbon.
Testing time clock settings.
Simply Luscious!!!!!!! TFS
[…] super favorite of mine as it incorporates my favorite go-to layout. Sentiments are by Wordsworth. See more here, including some how-to’s and quick tips for this […]
Sharon, your work is absolutely beautiful and all inspiring. You have such a wonderful feel of paper and colours, and your sentiments are really heartfelt. Thanks so much for sharing your wonderful talent with us.
[…] White. Rhinestones are by Kaisercraft – Champagne. This is my favorite go-to layout – directions on an old post here. Just a closer look. Sentiment is from JustRite’s Happy Everything Tag Making Kit – a […]
[…] papers from the Butterfly Garden 6×6 pad. I chose a couple sheets and reverted to my favorite go-to layout. The bookmark was an unplanned bonus as when the leftovers fell from my paper cutter when I cut […]
[…] This older post shows you layer by layer HOW I create the cards, so maybe that will be useful to some. Hope so! […]
Dear Sharon~
It is October 15th, 2011 and you posted this link today. Thank you so much for doing so! I have not figured out how to let my beautiful papers show…if I always stamp over them with a solid cardstock. This is wonderful…thanks a million!
He IS Able!
Traci Starkweather
By the way…why would you want to change your layout every time you make a card? You have a beautiful layout that has stood the test of time. I believe we call that a “Classic.” And, there are beautiful classics…cameos being one.
Better to work efficiently. Especially with such gorgeous results. Thanks for bringing this link out again. I copied it down, and I now have a “Go to.” Thanks for sharing your knowledge.
He IS Able!
Traci Starkweather
[…] paper exposing very little, then attach to the card front. If you’d like a better visual, this is a 2 1/2 year old post where I show how I do this. Now remember, this link goes to a very OLD post, so some of the items shown there are no longer […]