Oct 23 2010
Yuletide Tall Box
As promised, I’m back with the cutting and scoring measurements for the tall slender boxes I so love. Though I have made many of these boxes over the years, I do not intend in any way to take credit for their design. I spotted these tall slender boxes in a book I picked up at Michaels quite a few years ago, and I do believe it is still on the shelves, at least at our local store. It is entitled Great Gift Ideas Using Scrapbook Materials, A Tweety Jill Publication by Jill Haglund. The boxes that captured my heart were designed and made by Kelly Lunceford, known to many of you as atomicbutterfly. Kelly is an amazing designer who has inspired me far more than once! You can check out her work on her blog, Flutter by atomicbutterfly. She has an AMAZING baby shower post up right now (dated October 18, 2010). And if you’ve never seen her BANNERS, you truly MUST. She has a link to them in her baby shower post. TRULY an amazing designer. Thank you, Kelly, for all the wonderful inspiration you so generously share!
Here’s the box I just made using the Yuletide 12 x 12 pad by K & Company, and I made a little gift tag to go along with:
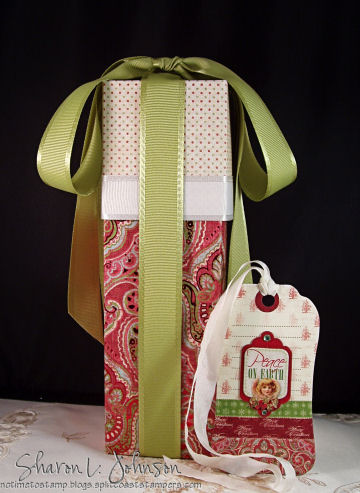
This is another *no stamp* project that goes together SO quickly. The box is simply scoring and taping, then finished off with ribbon. I used the 1″ Grosgrain with Satin Edges — Ivory is adhered to the bottom of the box top and the Celery is used as the final accent and bow on the box.
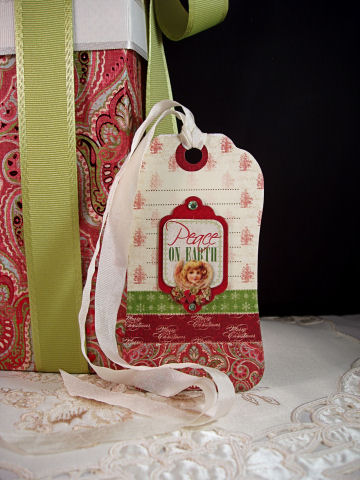
The tag is merely pulled from the Tag Pad (24 tags per pad). I then added a Chipboard Sticker, some Kaiser Rhinestones and tied on some 1/2″ Wrinkled Ribbon and that was it! These sweet little tags are a HUGE hit with me this season!
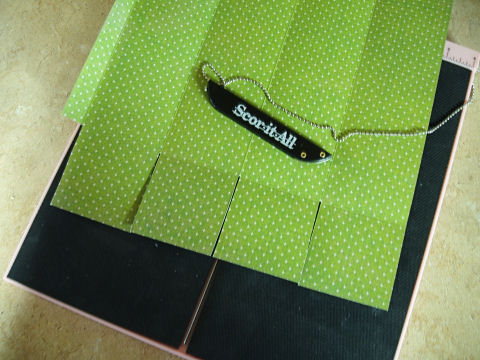
My preferred scoring tool for making boxes is the full sized Scor-It. With the centered measuring ruler on top, I can easily score anywhere I need to, easily seeing the lines on the well-marked ruler, making paper placement easy at any interval required.
For these tall boxes you’ll need 12 x 12 designer paper, I full sheet for the box bottom and 1/2 sheet for the box top.
Box Bottom, using a full 12 x 12″ sheet:
Score at 2 3/4″, repeating at 2 3/4″ intervals until you have 4 score lines
You’ll be left with about a 1″ tab, used to adhere the box together.
Turn the paper and score once at 2 3/4″ to create the folds for the box bottom.
Cut your slits as you would for any box, removing the narrow piece under the tab (see photo). When cutting your slits, I find the box folds together much easier if you actually cut out a narrow strip, rather than just slice up with your scissors. I remove about the width of my score line.
Using Scor-Tape, fold and adhere box bottom and sides together.
Box Top, using a 6 x 12″ piece:
The main thing to realize here is that you need your box top to be just slightly larger than your box bottom. If they are the same, it’ll be very difficult to get the top on, and if you do get it on, the box underneath will buckle on you. So follow the instructions above for the box top, only score every 2 7/8″ rather than 2 3/4″. That’ll make your box top 1/8″ larger than the bottom and it’ll slip on and off so easily for you! Remember, as you score for the fold, make that score line at 2 7/8″ as well.
To create boxes in graduated sizes:
I often do these boxes in trios, making the largest using the measurements above. For smaller boxes I usually DECREASE the box bottom by 2″ for each smaller size, and the box top by about 1/2″ or so.
You can see my recent Yuletide DUO here.
You can see one I did here as part of a Stampin’ UP ensemble from years ago.
And that about does it for today’s project. The Yuletide coordinates used today are all available individually or in KIT form.
All items available at The Stamp Simply Ribbon Store.
You can view all KITS available here.
You can view all ribbons available here.
You can view individual paper pads, supplies and JustRite stamps here.
You can view Verve stamps here.
You can view Wordsworth stamps here.
You can view all tools used here.
Thank you so much for stopping in again! I do so appreciate all your visits!!! Many thanks and hope to be back again real soon! Have a wonderful Sunday!
8 responses so far


I love these tall boxes. I am going to try making a few. I just need to figure out what to fill them with ð So classy!
A gorgeous box and tag Sharon! I still have the box you sent me, together with the accompanying pieces . . . I love them just as much today as I did when I first saw them!
Thanks so much for the tutorial!
Thanks again Sharon for a lovely project. Special thanks for the link to the Kelly site and the beautiful banners. I can see them in my future.
What a wonderful box and so simple actually… when they get too involved…pretty or not I dont EVEN attempt them!!! This one is in my print outs “to do” pile!!!
Gorgeous box, Sharon…love that May Arts ribbon!! Thanks so much for the dimensions!!
I have tried to email you but for some reason it will not work. I was wondering if I could still purchase any of the kits? If you could please email me and let me know. Thank you so much!!
Do you know if there is a dye or form anywhere that a person can make a box for giving a few hand make cards? To hold 3 or 4 cards. (Quarter sheet size with embellilshments, bows etc.)
Thanks for your time.
Ruth Carelli