Nov 19 2011
Ribbon Inspiration/Stamp Simply Style – The Tin Can
Welcome! Today we are working with recycling the tin can — whether you call it altering, decorating, recycling, repurposing or upscaling — it’s all about reusing some of those very versatile tin cans that are all around us. Remember the pencil cups we made from tin cans in grade school? Same idea — just a little more grown up!
My project for today uses 2 cans that I have saved:
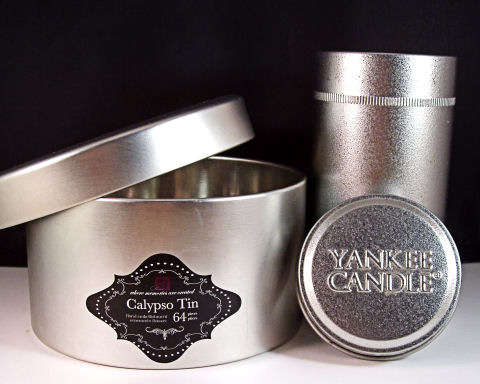
The larger can on the left was filled with Primas that I picked up at a craft superstore a few years ago and the taller, narrower can on the right by Yankee Candle contained long wooden matches. Once the matches were gone, of course I had to save the can!
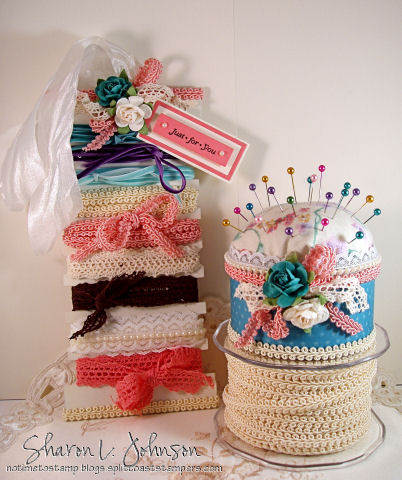
I didn’t use either lid for today’s project but I did save them as I do have ideas for them to add to this project at another time. And here’s what I made:

A craft table gift set for a crafty friend. I realize a lot of people likely don’t use common pins as much as I do, but I DO use them all the time. I use them on ribbon spools to keep the ribbon end in place, I used them to pick up and transfer rhinestones and I use them to poke out those tiny little pieces that get left in the Spellbinders dies on the more ornate designs. I have many other pin cushions, but they are all very low and are always getting buried under my messes, so I thought having a higher pin cushion would make it easier to find (at least in my workspace – LOL!).
The Prima tin is filled back up with Primas, but not the ones that came in it. I have a ton of opened Prima packages and they seem to be spilling all over my work space, so why not gather them up and keep them all in a pretty tin?
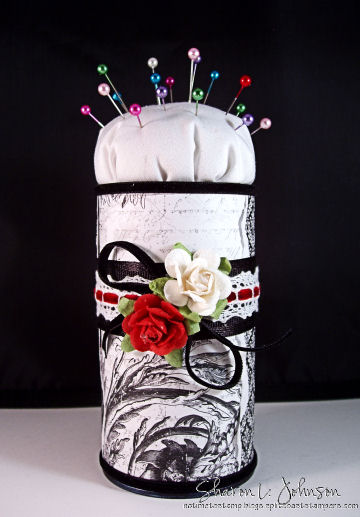
Here’s the pin cushion. To make the pin cushion part on top I wadded up a small handful of polyester fiberill, centered it over a square of white fabric scrap (neatly ironed), and pulled it up and tied it off with a heavy rubber band. It needs a little adjusting to get the gathers even, then just stuff it into the can, hiding the rubber band and fabric ends, using a little glue around the can edges.
The pins with the pretty colored heads are Dritz 120 Long Pearlized Pins.
The view below more clearly shows the ribbons used as well as my torn edge paper. Can you see the jagged, torn edge? The paper used is Bo Bunny’s Enchanted — LOVE this classic black and white pad. It’s a 6×6 pad that I used and the sheets weren’t long enough to go around either of the cans, so it worked well to piece several sheets around each can, tearing the edges to further enhance the vintage look of the paper — I think it worked great, looks good and it was easy to do!

I used Scor Tape to adhere all the paper and ribbon on these cans — in 1/2″, 1/4″ and 1/8″ inch. I ran the 1/2″ tape around the cans on the top, bottom and middle of the taller can. Once my paper was cut it was easy to wrap it around the can.
1/8″ Scor Tape was wrapped around the top and bottom to secure the 1/8″ Black Velvet. That same Black Velvet was used for the bow beneath the flowers.
I ran 1/2″ Scor Tape around the center of the can and then adhered the strip of 1″ Black Grosgrain with Satin Edges.
1/4″ Scor Tape was then run on top of the grosgrain to hold on my next layer — which is 5/8″ White Crochet Lace with 1/8″ Red Velvet run through the center.

This can was made in the exact same way. The Primas used are Fairytale Roses in French White and Coral.
The Primas inside the can are a variety from packs I’ve opened for my own use – they can all be seen here.
Primas are also available in coordinated embellishment kits called Stamp Simply Embellishment Kits.
This Prima tin is at an odd angle, but I was trying to make the torn edge as visible as possible.
I use Aleene’s glues from superstores or craft stores to adhere the roses.
One thing to note, before covering the cans with any paper, I did color the very bottom rim and top rim of each can black, just in case my job of covering with paper and ribbon wasn’t perfect, I didn’t want any shiny tin visible. I used a Black Copic and it covered well, but took forever to dry. I believe in times past I’ve used a Sharpie with good results and no drying issues.
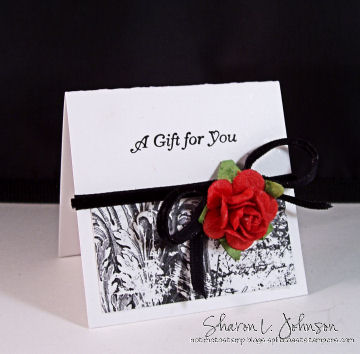
This little gift card is 2.5 x 2.5″. No reason — I just grabbed a scrap of white and that’s how big it was. It’s a perfect size for my mini sentiment. I am REALLY enjoying all these mini sentiments by JustRite. They are “just right” for small projects such as this and they make the most wonderful little tags as well. I find so many uses for them. I believe the sentiment I used was from Christmas Mini Sentiments, but I’ll link them all right here. The stamp sets that pop up in this link are there because they are sized to accept these mini sentiments. As you’ll note, many of them are reduced in price.
All items used are available at The Stamp Simply Ribbon Store, as linked above.
____________________
Once we are talking about tin can projects, let me take the liberty of showing you some other tin cans I’ve done over the years.

I made this to hold a Christmas gift 2 years ago. The can used was one of those cylindrical cookie tins — those long stick type cookies — the proper name escapes me at moment — hope you know what I mean.
The ribbon used was Velvet in 3/4″ and 3/8″ and Grosgrain Stripes in 1.5″ and 3/8″.
The lace was vintage and the stamps are older JustRite stamps.
The paper is Kaisercraft’s Dear Santa in 12 x 12. I do have this in stock (and on sale) in 6×6. Actually, I do have some sheets of this in 12 x 12, but it never got entered into the store as I don’t have very much. But if anyone wants paper from this collection in 12 x 12, shoot me an email ([email protected]) and I’ll see what I have left.

This tin is about 3 years old and was Valentine themed, again using retired JustRite stamps.
The ribbon used is 1.5″ Gingham and 3/8″ Dotted Sheer along with 3/8″ Velvet.
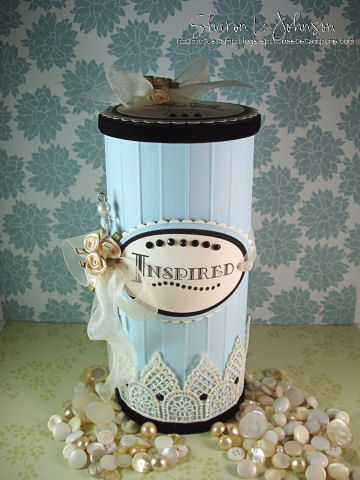
This is also several years old and I made it as a button box, of sorts. The unique thing here is that I scored the cardstock before wrapping it around the can. Actually, the same thing is done on the red can above, but you can’t see it as well in that color. Doesn’t it add nice texture? I used the Scor-it Score Board to score my cardstock. The Scor-It creates a nice, deep score line, making it more pronounced and noticeable on this type of project when you are after an embossed effect.
This can actually was featured in a magazine a few years ago — and of course I can’t remember which one off hand. The editor wanted the word Inspired changed to the word Bliss, so I did make that change and that altered version was published. My original version is shown above.
The stamp is again a retired JustRite stamp and the ribbon used is Black Velvet and Ivory 1″ Sheer. I had that pretty lace and not sure where it came from.
And the last one I have to show you is actually going to be our
Blog Candy for this week:
This pin cushion was made from a can similar to a tuna can and all the ribbon is on an altered MDF Ribbon Reel by Kaisercraft. The winner will receive the ribbon reel filled with ribbon and the pin cushion. The spool of trim is NOT included — it’s just a photo prop.
Ribbon on the reel includes 1/8″ Velvet, Ringlet Trim, 5/8″ Crochet Lace and Lace with Pearl Center.
This is a Mystery Blog Candy, meaning the winner will be drawn from comments on one of todays participating blogs, so leaving a comment on each blog will greatly increase your chances of winning, but only one comment per blog, please. The winner will be selected at 6 p.m. Eastern time on Tuesday, November 22 and will be posted here on my blog on Wednesday.
You must check back to claim your prize if you are the lucky winner!
Good luck!
__________
Now please check out the AMAZING projects The Stamp Simply Ribbon Store Design Team has created for today’s challenge — I KNOW you’ll be pleased:
Sharon Johnson – The Stamp Simply Ribbon Store (you are here)
____________________
Thank you so much for stopping in today, it is SO much appreciated by all of us. We love knowing you were here and reading your comments! Thank you SO much.
Please join The Stamp Simply Ribbon Store on Facebook for regular updates.
I wish you all a wonderful weekend ahead.
See you soon!
52 responses so far


Your tin can projects (todays and years past) are stunning! Great gift ideas now that the holidays are upon us.
I’ve always loved your can projects…the black, white, and red set you’ve created for this challenge are so lovely and elegant!
I love the black and white with red accent—very chic!! I also loved the can with the word inspire on it—-the scoring lines just give it the special touch!!! Thanks for sharing!
oh my goodness. I love reading your blog while I eat my breakfast. It’s such a nice combination.
My favorite tin is the one with the embossed the card stock. I love those colors together.
Thanks for sharing my breakfast with me.
Such wonderful ideas! And such pretty paper. Thanks for the inspiration.
I love your tins! Making them a set was a great idea. I love to decorate and embellish those pop top cans, which I open from the bottom (and use the contents), then stuff with my gift. Then the pop top still works! Cool right? The best ones are from condensed milk as they have no yucky smell later.
As usual, Sharon, these are fabulous! The papers and ribbons are wonderful and really make these sing! Love the idea of scoring the card stock first. Thanks for sharing your talent and inspiring us all.
Very pretty decorated cans and useful too!
Oh if ever a week I wanted to win it is this one!!! I would be so very honored to have a pin cushion YOU made! I LOVE pin cushions and use pins all the time – I am a seamstress and quilter. I am definitely going to make your table gift because I have been saving some cans “for the right” project and this is it!!!
All of you altered tins are absolutely gorgeous, Sharon! I love the striking black and white and red combo on today’s beautiful gift set! Wonderful details!
I love these tins and really appreciate the tips on coloring the rims and what adhesive to use:)
http://visionsofpaper.blogspot.com/
Beautiful work and great gift idea.
Great idea on the taller pin cushion. I am going to try one of those as I usually have pins running around on my desk or have to get up and go to the sewing area to get one. tfs
What beautiful pin cushions. It would be fun to have one for myself on my crafting table.
So very pretty! I would love to make my mother a pin cushion that beautiful for her sewing room, but we all have some that my grandmother made for us!
Hi Sharon.. These are so clever.. things I would not have thought of .. great inspiration.. thanks
Lovely set, Sharon! Love that BoBunny paper too! Hope you have a great weekend!
Lovely projects. All of your tins present and former are great. Thanks for the chance to win.
Happy Thanksgiving,
Peggy
Wow! I just love all the cans and what you created with them, you have given me so many ideas, thank you for creating and sharing them.
those are wonderful, gives me lots of ideas!
As usual, you’ve out done yourself again, Sharon. Love each and everyone of your cans. Gives me an idea of how to send my kids’ honeycomb ornaments I am making for them.
Gorgeous as always.
Wow! Sharon, you have some stunning projects here! I love to decorate my craft item containers also. I really love the black and white pin cushion and flower can. Such beautiful blooms! The idea of a taller pin cushion is a great idea…mine fall between the cushions on the sofa.
I love how the embossed card stock looks on the can…beautiful! The “Dear Santa” set is my favorite set! I love the striped ribbon. The lid is gorgeous with detail…and I love how there is a crocheted flower (I belive) with the bow. It is just wonderful. The papers are beautiful together!
I have a “container” collection. Perhaps I will give some gifts in some of them…redecorated, of course! I don’t know how you cut the top of a can…(like opening the cat food or tuna can with a can opener) so that it is smooth, and so no one can cut their finger or get a metal splinter off of it. I would love to know, if anyone knows.
Beautiful projects~
He IS Able!
Traci S.
Hi Sharon! These are wonderful! So classy and elegant, especially the black, white, and red one. All of your projects are great inspiration for us. Thanks so much for sharing. Hope you have a lovely Thanksgiving too.
What beautiful ideas — and in time for the holidays! I am a big recycler and now know what to do with all those tins I saved.
Both your projects are so beautiful and elegant. The person receiving these gifts is so lucky!!! Thanks for all you share and for the chance to win.
Well now I know what to do with those empty tins I have been saving! I do have a few tins that have become faded over time as well and covering them is a great idea. The score lines in a couple of your past projects are not only attractive but a really clever solution for wrapping cardstock around something round without it getting a bunch of unwanted creases.
your projects are always so amazing!! today’s are no exception… just beautiful!
Just beautiful, Sharon. Who wudda thunk I’d like a pink cushion, but they remind me of my mom! ð
What lovely projects, so very creative. Wonderful use of containers too good to discard and all that lovely ribbon, oooooooh!
What great ideas with Christmas coming!! And a great way to recycle.
Such gorgeous tins! Love your dp combos and your wonderful creativity! Thank you for the chance to win!
Wow!!!! Love the idea of the tin cans and love the colors too! What a neat idea! Well, I’m off to find some tin cans here! Thank you for sharing this awesome idea with us all!
Great project,thanks!
so pretty- great ideas!
Wow! Love these decorated tins! The possibilities are endless! I especially like the personalized one.
Wow! I love all of the decorated tins but the first one is my favorite! Love all of the ribbon you used. These are great recycling projects!
WOW, Sharon, I am still, after all of these years, speechless over these absolutely wonderful recycled tin can projects you come up with. That blue one with the pearls was one of my all time favorites! Thanks for all of your wonderful inspiration! Hugs and blessings, Sabrina
What gorgeous projects! Love all the flowers and the sweet little card to go with it.
Thanks for sharing your 3 bonus projects – love seeing your work. Such beautiful ribbon in all of these.
Every time I pop over here – which has been daily, I find something wonderful you’ve made and then I have to go and buy those items. It started with your beautiful gold embossed cards and every day since, I have become an addict. Your projects shown today are beyond wonderful, Sharon. I guess I have to start saving my cans/containers to reuse. I love, love those pin cushions – mine is always buried and I can’t find it! As always, thanks for sharing!
Simply stunning!! The black and white with touch of red is beautiful! Had to laugh when I read the rationale for the tall pincushion – how true : ) Thanks for the chance to play!
That makes a really nice gift for a crafty friend! Pretty and useful too!
Very nice projects. Great gifts.
Tina
Ohhhh wow, these are gorgeous Sharon! The “Inspired” is my FAVE!!! Love the scoring work ð
Love the can projects. I’ve always loved red and black together.
Sharon, I am just in awe of all of these beautiful projects and your creativity in using tins!! WOW~! Love the
blog candy!
Such cute ideas to recyle the tin! Thanks for the great ideas!
Your tins are beautiful love the papers you chose so rich and elegant . The recipient will love this gift for sure. Thanks for sharing some tips on the adhesive you used.
Marilyn
Oh Sharon – Your projects are awesome as usual. Thanks for sharing and for the chance to win!
beautiful projects!
[…] is Day 3 of the 3-Day Sale, I have a pennant hanging to show you and we have a winner from last Saturday’s Ribbon Inspiration/Stamp Simply Style – The Tin Can. We all sure had a blast preparing those projects! Let’s start with our winner. This week […]
Is more easy for me write in spanish: tus proyectos son hermosos todos en general, no hay duda de que Dios bendijo tus manos con este don!