Dec 10 2011
Ribbon Inspiration/Stamp Simply Style – Holiday Decor
Welcome to another Saturday of Ribbon Inspiration/Stamp Simply Style. Today we are featuring Holiday Decor — I think you’ll LOVE what the design team girls have come up with today. Their projects are fabulous items that you can make for your own home or to give as treasured gifts. The links to their blogs will be listed at the end of this post. Here’s my Holiday Decor project:
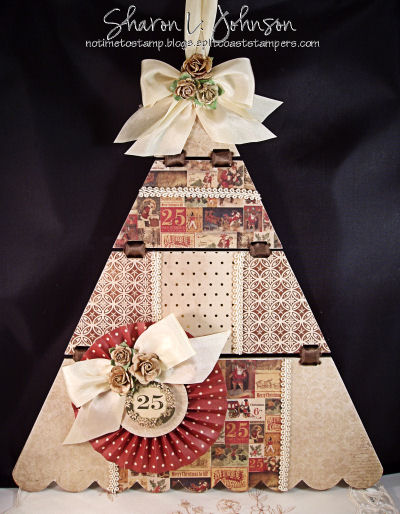
I made this Christmas tree using Kaisercrafts’s Scalloped Hanging Tree made of MDF board. I LOVE all the MDF board alterables by Kaisercraft. They are very good quality, sturdy, easy to work with and very reasonably priced (PLUS they are all on sale right now!). This tree measures about 12″ wide x about 11″ high, plus another few inches for the ribbon hanger.
All paper used on this project is from Kaisercraft’s December 25th 6.5 x 6.5″ pad. As you can see, the 6.5″ sheets were not large enough to cover the larger pieces of the tree, so I had to piece the paper. This was a perfect opportunity to use that to my advantange. I’ll give you a step-by-step in just a bit.
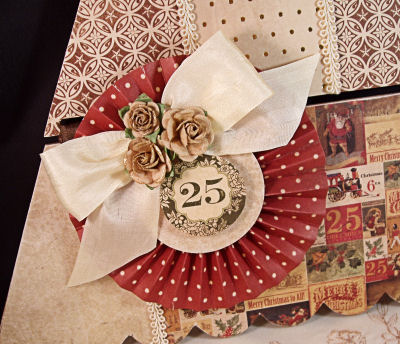
I wanted to use a fan fold medallion as my focal image. If you’ve never done one of these, I suggest you try. They are TOTALLY fun to do! You can find a tutorial here on SCS. The size I typically make calls for paper strips cut 1.5″ wide by 12″ long, giving you about a 3″ medallion (shown on this project using the Pennant MDF). The medallion on today’s project is larger (about 4″ wide). I cut my paper strips 2″ wide by about 16 – 17″ long. When you go wider, you need to go longer or it won’t work. And since I was using a 6.5″ pad, I cut 2 1/2 strips. I scored each strip every 1/4″ and after scoring adhered them together to make one long pleated strip. Again, if you’ve never done this, refer to the tutorial linked above and you will see what I mean.
A score board is essential to create these medallions, and I have them all on sale for this post. You can see the Scor-It boards here, and the Scor Pal boards here.
The 25 is a die cut punch out from the December 25th pad, the bow is 1.25″ Silk ribbon in ivory, made on the smallest legs of the BIGGER Bow Easy, and the roses are Prima Avon Roses (Romantique). These are beautiful, petite gilded roses, 24 per pack. 3D Foam Squares were used to pop up the 25 as well as to attach the medallion to the tree.
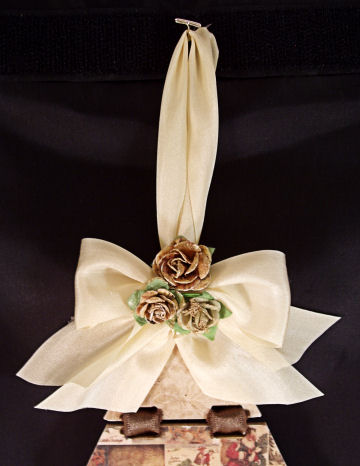
The hanger was made using more of the 1.25″ Silk ribbon. There is a small hole on the top of the tree. I created a loop of silk and ran it from the back of the tree to the front and knotted it. I didn’t want the knot on the back as it would make a lump preventing the tree from laying flush against the wall. So my knot, with tails, was on the front. To disguise the knot I made another silk bow, this time on the largest legs of the Original Bow Easy, and glued it over the knot. I then adhered more of the Avon Roses over the bow. I use Aleene’s glues for adhering the bows and flowers. You have to hold them in place for a bit, but once they *take*, they are on for good!
Now, if you’ve never covered MDF board or chipboard before, here’s a quick how-to. And please pardon the quality of these photos. They were just snapped quickly as I worked without proper lighting, but I think you’ll get the idea.

First I selected all my sheets and planned what goes where — for me that’s the MOST fun part! I traced my MDF pieces onto the paper and cut out with scissors. If you’re cutting isn’t perfect, it’s no problem because you come back and sand the edges so you can clean it all up then.
On this particular tree there were a lot of slotted holes for the ribbon to run through to connect the pieces — see them? To get them perfect I used my SU slot punch shown in photo — not sure if that’s the proper name for it. Luck was with me and it was nearly a perfect match. Once the pieces were cut to shape, then I traced those slotted holes onto my paper and cut them with the slot punch before adhering the paper. It was super easy with an excellent result.
The paper is adhered to the MDF board with Mod Podge, using a foam brush. Press the paper down well and let dry. It doesn’t take too terribly long at all. Then sand all the edges. This serves to get rid of any excess paper from a poor cut and it melds the paper right into the board, or so it seems, giving you a very finished and professional result. To sand I like to use one of those multi-colored, multi-grit nail files you can find near the nail polishes. That gives you something substantial to hold on to and it offers many different grits of paper. Just my preference. You can use any type of sanding tool or paper you prefer. There are those white sanding blocks as well, which I have also used.

Once all the paper is adhered and sanded, on this particular tree I needed to make my little ribbon hinges to join the pieces. This was easily accomplished with the use of 1/2″ Scor Tape. I cut all my little ribbon pieces about 4″ long, ran them through the slots, taped the bottom piece down with the Scor Tape, applied more Scor Tape to the TOP of that lower ribbon so I could lay my upper ribbon on top of it. Very easy and totally strong and secure. Gotta love that Scor Tape.
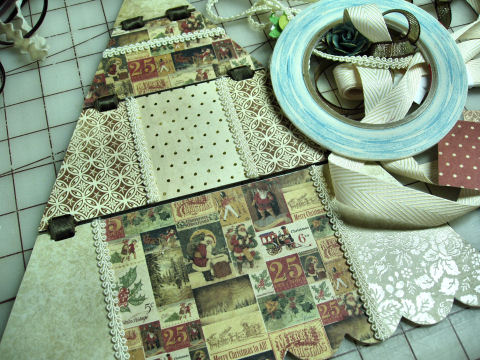
Next I flipped my tree back over to the right side to apply the 1/4″ Ringlet Trim to cover the seams. I just ran 1/8″ Scor Tape where I wanted to place my Ringlet Trim — quick and easy.

And here’s a more clear photo of the ribbon hinges and the applied 1/4 Ringlet Trim. I used 5/8″ Scalloped Satin in Brown for my ribbon hinges. The width was right, the color was right, the style was right and it was strong enough for the job.
And that’ll do it for this project today.
All items used are available at The Stamp Simply Ribbon Store, as linked above.
____________________
On Sale for your Holiday Decor Projects
ALL Kaisercraft MDF board alterables are marked down 10%
Please note: MDF Alterables will be removed from store once sold out, so if you aren’t finding something, that’s why. So sorry.
All Scor Boards are marked down 15% – Scor-It, Scor Pal
I used the Scor-It Mini Board to create my fan fold medallion today. It’s a great board for cards and smaller projects. It comes nicely packaged in a box so it’s a GREAT gift idea!
Remember there is a lot of the JustRite on sale – ALL Original Ribbed and some Cling and Clear as well.
____________________
Blog Candy
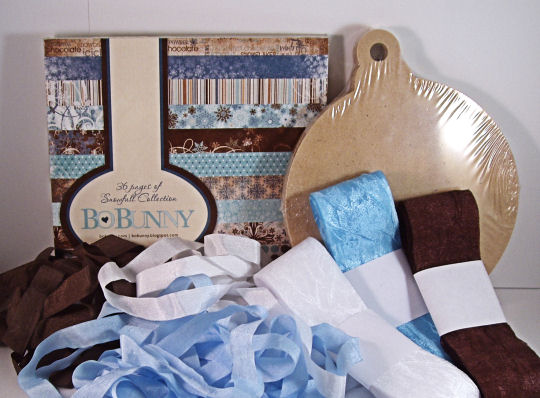
This is today’s Blog Candy.
6×6 Snowfall pad by Bo Bunny (this pad sold out instantly when I first got it and now I’m happy to have it back in stock), 1 package of Kaisercraft MDF Bauble Ornaments, May Arts 1/2″ Wrinked Ribbon and 1.5″ Crushed Silky Ribbon in blues, browns and whites.
This is a Mystery Blog Candy, meaning the winner will be drawn from comments on one of todays participating blogs, so leaving a comment on each blog will greatly increase your chances of winning, but only one comment per blog, please. The winner will be selected at 6 p.m. Eastern time on Tuesday, December 13 and will be posted here on my blog on Wednesday.
You must check back to claim your prize if you are the lucky winner!
Good luck!
____________________
Please check out all the wonderful Holiday Decor projects today on the blogs of these great designers:
Sharon Johnson – The Stamp Simply Ribbon Store (you are here)
____________________
Thank you SO much for stopping in today and joining us. We love having you come to play along with us.
Wishing you all a wonderful, crafty weekend!
See you real soon.
59 responses so far


This is beautiful – love these colors and how you dressed it up! Thanks for sharing all of the details! Thanks for a chance to play!
I just love this collection and the ribbons you’ve matched up with it!
Love the Christmas Tree. Love the Bo Bunny paper and stuff. All the girls’ projects are gorgeous!
Thanks for the tutorial on the tree! I was just looking in the SS ribbon store at the alterables and wondering what I would do with them and this really helped. I have that BoBunny pad, the papers in it are gorgeous! Would love to have more.
Sooooooooo, so pretty! I love how the tree is “hinged”. Your tree topper ribbon and roses bow is the perfect touch. Sharon you are amazingly talented! Is it terrible to hope I win this weeks give away?!? I love those colors of ribbon!
Wow! What a fantastic piece and your tutorial was so easy to read and understand! I like the written tutorials better than the videos, so, thank you, Sharon!! Your tree turned out beautifully. I can’t do without my bow easy or scoring board either!
Oh what a lovely love the papers and the tutorial on how you made the hinges with ribbon .The rosette and flowers give it that extra touch. Thanks for a chance to win some awesome blog candy .Gotta love the Bo-Bunny collection and the ribbon matches perfectly.
Marilyn
Barb, this is beautiful!! I love the shades of browns and cream with a hint of the dark red! Another version of Christmas colors I love! Someday, a bigger house and more than one tree and more than one color scheme…… Thanks so much for sharing!!
Your tree is beautiful. The tutorial is very helpful and clear. I LOVE the 1/8″ score tape. It is one of the most important things in my craft room. Thanks for the inspiration.
I’m sorry Sharon—-I was thinking I was heading to Barb’s blog next and got a head of myself and addressed your comment with her name! Please, forgive me.
This is a terrific project. You are correct, everything goes together so well. I just received some of the burgundy soutache and it is stunning so I ordered more in each color, LOL.
The way you used the ribbon to attach the tree parts is genius! I thought they were metal pieces at first sight, imagine my excitement when I discovered it was ribbon. Thank you for sharing the tutorial and offering a wonderful prize.
Thanks for the great directions on making your pretty tree. Appreciate all the details and where to purchase items. Need to look for one of those nail files while at Wal-Mart today. tfs
wowza!!! what a gorgeous piece of christmas decor!!
What a lovely hanging tree! I’ve never seen anything like it, and your tutorial really shows how easily it goes together with the right tools! I LOVE the BoBunny paper pad with the matching ribbons! It’s a gorgeous combination of beautiful color! Thanks for always sharing these wonderful crafts you make!
Great tree! Lovely selection for the ribbon prize package of the week! Love the blue, brown and white combo! Hoping to win:)
Love how you dressed up the hanging tree, Sharon. It’s beautiful! And the blog candy has my imagination already at work. Lovely candy! I love the colours too.
The colors are great and this would be the perfect decoration for an office space. The blog candy is wonderful; would love to win it!
This is totally cool!!
Love the tree you made and that paper is to die for! I got some of it at my LSS but would always take more LOL! Love blue and brown together.
Everything is simply beautiful. The paper, ribbon etc. is always coordinated correctly. Love all of your projects.
OH this is just a stunner Sharon! Love how you have paper pieced this and the ribbon on it, just gorgeous! And I am so loving that BoBunny kit…can we buy it? LOL!
Love the heirloom quality you crafted into this gorgeous Christmas tree…absolute perfection!!!!!
Your Christmas tree is gorgeous and so do-able! And the Bo Bunny kit is gorgeous!
Absolutely stunning project Sharon. You always inspire me and I’m going to give this a try.
Hi Sharon.
I have seen other projects you have made with the Bo Bunny Snowfall paper. This is truly a gorgeous array of colour and design. There are so many options for mixing and matching. I really like the choices you have made today. As always, well done.
I love looking at all your projects. Thanks for all the inspiration this year.
Thanks for a chance to win
Debbie p
Gorgeous project, Sharon! I love the papers and embellishments you used on your hanging tree! Thanks for the inspiration!
cool hinging. I love your adorable tree and the embellishments or so very cute!
Very nice project, and I like the “quilted” look of the different papers. Your bows are always beautiful!
Sharon
this is a beautiful tree love these papers and your ribbons and embellishments are gorgeous TFS
I love the inspiration!
Love the tree!
Hi Sharon! Oh, your Christmas tree is lovely! I like all the patterns used and how you connected them together with ribbon. You always give us the very best ideas! Thanks so much for all your inspiration.
Kelly
Very, very nice. You are so creative and provide inspiration to all.
Sharon
The tutorial is my Christmas present from you. Kaisercraft mds is the best. So is their paper is just wonderful. I like the size of this project. Thank you.
Sharon L
Great idea to piece the paper on the tree. And, thanks for the dimensions for the pleated flower embellishment. I am never sure what size to cut the paper. Great project!!
This is just gorgeous!! Thanks for sharing and the great candy for the chance to win!!
Wonderful tree. I really like your paper piecing.
Sharon,
That is a beautiful Tree, and such a wonderful project.!! I absolutely LOVE that Bo Bunny line, oh so pretty. You always make such pretty things. just love your work.
Thanks much for your inspiration, and also for a chance at your lovely blog candy.
Happy Holidays to you and your family.
Hugs
Donna
Very pretty. Nice projects from everyone.
Tina
[email protected]
Love the Christmas tree and thanks for the chance at the blog candy!
love it Sharon! Your paper choices are just perfect here!
Gorgeous, gorgeous tree! You always do such amazing work!
Thanks for the great how-to! I love those MDF alterables!
This is so beautiful, Sharon and it will be treasured for a long, long time.
Hello,
woooooooooooooow, wonderful, great, very nice. I love it. ð
Sorry, I’m German. ð
Liebe Grüße Gaby
Very nice and your tutorials are always so helpful! Thanks for all the time you put in to help others!!
What a gorgeous project! Thanks for the detailed instructions and the great inspiration.
Love your project. OK now I need to buy some Mod Podge. Never thought of using it, but now I will. Thanks so much for all the great projects and ideas. It always keeps my creative juices flowing.
Very nice. Nice to see how to use supplies for things other than cards.
Lovely tree project! Great choice of papers and embellishments!
DeniseB
Your tree is wonderful. Very neatly put together. Love the paper. Thanks for sharing.
WOW! What a gorgeous tree hanging! A wonderful keepsake to enjoy for years!
I love the tree wall hanging! I want to make one now! Everything is just perfect but you sure could change up the colors and stuff for gifts. Great blog candy, beautiful colors and I want that chipboard ornament album! Guess, I have a case of the “I wants!”
Very Pretty. I love the way you tied the ribbons!
Beautiful….loved the tutorial. Checking out the Chipboard Album…too cool.
Sheila
[…] I have a very quick duo of no stamp cards, but first let’s address the winner from last Saturday’s Ribbon Inspiration/Stamp Simply Style. Last Saturday we focused on holiday decor items and had fun with it. The winner was selected […]
kosatymctheft1973
[…] Last year’s post has the “how to’. If you are interested, click here. […]