Search Results for "scor-it"

Dec 06 2008

Stamp Simply Celebrates! Day 7 – Blog Candy and More!

Published by

ss-celebrates-julie.jpg

Welcome to Day7 of Stamp Simply Celebrates! If you are new here, check out Party Central for a full rundown of our 12 day schedule. Feel free to jump in anytime at all!!!

Anyone can play ANY of the challenges by ANY of the hostesses during our 12 days of Stamp Simply Celebrates!!!You DO NOTneed to have a Blog to play uploading your project to SCS (Splitcoaststampers.com) is not only permissible, but HIGHLY ENCOURAGED. When doing so, use the KEYWORD SSC08. Thanks!

ssc-challenges.jpg

Susan Roberts Rainy Day Creations How often do we give Gift Card Holders? Well, if youre like me, probably a lot!!! Susans Featured Project today shows us a quick gift card holder to make and she Challenges us to make our own, using her template or your own. Susan also has a BLOG CANDY offering today. You wont want to miss this, so be sure to visit Susan today!

You can see some more wonderful samples of gift card holders from Susan’s designers by checking out these blogs: Janine, Jennifer, Darlene, and AJ

Dee JacksonStampin cuz I Luv 2 -For her Featured Project today, Dee puts together some gorgeous Packaging for YourFood Items how fun!!! Her Challenge today provides many beautiful samples for you to see and to be inspired by so you can prepare your own packaged delectables for those on your gift list. Be sure to stop in at Dees today to see the sweet treats she and her designers have prepared for you!!!

You can see more beautifully packaged food gift items by checking out Dee’s designers at these blogs: CAT, Jennifer, Darlene, Heather and Barb. I have a packaged food item as well, and you can just scroll down to see that!

ssc-candy_copy.jpg

Susan Roberts Rainy Day Creations has a blog candy offering today in addition to her challenge listed above.
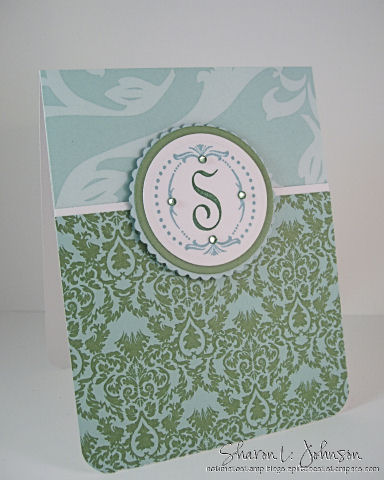
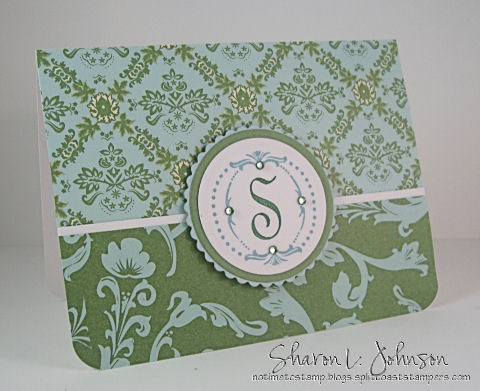
Sharon JohnsonNo Time to Stamp? – Thats me with more BLOG CANDY think specialty papers and just keep looking, because here it is:

mirri-candy-480-notime.jpg

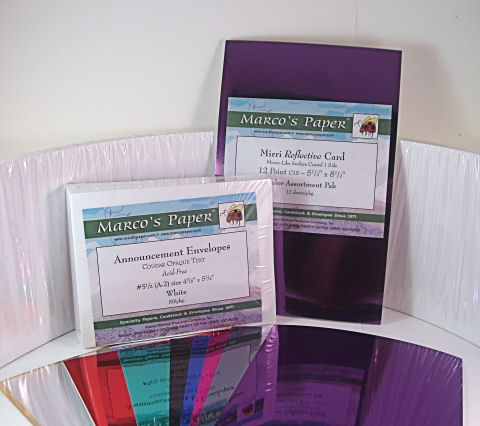
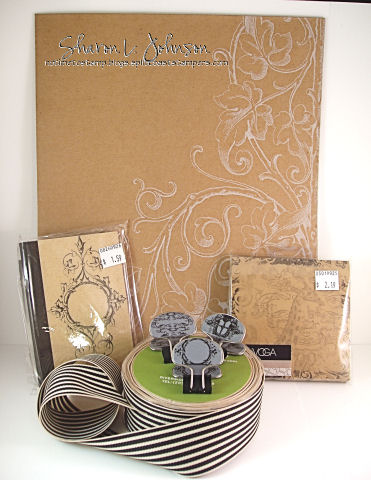
Today’s Blog Candy was graciously donated by Marco’s Paper. From reading past comments I realize many of you are familiar with Marco’s Paper, but I wasn’t until a few months ago and, oh my goodness, what a store!!! Totally filled with paper and supplies for any paper crafter!!! Today we have from Marco’s Paper15 sheetsof the Accordion Cardstock that I used on this post the other day. It is 5.5″ x 25″ and makes doing accordion projects so easy. We also have a pack of 1/2 sheets of the Mirri Reflective Card that I’ve been using so much lately – OH, do I LOVE this paper. If you’ve never used it, you’ll be in for a treat! It is highly reflective — truly a mirrored surface — and it works up SO nicely into pretty, elegant cards. It adds such a richness and class — I just love it!!! It comes in a large variety of colors and this pack has samplings of them all. I did open my pack and have it spread out so you can see the colors. And you can also see in the photo how highly reflective it truly is! Also we have a package of 50 White Announcement Envelopes in A-2 size. THANK YOU MARCO’S PAPER!!!! MUCH APPRECIATED!!! And in doing these links, I just noticed their announcement on the home page about FREE shipping with a $50 purchase through Dec 15 — that’s Monday!!! Just letting you know!

To be entered for this Blog Candy drawing, all you need to do is comment below and tell me what type of paper you usemost often OTHER THAN standard cardstock. Nice and simple!!! This post will be closed for Blog Candy entries at 6:00 p.m. EST on Friday, Dec. 12, 2008. Shortly thereafter a random winner will be selected by random.org. The winner will be posted both on this thread and at Party Central. OK, now on to my project:

coffee-gift-duo-f480-wm-framed-notime.jpg

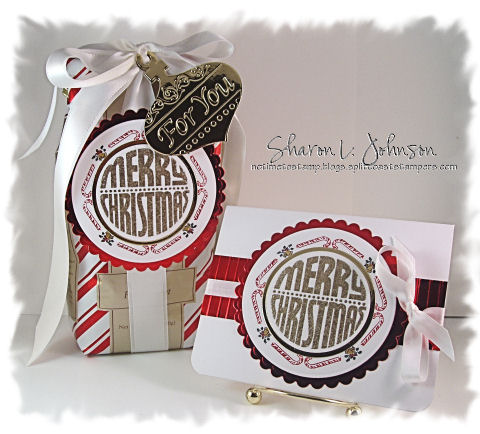
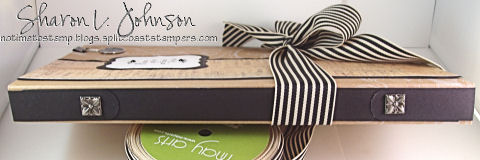
I played in Dee’s challenge today to come up with ways to attractively package gifts of food. Food gifts are SO totally practical and I think always appreciated, so it’ll be fun to see what everyone comes up with! My project today is SO simple. I took an already pretty bag of Ghirardelli Chocolate Peppermint Coffee. It was done in candy cane stripes of red and white which, much to my glee, was the EXACT same color as the red Mirri Card that I wanted to use today!!! AllI did was wrap with ribbon, attach my Merry Christmas sentiment medallion, hang on a tag, make a simple card to match, and DONE!!! It turned a lovely, but simple, bag of coffee into a WOW gift item!!!

coffee-bag-closeup-480-wm-notime.jpg

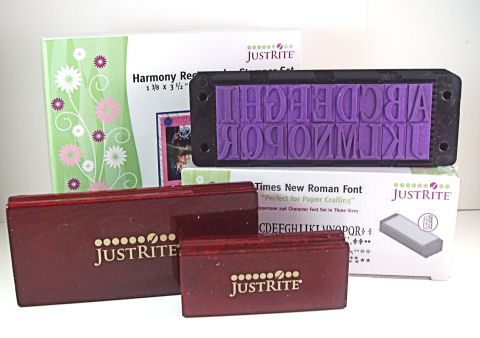
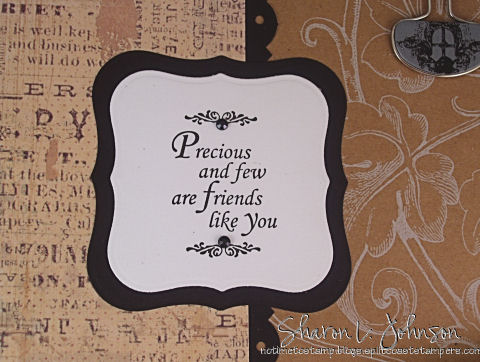
The sentiment medallion is made with the Christmas Ensemble by JustRite, using the Harmony Classic Circle Stamper III, which happens to be my favorite size. And JustRite is having a sale now, until the 19th. Check it out here. I am disappointed in my photos of this project. The Merry Christmas is embossed in a mixture of SU Gold Detail Embossing Powder and Dazzling Diamonds. It is SO GORGEOUS IRL, and in these photos it just looks like I’ve stamped it with brown ink and didn’t even get a good image — so NOT true!!! I apologize for that, but my photo abilities are quite limited!!! Anyway, just believe me, it is a soft gold with a bit of Dazzling Diamond sparkle!!! Very eye-catching!!! That is layered onto a circle of the gold Mirri Card, then onto a layer of candy canes which is a border in the Christmas Ensemble, then finally onto the scalloped layer made with the Red Mirri Card!!! It’s SO pretty!!! All the cutting and embossing was done with my Petite Circle Nestabilities by Spellbinders in the Cuttlebug. This Mirri Card, though heavy, cut like butter!!!

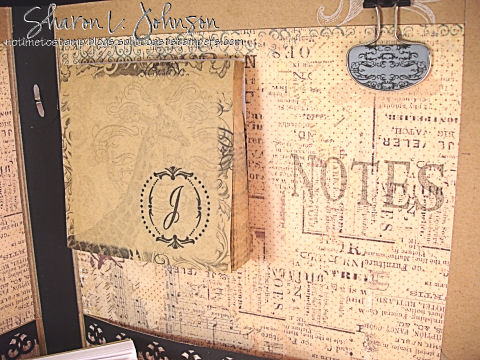
The For You ornament tag on top probably took a minute or less!!! And HOW pretty!!! I used my coordinating ornament die and embossing Folder for the Cuttlebug. I first cut the ornament with the die, then inserted it into the folder and ran it through. Made with this gold Mirri Card it looks JUST like a real ornament! Again, the Mirri Card ran through with the Cuttlebug die and folder with no problems. It has the heavy weight I love and still works like a charm with all my tools!

coffee-mirri-card-480-wm-notime.jpg

Here’s the card I made to coordinate. To make my candy cane border, I colored the border stamp from the Christmas Ensemblewith my SU markers in red and black, stamped it, then colored in the flowers with my Spica Glitter Pens by Copic, using Gold, Red, and Olive. And on the card I added this strip of ribbed Mirri Card. Another quick dress-me-up idea that is so effortless. Here’s how I did it.

coffee-gift-score-band-480-wm-notime.jpg

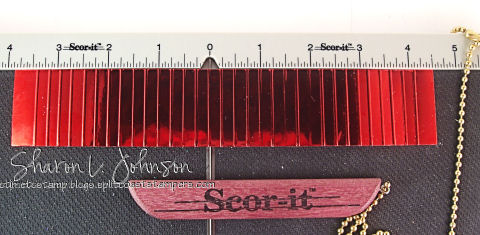
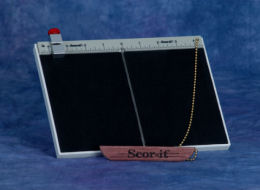
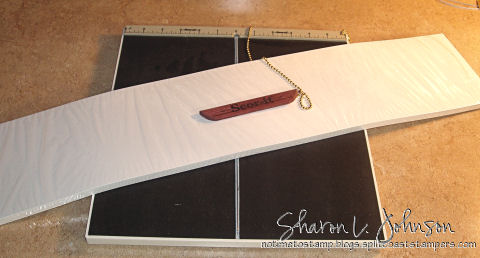
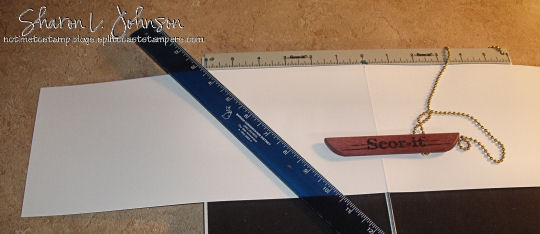
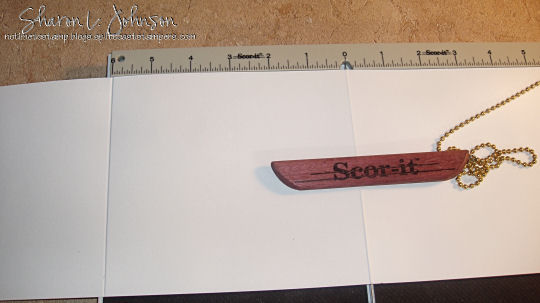
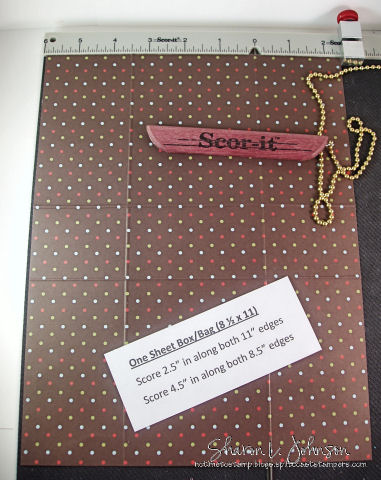
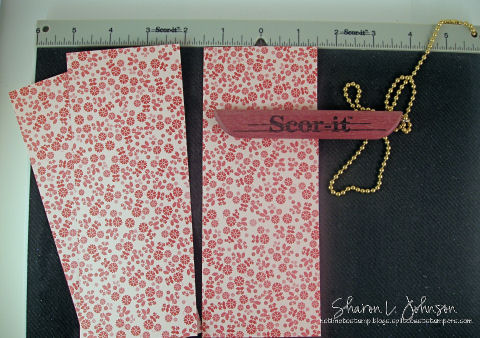
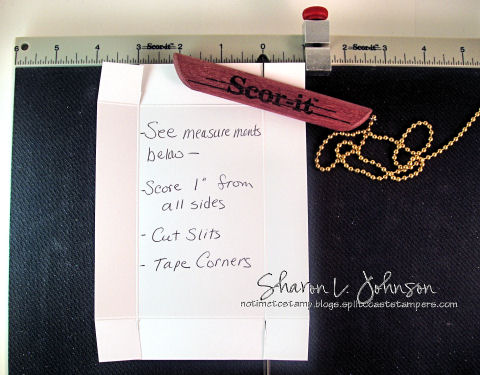
My strip is 1.5″ wide. This was just a scrap left over. Using my Scor-It, I quickly and easily embossed it (scored it) every 1/4 “. So easy to do with the well-marked ruler on top. Just score and keep moving it over 1/4” at a time. LOVE the rich look it adds. And again, this Mirri Card is quite heavy, but my Scor-It scoring tool glided over it making a perfect score with no effort at all. When you do this, be sure to start with a longer piece of paper than you need. Remember, as you score, it eats up length and you end up with a shorter piece. Start long enough, then cut off what you don’t need when all is said and done!

And that takes care of today’s project!!! Hope you liked it — it WAS so super fun, simple and quick!!! It would be great to do up a few of these just to keep on hand for those surprise visitors or extra gifts we so often need at the last minute!!! Sure to please!!! Thanks so much for stopping in again.I truly DO appreciate it — more than you know!!! Hope to see you again tomorrow as the fun continues throughout next week!!!

And the winner selected by random.org is #24, who is Michelle!!! Congrats, Michelle! Here’s what she had to say:

Michelle

That mirror paper is incredible! I love what youve done with it, Sharon!

Dec 7, 1:31 AM

Thank you so much, everyone, for playing along — much appreciated!!!

284 responses so far

Dec 05 2008

Stamp Simply Celebrates! Day 6 – Blog Candy and More!

Published by

ss-celebrates-julie.jpg

Welcome to Day6 of Stamp Simply Celebrates! If you are new here, check out Party Central for a full rundown of our 12 day schedule. Feel free to jump in anytime at all!!!

Anyone can play ANY of the challenges by ANY of the hostesses during our 12 days of Stamp Simply Celebrates!!!You DO NOTneed to have a Blog to play uploading your project to SCS (Splitcoaststampers.com) is not only permissible, but HIGHLY ENCOURAGED. When doing so, use the KEYWORD SSC08. Thanks!

ssc-challenges.jpg

Heather Telfordbits and pieces – Heather is sharing a Featured Project with us today how to Dress up Your Table! Fun!!! And Heather is also incorporating a Challenge in with her project, making it 1-2-3 easy for us to decorate our own tables!!! Be sure to stop in at Heathers place today for many great samplings of table decor!

You can see more samples from Heather’s designers. They are Jennifer, Darlene, Joan and Jerri.

LeAnne Pugliese Wee Inklings – Doesnt every Mother need a helper, especially during the Holidays? Well, for LeAnnes Featured Project that is just what she is giving us, a Mothers Holiday Helper! LeAnne is running a Challenge along with her project, providing us with templates and instruction so we can quickly and easily create our own helper!!! Dont miss it!!!

And you can see more samples from LeAnne’s designers as well. They are Barb, Deb, Janine, Darlene and me (just scroll down to see mine).

As usual, please bear with us all as we are busy uploading and linking through outtonight — everything should be up and in order by morning!

ssc-candy_copy.jpg

AJ Otto The Willow Garden– AJ has some BLOG CANDY to share!

Sharon Johnson No Time To Stamp? Me again, with more BLOG CANDY! And here it is down just a bit.

To be entered for this Blog Candy drawing, all you need to do is comment below — nothing more than that today!!! Nice and simple!!! This post will be closed for Blog Candy entries at 6:00 p.m. EST on Thursday, Dec. 11, 2008. Shortly thereafter a random winner will be selected by random.org. The winner will be posted both on this thread and at Party Central. OK, now on to my project:

folder-tnr-candy-480-notime.jpg

Once again, HUGE THANKS go out to the folks at JustRite!!! They know how much I love the various fonts and rectangle stampers, so they are most generous in allowing me to give some away to you!!! This time we have the Times New Roman Font (3 sizes in a box) and the Rectangle Stamper Set (2 wooden blocks in a set, one large and one small). Times New Roman is one of the fontsI used on my project for today. And before I show you my project, once we are talking JustRite, I would be remiss if I didn’t tell you about a sale they have going on — and the sale is especially for all of you Blog readers — they are grateful for their Blog traffic (which comes from YOU) and wanted to offer you a special. You may read about it here.

OK, now let’s move on to my project for today. I played as a sample maker for LeAnne’s Challenge, which you can read more about on LeAnne’s Blog. But basically, she provided us with templates for her Mother’s Holiday Helper which is made from a basic pocket file folder. Well, the only pocket file folders I had at home were neon colors or school colors with school logos – not QUITE what I had in mind. At Deb’s suggestion, she told me they had some plain kraft pocket folders at Office Max. Well, they sure did, plus they had some kraft folders that had designs on them, so I chose one of those. Here’s what I bought and used for this project.

folder-supplies-480-wm-notime.jpg

The folders had designs in white, while all the complimentary pieces had black accents — now WHY didn’t they make them all the same??? I’m really into matchy/matchy — LOL!!! Anyway, I figured I could make them work. And rather than follows LeAnne’s very cool template, I decided to make a gift for a friend — sort of an organizer for craft needs — you know those lists we all keep? I just wanted to make something to contain lists and notes of our crafting needs so when we go shopping everything is contained in one place. Here’s a look at the completed inside of my folder.

file-open-480-wm-framed.jpg

Isn’t it fun? I LOVED making this!!! My brainy idea here to make this a little different than a normal folder was to create a spine. See it? It functions very well, allowing plenty of room for all my little pads and notebooks and whatever else one might throw in there. The spine is 1″ and it was created very easily with my Scor-It. Takea look.

folder-score-480-wm-notime.jpg

See the center line? That is the line, the fold, that came on the folder. All I did was score 1/2″ on each side of that line, giving me a 1″ spine. Score with the right side down so that your score folds properly. This kraft folder is VERY thick. I don’t know how thick, but MUCH heavier than 110# cardstock. To score this on myScor-It was totally effortless. In places I scored over 2 thicknesses — no problem at all. I got perfect score lines and my folder now had a totally functional spine!!! Now to create a *pretty* spine, this is what I did.

folder-cover-spine-480-wm-notime.jpg

I cut 3 strips of black cardstock, 11 x 7/8″. Leave 2 of them the full 11″ long and cut the 3rd one in half. Each half will be 5.5″ long. Now score these 2 shorter pieces right in the middle, which is 2 3/4″. Adhereone of the 11″ strips right in the center of the spine. It won’t reach all the way, so just center it. Do the same on the outside of the spine. Now here’s where the little scored piecescome in. Corner round the ends of these 2 little pieces and they’ll look more like tabs. Now,just adherethem, top and bottom. They fold around the top or bottom, covering both sides. Can you follow me? In the photo the bottom is done, but the top still needs to be covered with the tab. Easy!!! It hides that unsightly midde*original* seamline and it sturdies up the spine — PERFECT!!!

folder-spine-480-wm-notime.jpg

And here’s a look at the completed spine on the outside. Can you see the rounded tabs? I just added some pewter brads to make it look a bit more finished off. I LOVE this spine — it was EASY, FUN and added great FUNCTION to my folder. I chose pewter brads because the little clips that went with this set were sort of grayish/pewtery in color.

folder-front-480-wm-notime.jpg

Here’s a look at the cover of my folder. The sentiment is from the JustRite Harmony Circle Stamper III Ensemble. (This is one of thesale items right now!) I omitted the outer ring and used my Labels 1 Nestabilities by Spellbinders to cut the sentiment out. As I’ve said before, you have a lot of options with your JustRiteimages/sentiments — they don’t all HAVE to be used in a round or oval format. I added some little rhinestones. The DP is by K and Co., (Margo) and it is edged with black. I used the Martha Stewart scallop punch on the right and then punched holes with my Cropadile. My favorite 1.5″ May Arts striped ribbon is adhered with 1.5″ wide double sided tape to the back and spine of the folder. It easily ties and unties for use.

folder-label-480-wm-notime.jpg

Just showing a close up with some detail.

folder-left-inside-480-wm-notime.jpg

This is the inside left. I covered the inside with the K & Co. paper (Margo). I thought this rather vintage looking old paper design would go well. I then stamped the larger words in Times New Roman Font using my Rectangle Stampersand Charcoal Palette Ink. I used a Stamp-a-ma-jig to get them positioned as I wanted. My Stamp-a-ma-jig is home made. I should show it to you sometime! A friend made it from left over window trim during a house remodel. She made about 10 of them and gave them to all of us here. She purchased the sheets from SU and we are good to go. This is the SAME friend who is making a Cuttlebug out of an old wringer washer — I KID YOU NOT!!! If she ever gets that up and running I WILL show you, for sure — LOL!!!

folder-insider-right-480-wm-notime.jpg

This is the inside right. The sticky notes are adhered to the top, but I am having technical difficulties there — LOL!!! They are too heavy. I’ll end up taking about 1/2 the pad off, I’m sure! Again, I stamped on the NOTES with Times New Roman Font. I love the little clips — they are pretty and functional, if needed!!!

folder-left-pocket-480-wm-notime.jpg

Here’s a look at the left pocket. The monogram was done with the Damask Monogram Set (it’s on sale — see above) and I used a J from Trompe Script Font, which is a really pretty, more fancy, font that I love. The little book just has a simple J on it, front and back.

folder-right-pocket-480-wm-notime.jpg

This is the right side pocket, no different. The top border is made with the retired SU Wrought Iron punch with the corner guard removed. The bottom border is made with the Martha Stewart Scallop punch and holes added with a Cropadile. I used my new Glue Glider from Joan’s Garden for this entire project and it sticks tight! It’s super easy to use and very light weight. I am one happy camper with my new Glue Glider glue gun!!!

And that wraps it up again today!!! Hope you are all enjoying your time of Christmas preparation, however much or little that may be. And I hope you are getting some ideas you can use from all of us here working on Stamp Simply Celebrates!!! We are mid-way now, 6 days down, 6 to go!!! Hope to see you soon!!! Thanks so much for stopping in!!!

The winner selected by randon.org is #6, for Blog Candy #6, who is Nina. Here’s what Nina had to say:

nina

I just love the way youve used this font – the Times New Roman is tops on my (large) list of JustRite items to buy!

Dec 5, 11:22 PM

Congrats! Nina and THANK YOU SO MUCH to all the rest who played!!!

308 responses so far

Dec 03 2008

Stamp Simply Celebrates! Day 4 – Blog Candy and More!

Published by

ss-celebrates-julie.jpg

Welcome to Day 4 of Stamp Simply Celebrates! If you are new here, check out Party Central for a full rundown of our 12 day schedule. Feel free to jump in anytime at all!!!

Anyone can play ANY of the challenges by ANY of the hostesses during our 12 days of Stamp Simply Celebrates!!! You DO NOTneed to have a Blog to play uploading your project to SCS (Splitcoaststampers.com) is not only permissible, but HIGHLY ENCOURAGED. When doing so, use the KEYWORD SSC08. Thanks!

And these fun little banners are compliments of Julie Koerber — how cool!!! Thank you Julie!!! And please bear with us tonight as we are all uploading. If some projects aren’t up yet, they will be by morning – thank you for your patience!

ssc-challenges.jpg

Deb SaaranenDream In Color – Do you need a quick, but lovely, little gift for someone? Maybe your childs teacher, an elderly lady from your church or neighborhood? Today Debs Featured Project is to make a gift of Note Cards, attractively packaged for gift presentation. She is also turning this project into a Challenge for you to participate in, allowing you to show all of us your creations. Be sure to check it out!!! There are sure to be so many lovely samples to inspire!!!

And please check out the following blogs for some wonderful Challenge Samples and inspiration: Jennifer, Julie, AJ, Tammy, Janine, and Jerri.

ssc-candy_copy.jpg

Dee JacksonStampin cuz I Luv 2 – Dee has some BLOG CANDY today!

Sharon JohnsonNo Time To Stamp? – Me again, with more BLOG CANDY!

candy-rec-se-480-notime.jpg

The Blog Candy I have to offer you today was once again so very generously donated by the folks at JustRite. Today I have a box of Special Occasions Font (3 sizes per box, plus lots of extra pretty little do-dads!) and a set of Harmony Rectangle Stampers. There are 2 stampers in the box, a large and a small, as shown above. I’ve used the S from the Special Occasions Font in my project today.

To be entered for this Blog Candy drawing, all you need to do is comment below and tell me what you serve for a quick meal during this busy time of year. For me the busiest night, and when I want things to be calm rather than hectic, is Christmas Eve. We go to church and then come home and open gifts.I am always wrapping last minute gifts to bring to friends at church, etc. so I need a quick meal. For many years I’ve been cooking a Stouffer’s Frozen Lasagna on Christmas Eve for our dinner. I really love their Italian Lasagna – great flavor! I serve it with hot garlic bread and a salad, and it makes a great, warm and comforting, quick meal!!! Works for me!!! And now I know I’ll be totally embarrassed by all the wonderful meals you all are probably cooking up!!! LOL!!!

This post will be closed for Blog Candy entries at 6:00 p.m. EST on Tuesday, Dec. 9, 2008. Shortly thereafter a random winner will be selected by random.org. The winner will be posted both on this thread and at Party Central. OK, now on to my project:

sab-group-480-wm-framed-notime.jpg

I played in Deb’s Challenge today, listed above. This is one more gift set that I needed to get done for a gift. I really love this combination of retired SU colors — Soft Sky and Wild Wasabi with Spring Silhouettes DP. I made 6 simple cards and a box to present them in.

sab-box-480-wm-notime.jpg

This is the box. The ribbon is just wrapped around it and tied. I just made the box top to look like one of the cards. The entire set is somewhat of a repeat of a pink and brown set I did 2 weeks over over at the JustRite blog. In fact, there is a tutorial with photos and measurements there on how to make this box which is sized perfectly to fit A-2 cards and envelopes. Click here to see that tutorial. But quickly, the box base is cut 8 3/8 x 7″ and scored on all 4 sides at 1 1/4″. The box top is cut 8.5″ x 7 1/8″ and scored on all 4 sides at 1 1/4″. Super easy and quick to do when you set the stopper guide on your Scor-It at 1 1/4″.

sab-card-1-480-wm-notime.jpg

I made 2 of this card. It’s my favorite top fold and I’ve rounded the bottom corners on all of these. I find it particularly quick to make cards when I cover the entire card front with DP, rather than make layers/mats. It’s probably not the most efficient use of DP, having to cut it to 4 1/4″, but I love the look and you can’t beat the ease.

sab-card-2-480-wm-notime.jpg

Here’s the next, and there are 2 of these as well. My monograms for this setwere made using the Damask Borders Deluxe Kit, only I switched out the initial. This kit comes with Times New Roman Font, but I wanted to use the bit more *pretty* Special Occasions Font today,so I did! That’s the great thing with the JustRite products — SO interchangeable!!! Most things work together, and you can’t beat that!!! Variety is the spice of life!!!

sab-card-3-480-wm-notime.jpg

And here’s the last of the cards. I made 2 of these as well. To actually stamp my monograms for this set, I did it the easy way. I inked my entire stamp in Baja Breeze ink, THEN with the Baja Breeze ink still on the initial S,I just colored over it with a Garden Green SU marker — quick, easy, no fuss and it worked like a charm!!! I got a 2-colored monogram with the least amount of effort – my kind of stamping!!! I then added some rhinestones to my monograms and mounted them with Dimensionals. OH, they were all cut, matted, framed and embossed with Petite Circle Nestabilities by Spellbinders — gosh, what did we all do before we got our Nesties!!!

If you need some gifts foryour crafty friends, consider a set from JustRite!!! The simple monogram starter kits are a GREAT first introduction to the JustRite products. Just click that link to see them. Everyone just LOVES a monogrammed project, and they are SO easy to use. They come complete with the wooden stamper, borders and alphabets!!! You can’t beat it for a WOW gift at a reasonable price!!! Editing to Add: I just noticed that the Damask Kit, in the older packaging (which is exactly what I used here), is ON SALE for $12.00 — just passing that on — GREAT PRICE!!!

And that wraps it up for another day!!!! Make sure you check out all the samples and entries for Deb’s challenge, linked above. There are sure to be a lot of great things to see and inspire!!! And THANK YOU so much for stopping in again!!! I SO appreciate all your visits. THANK YOU and hope you have a great day!!! Oh, our little bunch of local stamping friends is having our Christmas Party tonight — FUN!!! I’m bringing Chicken Wings — and they are GOOD!!! I did share the receipe here last year, but maybe I will again in the next day or two!!! Have a great day everyone!!!

Our Blog Candy winner is Debbie, and here’s what she had to say:

Debbie S

Your note cards are beautiful. My quick meal is spaghetti and meatballs. I use a prepared sauce, frozen meatballs, and I add some spices for added flavor. Thank you for the chance to win. The JustRite stamps are on my wish list.

Happy Holidays!

Debbie S.

Dec 5, 7:00 AM

Huge Congrats to you, Debbie!!! And THANK YOU to everyone else who played along!!! Much appreciated!!!

402 responses so far

Dec 01 2008

Stamp Simply Celebrates! Day 2 – Blog Candy and More!

Published by

Welcome to Day 2 of Stamp Simply Celebrates! We sure had FUN yesterday, and there’s more on the agenda today. Please let me remind youthat:

Anyone can play ANY of the challenges by ANY of the hostesses during our 12 days of Stamp Simply Celebrates!!! You DO NOT have to have a Blog to play uploading your project to SCS (Splitcoaststampers.com) is not only permissible, but HIGHLY ENCOURAGED. When doing so, use the KEYWORD SSC08. Thanks!

And here are the special events for today:

Becky Oehlers Hemidemisemiquaver Design – Today Beckyoffers us a beautiful Featured Project showing ussome of her over-the-top Gift Packaging Ideas. She also has some BLOG CANDY to share. Be sure to check it all out over at Beckys place today! You will surely be inspired!!!

Darlene PavlickDars Crafty Creations – Darlene is hosting afun Challenge today! If saving postage is of interest to you be sure to check it all out over at Dars today. In addition to Dars Featured Project Post Cards, youll be able to see all the wonderful samples her designers made as well as all the entries to her challenge that will be popping up over the next many daysso many sources of inspiration!!!

In addition to Dar’s above, check out these Blogs for some wonderful Post Card inspiration: Janine, Dee, Heather, Leslie, LeAnne(Please bear with us all through the night as we are uploading — should all be here and upby a.m.)

And I have some more BLOG CANDY to share today as well! Today’s generous offering of Blog Candy is compliments of Scor-It and Marco’s Paper, and I have a project below to show you a simple home decor project I made using my Scor-It and some speciality paper from Marco’s Paper, but first, here’s the Candy offering:

mini-scor-it-260.jpgmini-scor-it-tote-260.jpg

acc-cardstock-480-wm-notime.jpg

Being offered is a Scor-It Mini with Tote, along with 10 sheets of Cardstock for Accordion Cards. What aGREAT offering!!! Thank you Scor-It and Marco’s Paper!!! The Accordion Cardstock measures 5.5″ high x 25″ long (how fun!!!). It is a beautifully smooth and white paper in 65# weight, giving you so many options for use!!! I have never seen cardstock in this length before, and I can’t tell you how elated I was to find this paper from Marco’s!!! I know you’ll love it, too!!!

To be entered for this Blog Candy drawing, all you need to do is comment below and tell me if you’ve ever made an accordion card before (or accordion tags and an accordion album) and if so, what did you make? Personally, I LOVE making them — they are SO fun and the recipients always LOVE them!!! This post will be closed for Blog Candy entries at 6:00 p.m. EST on Sunday, Dec. 7, 2008. Shortly thereafter a random winner will be selected by random.org. The winner will be posted both on this thread and at Party Central. OK, now on to my project:

acc-on-desk-540-wm-notime.jpg

Here’s a full and opened view of this accordion card project on a desktop. It’s another one of those long projects that is rather hard to photo and capture much detail, so I’ll show you close-ups below.

acc-z-view-420-wm-notime.jpg

Here’s sort of an overhead view of the accordion card. It measures 5 5.” high x 24 inch long (I cut 1″ off the 25″ paper). It is scored every 6″ to give me thefour panels I needed for my four seaons. Each panel is 5.5″ high x 6″ wide. This can be folded and used as a card and then later expanded and used as a home decor item. OH, just think of all the different themes these could be made in — your children’s photos could even be inserted — HOW FUN!!!

As for supplies used, the background paper is from my stash from some LSS years ago. It is the same Brushed Metallic that SU does (or used to ) sell, only the color marked on the sheets is Bronze. It’s so pretty and goes so well with copper embossing powder. All embossing powders used are by SU, mostly retired by now I think. The ribbon is a beautifully soft May Arts satin. The stamp is my old Winter Woods by Rubber Stampede and the words are from Season by Season by SU. A Petite Oval Nestability by Spellbinders was used for the seasons.

acc-winter-420-wm-notime.jpg

I’ve used these trees a lot lately and this is the same copper/silver embossing that I’ve shown you here and here. The white paper used on this project is from Papertrey Ink, and the silver matting on my winter scene is the Brushed Silver Metallic from SU.

acc-spring-420-wm-notime.jpg

My spring trees are embossed in SU sage embossing powder, and before heating, I sprinkled on some Dazzling Diamonds. When you do this, not a lot of the DD stays on, but just enough gets stuck in the nooks and crannies of the powder so that it bakes in when you heat emboss and gives it just a hint of glimmer, which looks very nice IRL. Matted in Sage Shadow.

acc-summer-420-wm-notime.jpg

My summer trees are done exactly as my spring trees, only I used olive embossing powder by SU, and matted in Old Olive.

acc-autumn-420-wm-notime.jpg

My autumn trees were double embossed. I sprinkled Rust embossing powder on the bottom, shook it off, added the Mustard embossing powder on the top, then before heat embossing I sprinkled on some Garnet Glitter by Martha Stewart. Again, just a hint actually gets left and baked on, but it’s just enough to snazz it up a bit IRL.

acc-score-center-540-wm-notime.jpg

To score this 25″ piece of accordion cardstock I started by finding my midpoint with the ruler. That is 12.5″, so I marked it lightly with a pencil and scored there. Since I wanted mountain and valley folds for my accordion card, I flipped my paper over and see below:

acc-score-6-better-540-wm-notime.jpg

I then lined my score line up with the 6″ mark and scored. I did the same on the other side. I now have all my score lines made. I folded it on the center score, brought it to the paper cutter, and cut off that approx. 1/2″ that was *extra* on the ends. By scoring first and cutting last, I get my ends exact. When you score a piece many times, you do loose some length, so rather than try to account for that, I just do my scores first, then cut — makes it easy!!!

If you are wondering what to get a stamping/scrapping friend for Christmas, why notconsider a Scor-It? They come in 2 sizes, so there’s a style and price to fit each need. I honestly don’t know what I would do without mine, and I do have both sizes. You can read all about them at the Scor-It site. They also provide a list of retailers. I do know that Marco’s Paper carries the Scor-It, and Joan’s Garden most often has them in stock as well. And remember, Marco’s Paper has this fun Accordion Cardstock and also carries all the fun Mirricard (mirrored paper) that I’ve been using alot lately – really LOVE that paper. And I’ll have more Mirricard projects coming soon!!! And I will say one thing about shopping at Marco’s Paper — there is SO much there, you just don’t know where to begin. I’ve linked to the home page, and I have found it easiest, when looking for paper, to click on the Pricing Guide on the left – then you’ll get to a listing of all the types of paper — then you can go from there — at least that’s how I found it the easiest to navigate when looking for specialty papers!!! Other products by brand name are listed on the home page. Hope that helps!!!

And that about wraps it up for today again. Thank you so much for stopping in, and I hope you checked out all the links above to see all the projects some of the other girls did! Hope to see you back tomorrow for some more fun!!! Thanks so much!!!

And our WINNER is Lyn, #16. Congrats! Lyn!!! Here’s what she had to say:

Lyn S

Thanks for sharing your lovely project!

I havent made an accordian book before..the nearest Ive come would be a star book that I made for my Mother. It featured scrapping our family heritage and she just loved it!

Dec 2, 1:22 AM

Thanks so much everyone for playing along!!! It is SO MUCH APPRECIATED!!!

403 responses so far

Nov 30 2008

Stamp Simply Celebrates! Day 1 – Blog Candy and More!

Published by

Hi everyone!!! So glad you are stopping in — we have SO much lined up over the next 12 days. The schedule is full and we welcome you all to take a peek. Thecomplete schedule which we are calling PARTY CENTRAL is located at the TAB above my BLOG BANNER — look way UP — click there and you will see our full schedule of events for the next 12 days. You can refer there at any time. Right now all links lead to the Blog URL’s — but as the scheduled posts go live daily, the links will be changed appropriately.Once at Party Central,please take a moment to read about our KEYWORD for SCS uploads(SSC08) and our Rules of Blog Candy Netiquette. Thanks so much!

Anyone can play ANY of the challenges by ANY of the hostesses during our 12 days of Stamp Simply Celebrates!!! You DO NOT have to have a Blog to playuploading your project to SCS (Splitcoaststampers.com) is not only permissible, but HIGHLY ENCOURAGED. When doing so, use the KEYWORD SSC08. Thanks!

The main attraction today to get us started is over at Janine’s Blog, 2bKrafty. Janine’s creativity on this one was way over the top — be sure to check it out — it involvesher lovely Featured Project, a Challenge, AND Blog Candy!!!

In addition to Janine, above, the following girls have some GREAT Cookies, recipes and packaging to share with you: Jennifer, Darlene, Deb, AJ, Barb, Jerri, LeAnne.

And I have some Blog Candy today, too!!! The Blog Candy I am offering was very generously donated by JustRite. Here it is:

monday-curlz-candy-480.jpg

The winner of today’s Blog Candy will receive, direct from JustRite, the Curlz FontEnsemble which contains 3 different sizes of font in handy stackable storage trays, plus the Harmony Rectangle Stampers. They come 2 in a box, one large and one small, as shown in the photo above. To be eligible to win, merely leave a comment on this post telling me what it is about the JustRite product that MOST appeals to you — for example, the ability to do monograms, the snap in grids, the comfortable to hold wood stampers, the variety of font available, etc., etc. Inquiring minds like to know — LOL!!! This Blog Candy post is closed for entries at 6:00 p.m. EST on Saturday, Dec 6. Shortly after 6:00 a winner will be selected by random.org. The winner will be posted both on this thread and at PARTY CENTRAL.

OK, now on to my project for today. In keeping with the spirit of Janine’s Cookie Recipe Exchange Challenge (see details here), I wanted to play. I made some cookies, that I’ll show you in a bit, but first here is the little treat bag I made to put them in. This bag is fairly small measuring 2″ x 3.5″ with an overall height of 4.5″; however, the part that holds the cookies is only about 2.5″ high — you’ll see when I show more pics, but here’s the first:

sue-bag-front-480-wm-notime.jpg

I made this bag easily with my Scor-It, using SU Holiday Treasures DP, the Baking Ensemble by JustRite for the heart shaped focal image, Curlz Font by JustRite for my name tag, and some 1.5″ wide ribbon and some baby rick rack. I used my Petite Circle Nestabilities to cut, emboss and frame the focal image and a Tags die, also by Spellbinders, for the name tag. A SU 1 1/4″ punch was used on the bag to form the handle. A tiny gold safety pin holds the tag on the ribbon. SU Riding Hood Red ink was used.

sue-bag-side-480-wm-notime.jpg

Here’s a side view of the bag. 4 of my cookies, shown below, fit perfectly in this little bag. I think this bag would be just perfect for a little gift of cookies, or anything that fits in it for that matter. It would be lovely to give to a teacher or friend, and many of these filled with goodies on a table would make perfect table favors and/or place cards for the table. Fun for everyone!!! And now, here are my cookies to go inside:

12-01-cookie-plate-480.jpg

These cookies are called Bon Bons, and I never made them before. But I wanted to include them here as I remember these cookies so well from my childhood. My Mom made them every Christmas, with a cherry in the center and pink frosting. I will say my Mom’s were perfectly round and much prettier than my first attempt, but the taste is absolutely the same — just yummy!!! I had to get the recipe from my Mom, so she just gave me the old cookbook they were in. It appears to be a promotional book put out by Gold Medal. It says this recipe was from Mrs. Joseph J. Wallace, high in her Rocky Mountain home near Whitehall, Montana. Delicious cookies!!! Here’s the recipe:

BON BON COOKIES

From: Sharon Johnson Original Recipe by: Mrs. Joseph J. Wallace, Whitehall, Montana

Mix thoroughly: cup soft butter; cup sifted confectioners sugar; 1 Tbs. vanilla; Food coloring (if desired)

By hand, mix in: 1 cups sifted Gold Medal flour; 1/8 tsp. salt

If dough is dry, add 1 2 Tbs. cream. Wrap level Tbs. of dough around filling. Place 1 apart on ungreased baking sheet and bake until set, but not brown in a 350 degree oven (12 15 min).

Dip tops of warm cookies in icing.

Filling possibilities: Well-drained maraschino cherries, pitted dates, gumdrops, or tsp. mixture of 1 sq. unsweetened chocolate, melted, and cup shredded coconut.

Icing: 1 cup sifted confectioners sugar, 2 Tbs. cream, 1 tsp. vanilla, food coloring, if desired.

As for the HOW TO on this box/bag, it is made with one full 8.5″ x 11″ sheet of paper. Using the Scor-It, score 2.5″ in along the 11″ sides, and score 4.5″ in along the 8.5″ sides. It’ll look like this:

sue-bag-score-480-wm-notmie.jpg

On this box/bag there is NO cutting or slitting to make tabs. It is all just in the way it is folded. I got this template from the 3-D Design Challenge Blog. This project was called the One Sheet Box Challenge and here’s the link to their One Sheet Box Folding Video. Please check these links as it’ll make it clear. It’s a bit confusing at first, but once you see it and do it, it’s as easy as pie and makes total sense.

That’s it from me for Day 1. Be sure to run over to Janine’s if you haven’t been there yet — she’ll have a ton of links for you to check out many great Cookie Recipe Exchange projects!!! Thanks so much for coming!!! Hope to see you all again tomorrow!!!

The winner selected by random.org is Sara, #122. Congrats! Sara!!! Here’s what Sara had to say:

Sara – Congrats on all of the hits!! Those cookies look so YUMMY!!

I think its cool that they have the larger size fonts, most stamps are the smaller sizes but sometimes you just really need the bigger sizes.

Dec 1, 9:09 AM

Thank you ALL so much for playing — MUCH APPRECIATED!!!

402 responses so far

Nov 26 2008

Box for Accordion Project

Published by

I got the box made for the Merry Christmas Accordion Tag that you can see here. You can find the full tutorial with photos and all measurements on the JustRite Blog here. Here’s a look at the box to hold it, making it a perfect little gift!!!

acc-box-clean-full-front-480-wm-notime.jpg

This box measures 2 1/4 x 4″ and the top and bottom are each 2 3/4″ high, but the waythe top rests on the project, the overall filled box is 4″ high. Here’s a lookat more of a side view.

acc-box-side-full-view-480-wm-notime.jpg

Just slip off the red organdy ribbon and you can lift off the top to reveal the Accordion Tag inside — fun!!! Here’s a look at the bow and tag on top.

acc-box-bow-smaller-420-wm-notime.jpg

The To and From are stamped using JustRite’s Times New Roman Font and the small Harmony Rectangle Stamper. The tag is cut and embossed using Tags 5 die by Spellbinders. To get this fun bow that is really pretty and fluffy IRL, I first just tied a regular bow, making sure I had enough ribbon and left way too long tail ends. I then took those tail ends and just formed a loop, ran the tail end under the knot, did the same thing on both sides, then used the *hairy yarn* to also run under the knot, catching all the tail ends, pulled tight and tied a knot. It holds it all in place and it looks like I know how to make a fancy bow — LOL!!! I also used the *hairy yarn* to tie on my tag. There are red rhinestones on the tag for a bit of interest and sparkle!!! Here’s a look at the main image sentiment.

acc-box-hap-hol-smaller-420-wm-notime.jpg

I used Baja Breeze ink by SU to coordinate with the paper and the Ski Slope DP, stamping my snowflake from the Christmas Stamp Ensemble by JustRite, using the Harmony Classic Circle Stamper III. I stamped this without using an outer ring, just the center. Then cut it out with a Circle Nestability by Spellbinders, matting and framing in the same fashion, then added all the red rhinestones for a bit of sparkly glitz!!! I also pierced the scallops. Now for the *How To* on the box.

acc-box-score-fixed-480.jpg

For your box base, cut your paper 7 3/4 x 9 1/2″. You then need to score all 4 sides of the paper at 2 3/4. I set my stopper on my Scor-It at 2 3/4″ as all scores for this box are at the same measurement. With my stopper set appropriately on my Scor-It, I am assured of getting each and every score exactly the same, which makes for a perfect box!!! The box top is made in exactly the same way – the only difference being in the cutting. The box top is cut 1/8″ larger, both ways. So cut your paper for the top 7 7/8 x 9 5/8. Again, score all 4 sides at 2 3/4″, and your top will slip easily over your bottom.

acc-box-cut-slits-480.jpg

Next, cut your slits to form your box sides and tabs. As I’ve said before, I actually cut out a little sliver, rather than just a slit. It’ll make your box go together better. I cut out the width of the score line. Now, you would typically be able to fold your box together, but it won’t work on this box. Whenever your tabs end up longer than the width of your box, it won’t fold right without some modification. When you get there, you’ll see just what I mean. In this case, your tabs are 2 3/4″ and your box is only 2 1/4″ wide. So here’s what we do.

acc-box-cut-tabs-480.jpg

We need to make our tabs shorter so they’ll fold in nicely and neatly. Remember, our TABS are the 4 outer corners. The middle sections are the box sides. Do NOT cut your box sides. To prevent that from happening, fold them up and out of the way. I have used my JustRite Clear Alphabet Stamps as a paper weight to hold the box side down and out of the way. (These are the stamps I usedfor the lettes on the AccordionTag) Line up the score line at 2 1/4, or even a hair less works even better, lets say 2 3/16 or so. Then cut — pay attention that you are ONLY cutting the two tab ends and NOT the center piece, which is the box side. Repeat on other side.

acc-box-tabs-cut-done-480.jpg

When you’re done, this is what it’ll look like. The box sides are longer than the flaps that fold in. If you want to cover your box with designer paper, the time is now, before you form it into shape.

acc-box-dpd-480.jpg

So that my box coordinates with my Accordion Tag, I used the same designer papers and I edged themwith a gold paint pen, just asI did on the tags. I have covered the top and all 4 sides. There is no need to cover the tabs. Put adhesive on the tabs and form the box into shape. What you are looking at above is actually the box cover. On this project I did not cover the box bottom. I made it of blue cardstock and just left it blue.

acc-box-open-480-notime.jpg

Once your box bottom and cover are made and taped into shape, you are ready to decorate them as you wish. When you place your Accordion Tag into your box, the top sticks out.

acc-box-clean-full-front-480-wm-notime.jpg

Just slip the box top over, but do NOT press it down hard. Just rest it gently on top, then hold the box top on with a pretty ribbon. Hang on a tag and you are all set to give a gift that will get a ton of oohhss and aaahhhs!!! Guaranteed!!! Have fun!!!

Stamps: All by JustRite, Christmas Ensemble used with the Harmony Classic Circle III, and Times New Roman Font used with the small Harmony Rectangle Stamper Paper: PTI White, SU Real Red, Baja Breeze, Ski Slope DP Ink: SU Baja Breeze and Chocolate Chip Accessories: Scor-It, Red Organdy Ribbon, Red Rhinestones, White Fun Fur Fiber, Petite Circle Nestabilities by Spellbinders, Tag 5 Die by Spellbinders, Pop Dots, Mat Pack and Piercer

The Scor-It comes in 2sizes, full-sized and themini. You can read all about them on the Scor-it site, but you can’t purchase from that site. They do, however,provide a list of retailers. I also know they are usually available atJoan’s Gardenand Marco’s Paper. (Marco’s is also my source for the Mirricard (mirrored paper) I’ve been using so much!!!

Also, there is a huge sale going on at JustRite for certain product, the Christmas set I’ve used today is included. You can read more about it here, but the sale is over soon, so check it out quickly to take advantage!!!

Thanks so much for stopping in today!!! I wish you all a very Blessed and Wonderful Thanksgiving, hoping you get to spend some time with family and friends. I’ll have a Thanksgiving card for you tomorrow night — a day late — but it’s NEVER too late to be thankful for all our blessings!!! HAPPY THANKSGIVING, EVERYONE!!!

35 responses so far

Nov 12 2008

How to… on Boxes

Published by

Today I’ll show you how to create your own box to perfectly fit any little gift item you please. I get a fair amount of emails asking this exact question — “I want to make a box for this or that, and how do I figure how to cut my paper and where to score?” Well, if that’s something you’d like to know, keep reading — and fair warning, this tutorial is about as simple and basic as it gets. I am writing this to assume you have no clue where to start. I don’t mean to offend anyone with my simplicity, but I know many of you trulyhaven’t done this before and don’t know how to begin. This is written for those people. Once you learn this, you’ll have so much fun creating boxes, I’ll bet you won’t be able to stop!!! (I can’t!!!)

both-boxes-done-480-wm-notime.jpg

Above is the style of box I’ll teach you to do today. It is a simple base with a slip on cover. A very simple and elegant box design in my opinion. For today’s boxes, I just grabbed two items in my house that might be likely items one would purchase for a little gift — I grabbed a bar of handmade, scented soap and apackage of square, embossed cards from the $ Bin at Michaels. Here they are:

items-420.jpg

The first thing you need to do is determine the size box you need.We’ll start with the soap. You need to measure it. It measures 3 x 4.25″. I like my boxes with a little room inside for tissue paper, so I decided I want my box to be3.5 x 4.75″. That’s 1/2″ larger than the soap as to both width and length. Take a sheet of paper to write your notes and sketch your box.

soap-rough-sketch-480-notime.jpg

This is my worksheet. OK, we know the box is going to be 3.5 x 4.75″. But how deep does it need to be? Measure the soap. It is 1″ thick. Again, I want room to pad with tissue paper, so I’ll make my box 1.5″ deep. Now,sketch it outon your paper — it does NOT need to be to scale – just a rough drawing of a rectangle. Mark the shorter side as being 3.5″ and the longer side as being 4.75″. Again, this is NOT to scale. OK, now remember, we need this to be 1.5″ deep. That means our sides need to be 1.5″ tall. Draw on all the sides, all 4 sides. Looking at my drawing, our original rectangle is left in the middle, it has the X on it. That is the box base, the box size. We have now drawn the 1.5″ sides all the way around it. Write on all these sides that they are 1.5″

Now let’s do some math. How wide does your box need to be? The center is 3.5 wide, and the sides (look at your drawing) are 1.5″ each. There are 2 sides. So you add 3.5, plus 1.5 plus 1.5 = 6.5″. That’s how wide you need to cut your paper.

Now for the length. The center of your drawing (box base in the X) is 4.75 long, and you have 1.5″ sides on each end, so that is 4.75 plus 1.5 plus 1.5 = 7.75″. That’s how long you cut your paper. So for this box we cut our paper 6.5″ x 7.75″. That’s 6 1/2″ x 7 3/4″.

soap-box-score-480-notime.jpg

Then, where do I score? Well, remember our sides were 1.5″ high. That’s where we score — 1.5″ around all 4 sides. I’m using my full size Scor-It and I have set my guide at 1.5″ so there is perfect consistency on all my scores, making for a perfectly shaped box.

soap-box-clip-and-tape-480-notime.jpg

Now we need to clip our corners to form our tabs. You can see where I’ve clipped, and I actually take out a thin strip, rather just just one clip. Your box will bind a bit and not form quite as well if you don’t give those corner tabs room to bend in. This is particularly necessary when using a heavier paper. Then you need to put tape on your corner tabs. The tape goes on the RIGHT side of the paper (outside of the box)in the corners. When you fold this into shape, the tabs go on the inside of the box. Peel the tape and you’ll be all set!

soap-in-tissue-480-wm-notime.jpg

Stamps: Small Self-inking Stamper by JustRite

Paper: Frosted Orange by Prism, SU Very Vanilla

Accessories: Scor-It, Ribbon, Tag Die by Spellbinders

Once my boxbase was made, I wrapped my soapwith ribbon and hung on a little tag made usingone of the Small Self-Inking Stampers by Justrite. These stampers have a great assortment of tiny words that fit perfectly into the Tag Dies by Spellbinders. Such fun for quick tags. I also made a similar tag to hang on the wrapped box.

Now you need a box top, and there are no step-by-step photos to show you. But you make it in exactly the same fashion as the bottom — the only difference is the size you cut the paper. Cut the paper 1/8″ larger as to both width and length. This gives you just the right amount of room to easily slide your top over your box bottom. So for this soap box, you’ll need to cut your paper 6 1/2+ 1/8 =6 5/8 wide. For the length you’d figure 7 3/4+ 1/8=7 7/8 long. So cut your box top 6 5/8 x 7 7/8. Then score it exactly the same as the box bottom — score at 1.5″ on all four sides. Finish as above shown. Slip your cover on, tie with a ribbon, done — GORGEOUS!!!

soap-wrapped-480-wm-notime.jpg

Now let’s try another box in another size and shape. This box will house the white square embossed cards from the $ Bin at Michaels. Again, we’ll figure it out just like we did above. Here’s my worksheet:

green-box-rough-sketch-480-notime.jpg

Again, we start by measuring the item. The card package is 5 3/4″ square, so we’ll want the box to be 6 x 6″. The card package is 1/2″ thick, so we’ll want our box to be 3/4″ high. Let’s sketch it out like we did above. Draw your 6 x 6 square in the middle and add your 3/4″ sides on all 4 sides. Now let’s do the math. 6 plus 3/4 plus 3/4 = 7 1/2. So cut your paper to a 7 1/2″ square. Take it to your Scor-It and score 3/4″ from all four edges. Refer to the photo of the first box to clip on the score lines to form your tabs, adhere tape, and put your box bottom together.

To make the top, this time I wanted a bit of a tighter fit. This box is so shallow, it can fit a bit tighter and still go on easily enough. So I want to make the box top 1/16″ inch larger, rather than the 1/8″ we did above on the deeper box. So when we add 1/16″ inch to our 7 1/2″ measurement, we get 7 9/16″. That’s how big you cut your top — 7 9/16″ square. Make the top just as you did the bottom. Again, done and GORGEOUS!!!

green-box-unwrapped-480-wm-notime.jpg

Stamps: 2X Stamper by Justrite

Paper: Spring Willow Medium by Prism, PTI White

Accessories: Scor-It, Ribbon, Tag Die by Spellbinders

I made a tag for this box also, this time using one of the 2x Self-Inking Stampers by Justrite. There’s a great assortment of these fun little stampers as well. They stamp really great, giving dark and clear images. Really, when we find good buys like this in the $ Bin, we should stock up and have little gifts like this all made and ready and on hand for those times when we just need a *little something*!

green-box-480-wm-notime.jpg

Here’s a Few Tips:

  • I usually prefer a heavy weight paper for boxes. Today I used Prism Prismatics and it works nicely with it’s somewhat leathery texture. For DP I particularly love Crate Paper for boxes. It’s a really great weight and texture. I also got some new12 x 12 cardstock from WorldWin called Double Mates. It hashas alinen-like textureand it is a different color on each side and of a weight that would work well for boxes. I think the fact that it is 2 colors would be really fun for these boxes.
  • Once you design a box, make it first out of plain white cardstock. Cut, score and foldit, but don’t tape it together. This will let you see if it turns out the size you intended. THEN save this white box as a template for future use. Because you didn’t tape it, it’ll store flat. Before you know it, you’ll have a nice collection of box templates at your disposal.

If you’d like to read more about the Scor-It, they have a lot of good info on the Scor-It site. I do carry both the full sized and mini Scor-It Boards in the Stamp Simply Ribbon Store that you can see here.

And my apologies — I know I promised info today on my new stick pins. But this post ran so long again, it is late and I’m so tired — I’ll get it for you tomorow, OK — I’m sorry!!! Just want to say *thanks* for taking the time to click in and visit — much appreciated!!! Tomorrow we will be back to our regularly scheduled programming of quick, easy and flat cards for the season!!! Hope to see you then!!!

46 responses so far

Nov 10 2008

Stamp Simply Bare Necessities Box

Published by

Grandma had a button box, Stampin’ Up! has the Pretties Kit, and now Stamp Simply has a Bare Necessities Box! Talk about fun to make and put together!!! I created this project for a fun *Girlfriend Gift*, and following will be a complete tutorial so you can make one, too — if anyone so desires!!! This is one of those gifts that is as much fun for the giver as for the recipient!!! I had so much fun filling up my little boxes!!! Take a look:

both-480-wm-notime-fade.jpg

Five small boxes within a sturdy, recycled box base, filled to the brim with fun things for your crafty girlfriend. A kit filled with any crafter’s Bare Necessities!!! And the fun Girlfriend card to give with this gift is a Joy Fold Card, another fun project!!! I’ll show you a few more pictures, then we’ll get down to the nitty gritty of how to make a Bare Necessities Box for yourself.

box-top-view-480-wm-notime.jpg

Here’s a peek inside!!! Ooh, I just smile looking at this!!! I’ll try to contain myself, but honestly, this was THE most fun project I think I have EVER done!!! I SO love all these type of things. Hope the recipient does, too!!! Lush ribbons, pretty buttons, vintage/recycled pieces of lace, satin flowers and all sorts of pretties — pearls, pins, crystals and charms!

card-480-wm-notime.jpg

Here’s the Joy Fold Card — so fun to do!!! A great tutorial on this Joy Fold Card, complete with all measurements, can be found at SCS in this tutorial written by Beate — thank you, Beate!!! This is a quick and fun fold that packs a lot of punch with very little effort!

card-side-inside-480-wm-notime.jpg

In this shot I’m just trying to let you see how the card functions!

card-open-480-wm-notime.jpg

Here’s the card opened fully. This fun girlfriend sentiment, as well as the girlfriend greeting on the front, are in a set called Glamour Girls by Crafty Secrets. I got mine from Joan’s Garden. And now that you’ve seen the completed card, here’s how I did it:

card-scoring-480-wm-notime.jpg

The card base is 4.25″ x 8.5″, and using my Mini Scor-it, I scored at 3″, so when folded my card base is 4.25″ x 5.5″, a standard sized card. The smaller card that will be on top is cut 3″ x 8″ and scored at 4″. That’s it. Add your DP and assemble as shown in photos or, better yet, refer to Beate’s tutorial linked above. Can you see my scalloped top (Martha Stewart Scallop Punch) ? The DP is attached with double sided tape to a piece of SU cardstock — so it is quite thick, but I scored the embossed line above the scallops on my Mini Scor-It without any problems whatsoever — a beautiful embossed line — just a subtle detail, but it’s all the little details thatproduce agreat end result. Here’s a close-up:

card-detail-480-wm-notime.jpg

Can you see the detail? I love it! I think adding a bit of embossing with the Scor-It or Mini Scor-It adds so much, with so little effort! If you’re not in the habit of scoring lines for embossed detail — give it a try — I think you’ll like it!!! And, oh YES, my pretty pin!! This post will be continued tomorrow, and tomorrow I will share information on sources for these beauties!!! And the *Necessities* monogram was done with JustRite products, discussed further down! Fun!!! OK, now on to the details for making the Bare Necessities Box.

We’re going to start by covering a recycled box base. The box I used was 7.25″ square. And I know many of you may actually HAVE this same box at home. It is the base only of the box containing the Harmony Circle Stamper III Ensemble. As you look at the pictures below, my box is pure white and your box will have the graphics of the JR product on it — but it’s the same box. When I got my Ensemble it was a prototype and just came in the plain box — that’s all! OK, now to cover our box:

1score-paper-480.jpg

Start by measuring how tall the sides are on your box. My box has sides a little over an inch tall. I wanted to cut my paper about 3 times the height of the sides, so I cut my paper so I had 3″widestrips. Then cut your strips as long as the sides of the box – in this case, 7.25″. Cut 4 strips and then score them right down the middle lengthwise, which for thisstrip was at 1.5″. I am using the Scor-It, and as you’ll see above, I am scoring with the paper upside down. I want the brown side to be the right side — so I want the valley side of the fold on the right side — and to do that I must score with the right side down/wrong side up.

cover-edges-score-480.jpg

Here’s my 4 scored strips. This is really aneasy way to cover the box and get good corners withoutmuch fuss at all. I cut 4 small pieces to cover the corners, as shown. I also took a brown marker and colored on the top rim in the corner area– I’m just a bit paranoid about any white showing through – LOL!!! To adhere the paper to the box, my choice is Mod Podge. I like it for covering projects as it sticks nice and tight and it never peels up once adhered. Its quick to work with, but can be a bit messy on your fingers. But in my opinion it’s worth it for the nice result it yields. OK, once your corners are all covered, take one of the scored strips, lay it on the rim, as shown, and press it to the inside with your fingers and to the underside, tightly creasing both creases as you press. Once you have formed it to the shape of the box with your fingers, take it off, you will probably have to clip out a bit at the lower inside corner where it goes along the box bottom, and then paint your Mod Podge over the inside of the strip, making sure to cover it all. Then quickly adhere that strip to the box, again pressing with your fingers — but it’ll go right into place easily as you had already formed it before you had any glue on it. Press to make sure all the air bubbles are out, then continue on to do the other 3 sides.

inside-not-done-240-notime.jpginside-done-240-notime.jpg

When you get the inside done, it’ll look like the box on the left above. Cut a piece to fit on the inside, which in this case was slightly less than a 7.25″ square, cover the back of the piece with your Mod Podge and adhere in the box, again pressing out all air bubbles. The 2nd photo shows the completed inside.

outside-not-done-240-notime.jpgoutside-done-240-notime.jpg

And here’s the outside after covering the sides, then after covering the bottom. In this case, I used a piece just about 7.25″ to cover the bottom.

And now that our box base is done, on to all the little boxes. The measurements provided below are to fit the above-referred to box. If you do this you may have a different sized box base you are using. In tomorrow’s post I will teach you how to determine what sizes you need to cut your paper and where you need to score, for whatever size boxes you need to make. Please check back tomorrow if that’s something you’d like help with.

taping-box-480-notime.jpg

All specific measurements for each of the 5 boxes will be listed at the end of this post. The process is the same for all of them. Once your box is cut and scored (see measurements below), cut your slits as shown above and apply adhesive of your choice to the corners. I have them marked with an X above. There is one major difference here from a normal box. Normally you would adhere your corner tabs on the INSIDE of the box — NOT SO with this box.I want the insides of these boxes to be the nicest sides as that is what we see, so we are going to adhere our tabs on the OUTSIDE of our box, as shown in the photo above.

labels-jr-480-wm-notime.jpg

And here’s a pic of all the boxes in the base. You can see they are not squeezed in there super tight as I still needed room to attach my labels and I also wanted them to be loose enough that I could easily removed any filled box without a struggle, and I can. I have also shown my labels partially done. They are made using the Damask Border Starter Kit Iby JustRite, but I used a different font rather than the font in the Kit. I chose the Special Occasions font for my labels, which can be purchased separately.I used markers to color my Initials and my borders – Real Red and Chocolate Chip — to go along with the the SU Bella Rose DP I’m using. Once stamped I cut, embossed and framed them using my Petite Circle Nestabilites by Spellbinders. But this photo does not show the finished label. If you’ll refer to the finished Bare Necessities Box, you’ll see that I also added a pink scallop framing behind the brown solid matting. The label as seen above was adhered to the inside of the box and I then adhered the pink scalloped framing to the outside of the box — just gives a more finished look. And can you see how/why I decorated my labels as I did? I wondered if anyone would ever get this — R for Ribbon, B for Button, L for Lace, F for Flowers and P for Pearls, Pins and Pretties!!! (Cute, huh? LOL!!!)

box-front-view-480-wm-notime.jpg

Here’s another front view of the completed Bare Necessities Box. My Necessities label on the box front was made with the same Special Occasions Font mentioned above and the Small Letter Set for Round Monogram Stamper. Rather than placing my letters in the round border formation you so often see, I just placed them in the center grid and got a straight word. I stamped my Necessities first, and then I stamped the N over it.And I’ll wrap it up here with the measurements for each individual box.

box-templates-480-notime.jpg

One thing that makes these boxes so easy, is that they are all scored exactly the same – 1″ from each edge. I put my guide/stopper at 1″ so scoring all these boxes was an effortless breeze. Once scored, cut slits on the score lines as show in this photo and photo up higher in this post, adhere tape to corners and tape. Remember, as I said above, for this project adhere you corner tabs on the OUTSIDE of the box. You’ll be done with this project before you know it!!!!

Ribbon Box – Cut paper5 x 7 – Score 1″ from all 4 edges

Button Box – Cut paper 4 1/8 x 5 – Score 1″ from all 4 edges

Lace Box – Cut paper 6 x 6 – Score 1″ from all 4 edges

Flower and Pretties Boxes – Cut paper 3 15/16 x 4 15/16 – Score 1″ from all 4 edges

These are just so quick and fun to make and could serve any number of purposes. I hope you get creative and come up with some more fun things to fill up a box you might make!!! If you’d like to read more about the Scor-It, they have a lot of good info on the Scor-It site. To purchaseeither the full sized Scor-It or the Scor-It Mini, you do need to go through a retailer. My friend Joan over at Joan’s Gardenjust got her order of Scor-It’s in, I know Ellen Hutson usually has them in stock (listed under Tools), and Marco’s Paper also carries the Scor-It Boards. These are all great places to deal with! And if you have any gifts to buy for crafters in your family or circle of friends, consider a Scor-It — I think you’d make someone VERY happy!!!

Thank you for bearing with me though this LONG post. It will be continued tomorrow with information on how to determine measurements for your own box, of any size, as well as informationon the pretty pins I’ve used. It’s super easy!!! Thanks for stopping in and I hope to see you all again tomorrow!!! Have a great day!!!

51 responses so far

Nov 09 2008

Pink Christmas Classics

Published by

A pink Christmas card — that looks more like a baby card!!! Oh well, let’s just say I killed two birds with one stone — a Christmas card and an idea for a baby card — LOL!!! I made this card for today’s Featured Stamper Challengeat SCS, and today’s Featured Stamper is Wendybell — LOVE her work!!! This is the card I cased. Here’s mine:

fs92-pink-ornaments-480-wm-notime.jpg

AS you can see, what I took from Wendybell’s card was the hanging element and the fact that it was a basically white card. I changed colors, images, added a sentiment, embossing and a ribbon. I really do like this card and I will try it again in other colors. The ornaments are in my new SU set, Christmas Classics. This is my first test run with it and I think I’m going to like it! The ornaments are stamped on the white in black ink and colored with pink. They are stamped again on a scrap piece of pink, black embossed, then cut out and mounted onto the card with dimensionals. I drew the black strings in with my SU Black Journaler.

fs92-pink-ornaments-close-up-480-notime.jpg

I wanted to show you this close up as it is a detail I really love. I do it often, and very often it just doesn’t show up on my photos.I haveembossed lines above and below the ribbon. I do this using my Scor-It Mini. It just takes a minute and I think it adds so much. I keep my Mini right where I work so I don’t even have to get up and go to my counter where I keep my other tools, so it’s really handy. Just wanted to show you!

Stamps: Christmas Classics, Many Merry Messages both by SU

Paper: Whisper White, Pink Pirouette by SU

Ink: Black Stazon, Versa Mark, Pretty in Pink Marker, Black Journaler, all SU

Accessories: Pink Taffeta, Corner Rounder, Black Embossing Powder, Dimensionals, Scor-It Mini

That’s it for tonight — a short post again. I’m working on a fun project that may be ready for a Monday night upload — hoping so — it’s a really fun girlfriend gift!!! And as I said before, I will continue working on quick and flat Christmas cards and post those regularly!!! Hope you had a great weekend. We have several inches of snow on the ground. Still hoping it melts, and I do think it will!!! The eternal optimist!!! See you soon!!! Thanks for coming!!!

Oh, almost forgot — those of you who subscribe with Feedblitz — they have not been picking up all my posts — I know they missed one or two this week and they missed several about two weeks ago. I find it very frustrating, but I can’t seem to get it fixed. Just letting you know that you are NOT getting all the updates through Feedblitz of late – I am posting 5/6 times a week — just so you know!!! And THANK YOU so much for reading and checking!!! I truly do appreciate it!!!

26 responses so far

Oct 27 2008

A Graceful Remake

Published by

My original card just wasn’t cutting it for me — nothing terribly wrong with it — but it just looked plain, unfinished. This original card was made for a color challenge at SCS a few months backand I uploaded it over there, but never did post it on my blog as I just felt it wasn’t quite *right*. So this evening I decided to try to do something about it. Let me show you the original, the remake, and then I’ll explain what I did.

remake-original-400-notime.jpg

I just thought it was so plain, something was lacking, maybe the colors were poor choices for this card — here’s the remake I did this evening.

remake-fs-480-wm-notime.jpg

I think it’s a huge improvement — how about you? My remake is large, a full sheet folded in half, so its 8.5 x 5.5. I took my original card and cut the front of the card off — and there you go, an image panel to work with! The only thing I did to that image was to add the black pearls. I think you can see them better here.

remake-close-up-400-x-300-notime.jpg

Just a little thing, but they added a lot! I then white embossed my sentiment along the bottom of my new card front, scored a partial line a little above my sentiment using my Scor-It. It adds so much IRL, but is barely visible in my photo above — but if you look real closely you can see it. I then adhered my image panel to the card and I was done! A remake that made a dramatic difference (in my opinion anyway), but took only a very short amount of time. I do feel so much better about this card now!!!

Stamps: Cross of Christ by Our Daily Bread, Graceful Wordsby SU

Paper: Cameo Coral, Sahara Sand, Black, White

Ink: VersaFine Onyx Black, Craft White, VersaMark

Accessories: Petite Oval Nestabilities and Tag dieby Spellbinders, Scor-It, White Embossing Powder, Ribbon, Cording, Pearls, Mounting Tape, Cropadile, Eyelet, Ticket Corner Punch

That does it for tonight again! Thanks again so much for taking your time to stop in. I truly do appreciate it!!! Wishing you all awonderful week ahead!

20 responses so far

« Newer Entries - Older Entries »