Sep 14 2007
Levi Cowboy
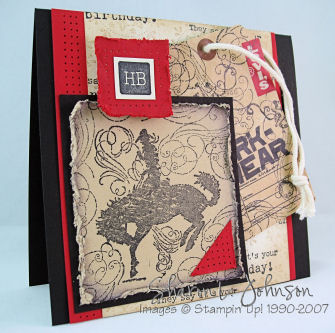
I made this today for the Limited Supply Challenge at SCS. We could use NO store bought embellishments — none — no ribbon, brads, eyelets — no DP, punches, dimensionals. The idea was that we just try to creatively recycle things that are around us — not using embellishments we bought from the store. It was a fun one!!!
I used a tag from my son’s Levi’s — I always save those — I’ve done many cards with them in the past. They come complete with punched corners and string — how perfect!!! And I think they make GREAT guy cards!!! A card I made maybe a year ago with a Levi tag was the ONLY card my DH has ever complimented me on(without being asked — LOL!)!!!
I’m experimenting with different ways to write instructions. Sometimes I think writing step by step instructions is not necessary when my cards typically don’t feature anything difficult or out of the ordinary. I think most people can tell what I did just by looking . This time, I’ll just list supplies (always) and the measurements. From PM’s I get, I think people struggle moreso with measurements — I don’t know — just trying out different styles of instructions. I’m happy to hear your opinions!
- Stamps: Bronc Buster, Wanted, It’s Your Birthday
- Paper: Basic Black, Real Red, Natural Ivory, Confetti Tan
- Ink: Black Stazon, Creamy Caramel
- Accessories: Levi Tag with String, Mat Pack and Piercer, Distressing Tool on Cutter Kit, Sponges, Mini Glue Dot.
Measurements:
- Card: 5 1/2 high x 5 3/4 wide (fits into a 6″ envelope)
- Red: 5 1/2 x 5
- Natural Ivory b/g panel: 5 1/2 x 4 1/4
- Black Frame for main image: 3 1/2 x 3 3/4
- Red HB Frame: 1 1/2″ square
- Red Corner: Started as a 1″ square, cut on diagonal
Desperate Measure: I could handle the limited supplies, but I could NOT handle the NO dimensionals part — LOL!!! I use a ton of mounting tape, Pop Dots and Dimensionals. And that HB really needed to be popped up, especially since the distressed layer under it made a lump — so, I made a home made pop dot — easy and quick and very sturdy, too!!! I cut a 1/2″ strip of paper x a couple inches long, accordion pleated it in my fingers, then wrapped it together tightlywith sticky tape all the way around — all ready and set to use!!! It was really quick to do and worked wonderfully, and I think I will do this again when I need a Pot Dot that is thicker than the purchased ones!!!
Hint: When making a card, sometimes you just end up with what I call “dead areas”. A great way to fill them up and add interest is with piercing — I LOVE to paper pierce — it adds interest, texture, and is often a life saver, taking bland to being an area of great interest!
Thanks for stopping to look!!!
13 responses so far


Neat creation… MORE please! {grin!} One can never have too many masculine card ideas. I plan on trying the homemade pop dot this afternoon… TFS!!!
Wow, look at you……..no store bought embellishments or dimensionals, but a very textured and interesting card still! Great job and cool masculine card. TFS
P.S. We leave sat. a.m. for 2+ wks. Will miss my stamping friends…..
I really like this. Great job. And go recycling!
I love all the cards you’ve done with the Levi tags. You do give good directions and explanations for your cards. Anyone could easily follow them.
Wow — this is so great!!! I have loved your Levi Tag Cards since I saw your first one on SCS!!!
Fabulous card!!! You are so correct about that piercing. TFS your becautiful work each day.
WOW this card is FANTASTIC, and no dimensionals — love the piercing!!
Wow, what a fantastic job you did with this challenge, Sharon! Brilliant idea to keep the jeans tags — you incorporated it great!
Sharon, your Levi tag cards are just FAB!!! Not surprised that your guys like ’em– I think mine would too!!!
What a wonderful idea to use the Levis tag! Your card is so awesome, that you can’t tell it’s a LSC card. You rock, Sharon!
Absolutely awesome. Great job. I love this. I will be adding you to the blogs I love.
Never in a million years would I think there’s anything limited about this card. It’s absolutely fabulous! I’ve always loved your Levi cards and, oh boy, this set is perfect for you! I notice how you used the It’s Your Birthday stamp down there in the corner, too–pretty cool!
I forgot to post this earlier, but I love it when you give “hints”. The piercing to fill in “dead space” is a great one. Any other tips you wish to add on to your blog entries would be greatly appreciated as I love to learn from “the card making masters” 🙂