Nov 10 2008
Stamp Simply Bare Necessities Box
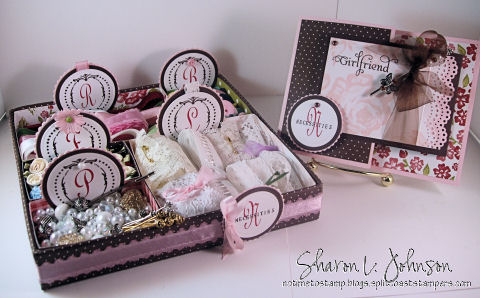
Grandma had a button box, Stampin’ Up! has the Pretties Kit, and now Stamp Simply has a Bare Necessities Box! Talk about fun to make and put together!!! I created this project for a fun *Girlfriend Gift*, and following will be a complete tutorial so you can make one, too — if anyone so desires!!! This is one of those gifts that is as much fun for the giver as for the recipient!!! I had so much fun filling up my little boxes!!! Take a look:
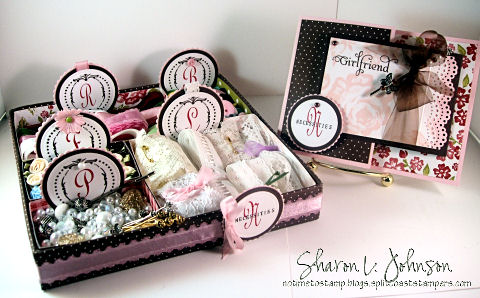
Five small boxes within a sturdy, recycled box base, filled to the brim with fun things for your crafty girlfriend. A kit filled with any crafter’s Bare Necessities!!! And the fun Girlfriend card to give with this gift is a Joy Fold Card, another fun project!!! I’ll show you a few more pictures, then we’ll get down to the nitty gritty of how to make a Bare Necessities Box for yourself.
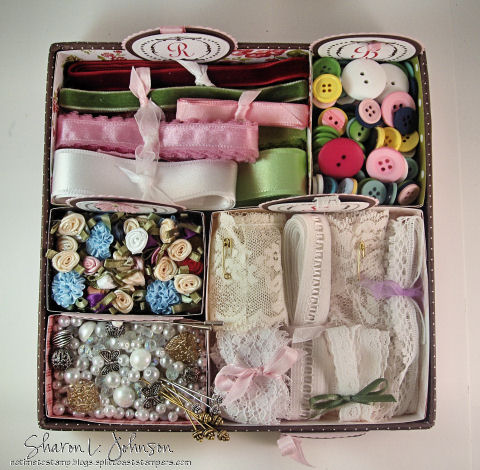
Here’s a peek inside!!! Ooh, I just smile looking at this!!! I’ll try to contain myself, but honestly, this was THE most fun project I think I have EVER done!!! I SO love all these type of things. Hope the recipient does, too!!! Lush ribbons, pretty buttons, vintage/recycled pieces of lace, satin flowers and all sorts of pretties — pearls, pins, crystals and charms!
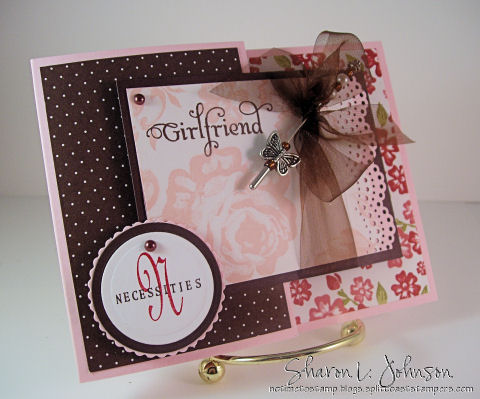
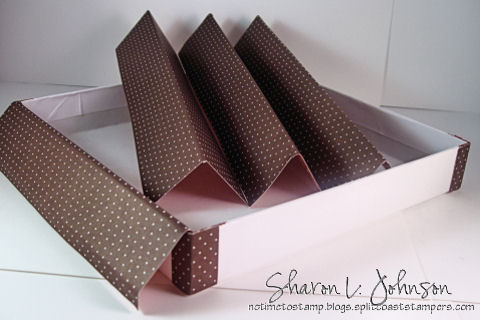
Here’s the Joy Fold Card — so fun to do!!! A great tutorial on this Joy Fold Card, complete with all measurements, can be found at SCS in this tutorial written by Beate — thank you, Beate!!! This is a quick and fun fold that packs a lot of punch with very little effort!
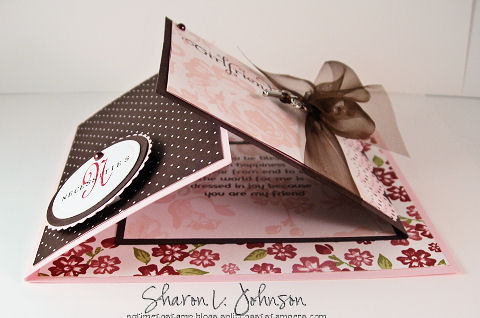
In this shot I’m just trying to let you see how the card functions!
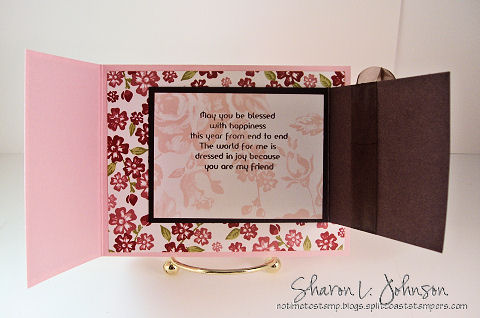
Here’s the card opened fully. This fun girlfriend sentiment, as well as the girlfriend greeting on the front, are in a set called Glamour Girls by Crafty Secrets. I got mine from Joan’s Garden. And now that you’ve seen the completed card, here’s how I did it:
The card base is 4.25″ x 8.5″, and using my Mini Scor-it, I scored at 3″, so when folded my card base is 4.25″ x 5.5″, a standard sized card. The smaller card that will be on top is cut 3″ x 8″ and scored at 4″. That’s it. Add your DP and assemble as shown in photos or, better yet, refer to Beate’s tutorial linked above. Can you see my scalloped top (Martha Stewart Scallop Punch) ? The DP is attached with double sided tape to a piece of SU cardstock — so it is quite thick, but I scored the embossed line above the scallops on my Mini Scor-It without any problems whatsoever — a beautiful embossed line — just a subtle detail, but it’s all the little details thatproduce agreat end result. Here’s a close-up:
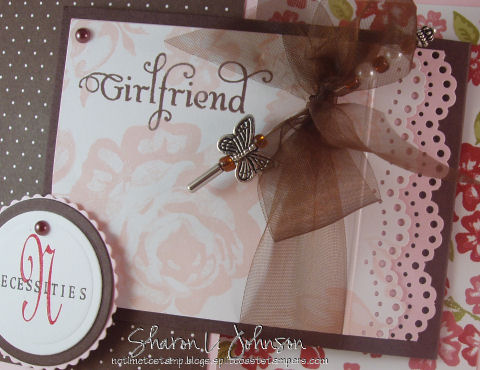
Can you see the detail? I love it! I think adding a bit of embossing with the Scor-It or Mini Scor-It adds so much, with so little effort! If you’re not in the habit of scoring lines for embossed detail — give it a try — I think you’ll like it!!! And, oh YES, my pretty pin!! This post will be continued tomorrow, and tomorrow I will share information on sources for these beauties!!! And the *Necessities* monogram was done with JustRite products, discussed further down! Fun!!! OK, now on to the details for making the Bare Necessities Box.
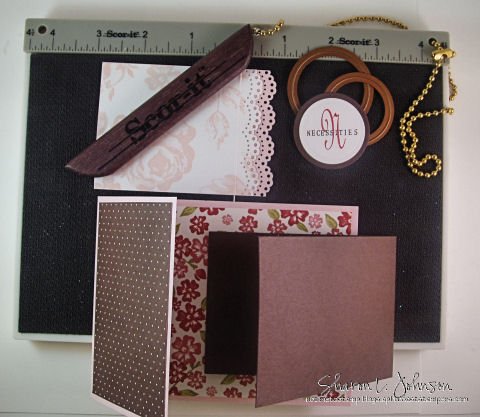
We’re going to start by covering a recycled box base. The box I used was 7.25″ square. And I know many of you may actually HAVE this same box at home. It is the base only of the box containing the Harmony Circle Stamper III Ensemble. As you look at the pictures below, my box is pure white and your box will have the graphics of the JR product on it — but it’s the same box. When I got my Ensemble it was a prototype and just came in the plain box — that’s all! OK, now to cover our box:
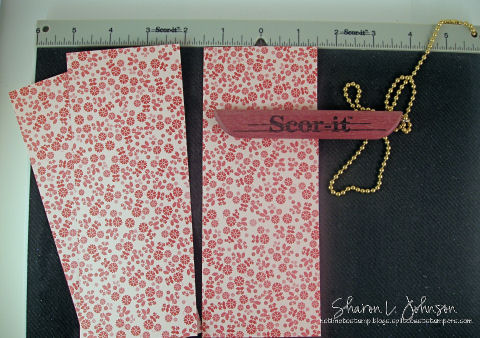
Start by measuring how tall the sides are on your box. My box has sides a little over an inch tall. I wanted to cut my paper about 3 times the height of the sides, so I cut my paper so I had 3″widestrips. Then cut your strips as long as the sides of the box – in this case, 7.25″. Cut 4 strips and then score them right down the middle lengthwise, which for thisstrip was at 1.5″. I am using the Scor-It, and as you’ll see above, I am scoring with the paper upside down. I want the brown side to be the right side — so I want the valley side of the fold on the right side — and to do that I must score with the right side down/wrong side up.
Here’s my 4 scored strips. This is really aneasy way to cover the box and get good corners withoutmuch fuss at all. I cut 4 small pieces to cover the corners, as shown. I also took a brown marker and colored on the top rim in the corner area– I’m just a bit paranoid about any white showing through – LOL!!! To adhere the paper to the box, my choice is Mod Podge. I like it for covering projects as it sticks nice and tight and it never peels up once adhered. Its quick to work with, but can be a bit messy on your fingers. But in my opinion it’s worth it for the nice result it yields. OK, once your corners are all covered, take one of the scored strips, lay it on the rim, as shown, and press it to the inside with your fingers and to the underside, tightly creasing both creases as you press. Once you have formed it to the shape of the box with your fingers, take it off, you will probably have to clip out a bit at the lower inside corner where it goes along the box bottom, and then paint your Mod Podge over the inside of the strip, making sure to cover it all. Then quickly adhere that strip to the box, again pressing with your fingers — but it’ll go right into place easily as you had already formed it before you had any glue on it. Press to make sure all the air bubbles are out, then continue on to do the other 3 sides.
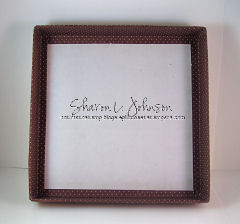
When you get the inside done, it’ll look like the box on the left above. Cut a piece to fit on the inside, which in this case was slightly less than a 7.25″ square, cover the back of the piece with your Mod Podge and adhere in the box, again pressing out all air bubbles. The 2nd photo shows the completed inside.
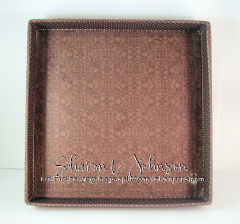
And here’s the outside after covering the sides, then after covering the bottom. In this case, I used a piece just about 7.25″ to cover the bottom.
And now that our box base is done, on to all the little boxes. The measurements provided below are to fit the above-referred to box. If you do this you may have a different sized box base you are using. In tomorrow’s post I will teach you how to determine what sizes you need to cut your paper and where you need to score, for whatever size boxes you need to make. Please check back tomorrow if that’s something you’d like help with.
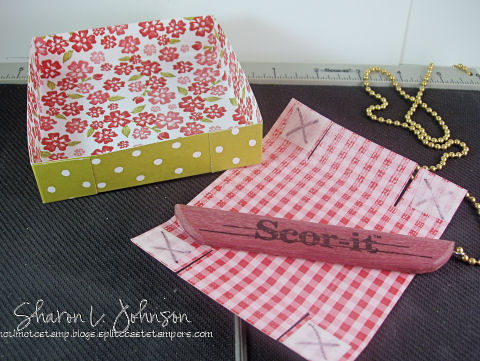
All specific measurements for each of the 5 boxes will be listed at the end of this post. The process is the same for all of them. Once your box is cut and scored (see measurements below), cut your slits as shown above and apply adhesive of your choice to the corners. I have them marked with an X above. There is one major difference here from a normal box. Normally you would adhere your corner tabs on the INSIDE of the box — NOT SO with this box.I want the insides of these boxes to be the nicest sides as that is what we see, so we are going to adhere our tabs on the OUTSIDE of our box, as shown in the photo above.
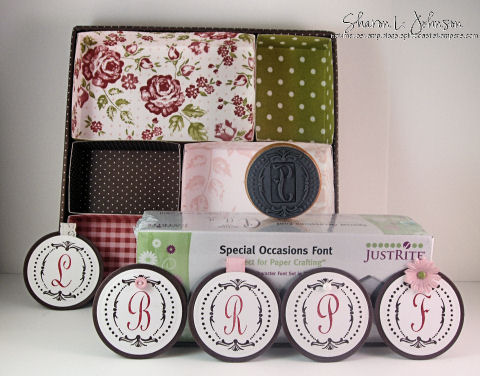
And here’s a pic of all the boxes in the base. You can see they are not squeezed in there super tight as I still needed room to attach my labels and I also wanted them to be loose enough that I could easily removed any filled box without a struggle, and I can. I have also shown my labels partially done. They are made using the Damask Border Starter Kit Iby JustRite, but I used a different font rather than the font in the Kit. I chose the Special Occasions font for my labels, which can be purchased separately.I used markers to color my Initials and my borders – Real Red and Chocolate Chip — to go along with the the SU Bella Rose DP I’m using. Once stamped I cut, embossed and framed them using my Petite Circle Nestabilites by Spellbinders. But this photo does not show the finished label. If you’ll refer to the finished Bare Necessities Box, you’ll see that I also added a pink scallop framing behind the brown solid matting. The label as seen above was adhered to the inside of the box and I then adhered the pink scalloped framing to the outside of the box — just gives a more finished look. And can you see how/why I decorated my labels as I did? I wondered if anyone would ever get this — R for Ribbon, B for Button, L for Lace, F for Flowers and P for Pearls, Pins and Pretties!!! (Cute, huh? LOL!!!)

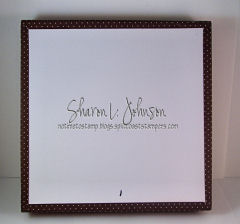
Here’s another front view of the completed Bare Necessities Box. My Necessities label on the box front was made with the same Special Occasions Font mentioned above and the Small Letter Set for Round Monogram Stamper. Rather than placing my letters in the round border formation you so often see, I just placed them in the center grid and got a straight word. I stamped my Necessities first, and then I stamped the N over it.And I’ll wrap it up here with the measurements for each individual box.
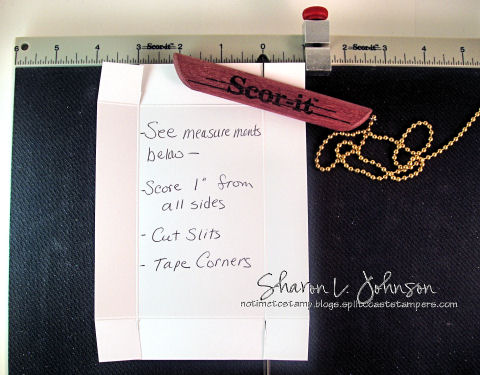
One thing that makes these boxes so easy, is that they are all scored exactly the same – 1″ from each edge. I put my guide/stopper at 1″ so scoring all these boxes was an effortless breeze. Once scored, cut slits on the score lines as show in this photo and photo up higher in this post, adhere tape to corners and tape. Remember, as I said above, for this project adhere you corner tabs on the OUTSIDE of the box. You’ll be done with this project before you know it!!!!
Ribbon Box – Cut paper5 x 7 – Score 1″ from all 4 edges
Button Box – Cut paper 4 1/8 x 5 – Score 1″ from all 4 edges
Lace Box – Cut paper 6 x 6 – Score 1″ from all 4 edges
Flower and Pretties Boxes – Cut paper 3 15/16 x 4 15/16 – Score 1″ from all 4 edges
These are just so quick and fun to make and could serve any number of purposes. I hope you get creative and come up with some more fun things to fill up a box you might make!!! If you’d like to read more about the Scor-It, they have a lot of good info on the Scor-It site. To purchaseeither the full sized Scor-It or the Scor-It Mini, you do need to go through a retailer. My friend Joan over at Joan’s Gardenjust got her order of Scor-It’s in, I know Ellen Hutson usually has them in stock (listed under Tools), and Marco’s Paper also carries the Scor-It Boards. These are all great places to deal with! And if you have any gifts to buy for crafters in your family or circle of friends, consider a Scor-It — I think you’d make someone VERY happy!!!
Thank you for bearing with me though this LONG post. It will be continued tomorrow with information on how to determine measurements for your own box, of any size, as well as informationon the pretty pins I’ve used. It’s super easy!!! Thanks for stopping in and I hope to see you all again tomorrow!!! Have a great day!!!
51 responses so far


Sharon, this necessities kit is FABULOUS! What I’d like to know more about are those beautiful pins. I’ve been searching and have had no luck on cute ones in your kit with the stopper on the ends. Thanks so much for sharing your beautiful project!
Oh my goodness! I love the card, too, but the BOX, the BOX! I love it! What is it about bits and baubles that are so endearing? TFS!
oh heavens, this is amazing Sharon! What a fabulous, unique amazing gift! I would be tickled to recieve this! You are so talented!
Sharon, you are awesome. You not only come up with the most awesome projects, you kindly share directions, measurements, hints & helps. God bless you!
LeAnne
Wow! How utterly generous of you to post the tutorial, complete with dimensions and everything! Your creations are just stunning. The card is breathtaking.
Oh my word!!! Sharon, you amaze me every time you post a creation. What a fun gift that would be to receive ;). That pin on your card looks woderful.
WOW! You are just amazing! This is beyond gorgeous. Every little detail is perfect. Anyone would be thrilled to receive something like this! WOW!!!!!
FUN, FUN, FUN and CUTE, CUTE, CUTE!!! An amazing gift to make and to receive! I would say your blog is one bare necessity with all your great directions and the time you take to explain. THANK YOU!!
GORGEOUS!!!!!!!!!!!! I really need to make several of those for myself. What a fabulous organization tool…and gift, too!!! LOL!!!! I love how you did everything. Of course, the look would not be complete without the JustRite labels!!!! Fabulously done, Sharon!!!!! FIVE ***** WOW!!!!!
Blessings!!!!!
I want to be your girlfriend!!!! Can I huh? Can I? LOL Wow what a wonderful gift. Such a thoughtful project. The card is fabulous too. Sure you don’t need another girlfriend???? LOL Best, Curt
Wow – what an amazing project, and yet you make it look so simple. Gor-jus, simply Gorjus!!!
Words fail me. This is so far beyond a-m-a-z-i-n-g it’s stratospheric. WOW WOW WOW. I have some close and wonderful friends but never in my wildest dreams could I envisage any of them making something as perfect, as heavenly, as utterly, unspeakably, totally breathtaking as this for me. Guess I’m going to have to make one for myself.
A Bare Necessities Box aka Heaven on Earth. Sharon: Thank you so much for your kindness and generosity in sharing this exquisite creation.
Marion, UK
Oh, Sharon! You are killing me! I had my surgery today and my right hand and arm are wrapped in a ton of bandages AND elevated over my head for the next 3 days! Why couldn’t this have arrived in my emails yesterday so I could have at least STARTED it?! Beautiful! Thanks so much for your inspiration This will go at the TOP of my list to do just as soon as I can stamp again! Hugs, Mary (#1volunteer)
Beautiful Sharon…where do you get your hat pins? I have almost run out of my SU Pretties Kit Hat pins and I want some more….Also, I envy your photography work!!! I have a Canon EOS Xti, which was very expensive…and I also have the Corel Paint Shop Pro, which I use…but I can work at it feverishly and never get the results that I want…Your pictures are amazing! Thanks for the tutorial 🙂
My goodness, Sharon! This is a gorgeous gift and thanks so much for sharing all the details.
Oh my goodness Sharon! What a great idea and your Neccesities box is absolutely adorable. I know the lucky friend will love it. I am thinking what a cute idea for my Great-Grandkids for Christmas. Their own little box. Thank you so much for all your details. You amaze me how you figure this all out. You are very, very gifted and we all thank you for blessing us with your talents.
Joan
That box is a fantastic idea! I love that “Joy Fold” card with the DSP and lovely sheer ribbon, too!!!
WoW this is amazing!!! Love the colors and what a creative and inspiring project with a matching card. You ROCK!!!
Oh what a box! I love it and know it must have been great fun to make and fill. I can hardly wait for the directions.
Heather
A-M-A-Z-I-N-G!!!!!
So beautiful, Sharon. Your attention to detail makes this a super WOW project. TFS!!
OMG Sharon!! I don’t know if your recipient will be able to use it because it is soooooo beautiful to look at. Would love to get one of these as a gift. Just beautiful, as always! Thanks so much for sharing your talents.
Sharon, What a great giftbox and card. As always you come up with
beautiful gifts/projects and fabulous instructions too. Barb
WOW! This is really neat. Thanks for all the details of how you made it. I love it 🙂
Oh my word Sharon! What a wonderful gift to receive! I’m even more excited that you have shared with us, how to make it and ideas to fill it! This looks like it took you a long time to prepare for us and I really appreciate it!!
Oh my word! Sharon, this goes beyond anything I have ever seen! Fabulous, utterly Fabulous! Wowzers, how do you think up these absolutely stunning creations? I’m printing this post to study in bed tonight! I can’t begin to imagine how long it took you to prepare this tutorial, we are ever so grateful for your thoughtfulness and consideration in sharing this post, your generous heart speaks volumes dear friend.
Oh Sharon…you totally blow me away with your creativity and beautiful designs! Your friend will LOVE this!! Wow!! Thank you for all of the details.
Your girlfriend will be over the top THRILLED with this fabulous gift box! I wish I knew you better! lol! I do wish it, but not just for the box! 🙂 I think your creativity shines! Thanks so much for sharing your tutorial, which I know must have taken you quite some time to prepare!
Smiles,Deena
My goodness girl, you are PURE GENIUS!!! I love this!!!
sharon, you outdid yourself!! i LOVE this and am imagining all the possibilities!! (admitting that at first, i thought there was lacy underwear in it!!–THAT would be a fun girlfriend or bachelorette gift!). you ROCK!
Ohhh….*sigh* I wish you were my best friend! Any crafter will absolutely LOVE this, Sharon. You’ve outdone yourself here. It is absolutely LOVELY!
Wow Sharon. This is just beautiful. Thanks for the instructions too. Well worth the effort for a special friend. 🙂
How wonderfully creative 🙂 I’m sure your friend will love it. Great instructions too. Glad you had so much fun making it – it is truly a “nottimetostamp” wonder 🙂
Sharon, this is amazing. Thank you for the tutorial on it. What a wonderful gift for a creative friend. I’ll look forward to trying this one out.
And I can’t wait for tomorrow’s post to hear about some sources for the pins. I’m running out of my SU ones from the Pretties Kit and was wondering where I might find more. I thank you for coming to my rescue.
Have a great day.
Wowsers! Can I be your girlfriend? What a creative and beautiful creation. You rock!
I LOVE this, Sharon! A great idea and sooo pretty! Thanks for the how-to!
Wow! you worked really hard on putting this tutorial together! I love it! What a great gift idea!
This stamp was made for you! You ROCK it! I can’t tell you how much I love this one, Sharon! It’s absolutely perfect! TFS! Hope you are doing well and that you have a great day! 🙂
Oh, Sharon, this is AMAZING!!!! …and a tutorial too! You are such a ROCK STAR, girl! I am SO going to make one of these for my girlfriend!!!! Thank you for sharing such a fabulous project with us! {{hugs}}
This is truly an amazing gift idea Sharon!! What a wonderful tutorial! Thank you so much for sharing! I am always intimidated by making things like this, one of these days I will have to give it a try, because they look awesome!
This is awesome!!! I love it, what a wonderful idea and it would be a gift I would love to give or receive. Thank you for shearing so a fabulous idea.
WOWZER!! Gorgeous gorgeous!! So Victorian!! Love your project!! Fab idea!! TFS!!
What a fabulous gift and design! So many great items in such a lovely box! Wow!!!
so glad to be home agin now i can go on your blog every day love the boxs i cant wait to to start stampen my be i will be brave and try to make a box have a awsome day
I can’t imagine any crafty friend who wouldn’t just swoon over this gift! Wow! What a wonderful idea! You could turn a girl’s head, Sharon!
Beautiful projects! I love them! I hope your enjoying your day. TFS!!
Your card and that box are fantastic! I love the colors and design of that card! Thanks for the directions-your projects are always wonderful!
All these beautiful boxes……just in time for the holidays 🙂 Thank you, thank you Sharon!
Sharon –
first of all, I love your blog – you are very creative and really inspiring! I check in with you every morning over coffee!
Second, can you give me the item number of the circle nestabilities that you’ve use to cut out circles like you did on this project? You labeled it as “petite circle nestabilities” but I cannot find those on any retailer site or on the Spellbinders site. I have tried my 1 1/4″ circle punch (by McGill) and its too small. I figure I need at least a 1 5/8″ but am not sure which nestabilities set has that size in it.
Thanks for your help!
I may have just gone over it, but I can’t seem to find the directions and supplier on the stick pins. Can someone direct me?
Finally thought to just go through the November archives and found the answers to my question. Thanks so much for putting the info out there for all of us card lovers!