Search Results for "scor-it"

Aug 08 2008

Stamp Simply #47 – Something Old

Published by

Keyword ssnotime47 -There is no time limit. You can play this challenge and upload yourproject at Splitcoastand/or your Blog, anytime at all! You (and that means anyone and everyone, blogger or not!)can play as many times as you like!!! The point is to keep it simple, quick and have fun!!! Please link back here.

I think we all get so wrapped up into getting new *stuff* — but what about all those old stamps we bought and once JUST LOVED!What happened to them? Today we are going to dig deep into our cabinets and pull out a stamp that we once truly loved and just haven’t touched in ages. Let’s make those old stamps shine again!!!As an alternative,if you MUST use a newer stamp (LOL!), then make sure you useSOMETHING OLD on your card that you once loved– DP,embellishment, etc. (OK, you can even go for an old vintage look if you like!) Let’s show off some of our old favorites, whatever they might be!!!Cant wait to see what you doand, as always, try to keep it simple.Most importantly have fun!!!

Check out Julie Koerberssample here.

Check out Dee Jacksons sample here.

Check out Jennifer Bucks sample here.

Check out Janine Orchards sample here.

Check out Tammy Hershberger’s card here.

Our Stamp Simply Team is smaller today, what with vacations andallthat summer entails!!! But aren’t they FABULOUS!!! Thank you girls!!! Much appreciated!!!

And heres my card:

47-old-520-wm-notime.jpg

This is a stamp I’ve had for years, fairly large, by PSX, purchased from JoAnns. I used the Long Rectangle Nestabilities to cut off only a portion (just a tad over 1/2) of the image. I guess I’m still in a *white* mood from last week and preferred more white to show — so NOT true!!! In all reality, I made a major coloringmistakeon theleft side of this image,so rather than trash it, I just used my Nesties to cut and emboss that which was still OK — how’s that for a save!!! Here’s my Copic colors:

47-old-markers-480.jpg

And by showing you these I am by no means trying to say that these are any fabulous color combinations — I am lacking in certain colors and need to do some shopping real soon!!! But, they are what I used on this card.

470-detail-400.jpg

HereI’d liketo show you a bit of subtle detail that really adds a nice touch IRL. I embossed 5 lines on my Mini Scor-It, each 1/4″ apart. That gives you a 1″ embossed area, the same width as the ribbon.

  • Stamps: Tulips by PSX from JoAnn Fabric
  • Paper: PTI White
  • Ink: Brilliance Black, Copics to Color
  • Accessories: May Arts Sheer Ribbon, Long Rectangle Nestabilities by Spellbinders, Scor-It Mini

Remember when you upload to use the keyword above, followed by a comma.Please come back here to post (as a comment) that youve played, and provide a linksowe can check out your card right away. You can find all cards uploaded for this challenge by clicking Gallery Submissions Here.

Some wanting to play said they have never uploaded before. If thats you and you need help uploading, just go to my Challenge No. 1 here.

Thats it for today — wishing you all a wonderful summer weekend!!! Thanks so much for stopping in!!!

53 responses so far

Aug 04 2008

Had a Great Weekend!

Published by

Hi everyone — had a really great weekend!!! This weekend was the 1st ever Stampin’ in the UP event. It was so well organized and run ina fabulous facility with LOTS of room to work, eat and socialize AND a wonderful in house restaurant where we ate many meals! We had a small group of 22 who participated in card swaps, shoe box swaps, fun, games and prizes. I did a presentation on Saturday, and since requests had been put in earlier as to what these girls wanted, it was a breeze!!! They wanted toseeand use product they were unfamiliar with, so at their request I demoed and allowed them to use Eclipse Tape, the Score-It, Scor-It Mini, Scor-Pal, Nestabilities and other dies by Spellbinders, and several different of the JustRite Stampers.

But, as usual, the best part of this event from my perspective was meeting and visiting with the people. Most participants were from within about a 100 mile radius, but we had 2 brave souls who ventured into our northlands from down below — LOL!!! And here they are:

barb-schram-and-me-notime-smaller-360.jpgjoan-fricker-smaller-180-notime.jpg

On the left is Barb Schram from Grand Rapids, Michigan, then me, then on the right is Joan Fricker from Northern Indiana. I’ll start with Barb — well, my goodness — her ever so sweet DH (and he REALLY is!) took her on this 8/10 hour journey, and the moment they walked in the room it was like I’d known her all my life — we just CLICKED!!! We have been Blogging/SCS buddies for a year or so. We became fast friends and have kept in touch regularly, and I’ll tell you, to finally meet someone face to face whom you have been friends with already is such an awesome experience. No introductions, no *get to know you stuff*, just one big hug and start visiting right where you left off the last time you chatted online!!! Barb is an awesome person, a fabulous designer, an absolute delight to be with and a very, very good friend!!! I can’t wait until we can meet up again!!!

Next is my good friend Joan Fricker who came even further, from Northern Indiana. Joan and I also met online maybe 6 months or so ago, and this is the 2nd time in as many weeks that I’ve had the pleasure of spending time with Joan. Considering the miles between us, that’s pretty amazing!!! Joan and I were in the same Copic class2 weeks ago in Chicago at CHA — gee, she puts on a lot of miles!!! Joan has a very, very interesting background, which I’ll share more with you in about a week — need to give her a chance to get home!!! I was just thrilled to pieces to see Joan again and somehow I do think I’ll be running into her some more — LOL!!! More on Joan in about a week!!!

Friday night as the girls participated in games and challenges, I chose to sit and color some images with my Copics as I visited with my table mates. My friend had brought several Gina K sets with her, so I stamped and colored those images — how fun!!! Here’s a card I made with one imageafter I got home:

orchid-500-wm-notime.jpg

This beautiful orchid is in a Gina K set called Botanical Dreams and was drawn by Asela Hopkins. This is such a fun image to color — I did several once I had the opportunity, so you’ll be seeing more cards with this image over the next few days or weeks. This set alsohas several lovely single words which, of course, I did not stamp when I had the opportunity. Oh well –This is just a simple card which I did for the Sunday Featured Stamper Challenge at SCS — the featured stamperI cased is Shellapoo and, oh my, she has quite the interesting story and certainly serves as an inspiration to us all. You may read about the challenge and about Shellapoo right here. I loved this simple layout in this card of Shellapoo’s. I followed it pretty much exactly, but added ribbon and a die cut corner. Thank you Shellapoo!!!

  • Stamps: Botanical Dreams by Gina K, Floral b/g by SU
  • Paper: PTI White, SU Pretty in Pink and Rose Red
  • Ink: Unknown Black, SU Rose Red, Copics to color (colors unknown)
  • Accessories: SU retired Organdy, SU Pretties Kit, Corsage Pin, Cuttlebug die cut corner, White Pearls, Long Rectangle Nestabilities by Spellbinders

That’s it for tonight — thank you so much for stopping in, and also, I just can not thank you all enough for all your emails, comments, phone callsand the many kindnesses extended to me over the pastfew days– THANK YOU ALL SO MUCH — Blogland readers are truly THE BEST!!!!!

10 Minute Tuesday is still the plan for tomorrow!!!

18 responses so far

Jul 12 2008

JustRite Wedding for CHA

Published by

CHA is rapidly approaching and I’m so exicted!!!! I’m going and I can hardly believe it!!!! For those who may not know, CHA stands for Craft and Hobby Association and their Summer Convention and Trade Show is being held in Chicago next week, Friday through Sunday, July 18 – 20. And to answer the question I keep getting — NO, Flourishes does not have a booth there, but maybe one of these days!!!! Now, wouldn’t that be something!!! But both Jan Marie and I will be there shopping our hearts out for Flourishes, along with Susan Roberts, one of our fabulous Design Team Members. Can’t wait to see what we find to fill our shelves with!!! Fun, fun!!!

I do, however, have one little job at CHA that has me SO excited!!! You all know how I love using my monogram stampers by JustRite — well, I will be one of the demos working at the JustRite booth — how fun is that!!! And wait until you hear who all the other demos are — I’llhave the schedule at the end of this post. All I know is that I’m going to have a hard time tearing myself away from their booth!!!! LOL!!! Anyway, here’s my project, along with a few extras I made to go along with it.

cha-trio-520-wm-notime.jpg

What I’ll actually be doing as the demo for JustRite at CHA is the bridesmaids dress on the right. Both the dress and tuxedo are favor boxes cut by AccuCut. How fun and easy they are toput together!!!! The monogrammed CHERISH is one of the new releases by JustRite — oh, just wait until you see ALL they have coming out to go with the stampers you all already have — you won’t believe it, you truly won’t!!!! I used Petite Circle Nestabilities to cut and emboss my monogram tags. The C-45 makes it so quick to mass produce these tags in the event you may be doing a real wedding or other large project.

cha-placecard-480-wm-adj-notime.jpg

This bride has her table settings all set to go with the favor boxes and place cards — aren’t they just the most gorgeous things!!! The frame for the place card was made by cutting a rectangle of white, then just cutting the center opening with a Long Rectangle Nestability, and adhering the frame onto the black card. Names can easily be written with the Inkksentials Opaque White Pen.

cha-pair-480-wm-notime.jpg

The groom’s tux is stamped, tone on tone, in black withthe Damask background stamp. His shirt was embossed easily using the Scor-It, black Pearls were added for buttons, and a tiny flower, folded into quarters was attached with a black brad. The tux, shirt and bowtie were all done on the AccuCut, as was the dress. And, of course, all monogram tags are done with the monogram stamper by JustRite.

The dress and place card were stamped with the flourish stamp in Wedding Essentials, gone over with the Quickie Glue Pen, and covered with Dazzling Diamonds. The dress has a Black Sheer Ribbon belt. Such FUN to make these!!!!

This bride is also ready with the cards requesting her bridesmaids to serve and her Save the Date announcements.

cha-serve-480-wm-notime.jpg

What a gorgeous bridesmaid! She is from Wedding Party, colored in with Copics and adorned with pearly colored Pearls. Her dress bodice was colored with a black Copic, gone over with the Quickie Glue Pen and Dazzling Diamonds. The Will You Serve sentiment is from Wedding Essentials.

cha-date-480-wm-notime.jpg

Again, continuing in the same theme. The sentiment, Save the Date, the rings and the flourish are all from Wedding Essentials. A pretty self-explanatory card. And I’ll tell you, making cards and projectslike these — with the flourishes and glitter — are just my all time favorites!!! They have class, elegance, eye-appeal and, best of all — they hardly take any time at all!!! Now, THAT I like!!!

Now, back to CHA and some important things to know — if you’re going to be there, PLEASE come to see all of us at the JustRite booth and do some fun make-n-takes. There will be 9 different make-n-takes!!! JustRite will be located in Booth #3309 and has 32 new products to introduce — can’t wait!!! Here’s the schedule of fun events planned:

Friday, July 18 — 9 – 11 a.m. — MICHELLE WOODERSON (Mish Mash)

Friday, July 18 — 1 – 3 p.m. — SHARON JOHNSON (notimetostamp) (that’s me!)

Saturday, July 19 — 10 – 12 noon — TAYLOR VAN BRUGGEN (tayloredexpressions)

Saturday, July 19 — 1 – 3 p.m. — JERRI JIMENEZ (Jerri Kay)

Sunday, July 20 — 10 – 12noon — SUSAN ROBERTS (rainy)

Before, after and in between the above, there will be a ton of fun projects being conducted by the JustRite crew!!! And, to SEE all the projects, read about each designer, and see some of the soon to be released new products, check out the JustRite Blog.

If you’re at CHA, we surely would hope to see you!!! I’d LOVE to meet each and every one of you!!!

Thanks for stopping in — hope you are having a wonderful weekend — we are having such beautiful weather today!!! Hope you are, too!!!

25 responses so far

Mar 03 2008

Cherry Cheesecake

Published by

This is a card I did for Jami’s Swap for the Occasions Mini. I had to use Tart and Tangy and I chose to use the Summer Picnic Designer Paper that coordinates with it — fun!!! I made a card that has an inside pocket that will hold a recipe. Here it is:

jswap208-recipe-holder-540-wm-notime.jpg

I used the fun paper with the cherries on it and the cherry stamp since I was enlcosing a recipe for Cherry Cheesecake. I also put a tab on the top to sort of look like an index tab in arecipe box. I made the card shorter so that the top of the tab is at 4 1/4″, so it still fits into an envelope. I colored my cherry stamp with markers. Here’s a picture of the inside:

jswap208-recipe-inside-540-wm-notime.jpg

Isn’t it cute? A fun way to enclose a little something extra with the card. This would also serve well as a gift card holder. This is a really good and really simple Cherry Cheesecake recipe. If you’d like it, here it is:

CHEESECAKE

Make, or buy prepared, standard graham cracker crust — use a larger pie pan or else it will overflow.

For filling:

  • Mix 1 envelope Knox gelatin in bowl with1/2 cup sugar.
  • Add 1 cup boiling water and stir until dissolved well, about 5 minutes.
  • In mixer, beat together 2 8-oz. packages of softened cream cheese and 1 tsp vanilla, beating well until smooth. Slowly beat in gelatin/water mixture. Pour into prepared/cooled crust.
  • Refrigerate until firm — about 3 hours. Top with cherry pie filling.

OK, now back to the project at hand — I have prepared a template for this card. Using the Scor-Itmade this super quick and easy. Here it is:

jswap-recipe-template-540-wm-notime.jpg

  • Cut your cardstock 5 1/4 x 11
  • Score in half at 5 1/2
  • Using a paper cutter, cut off 1 1/2″ from the right edge, as shown in photo, ONLY up to the score mark
  • Now comes the fun part, and it is so super easy using the Scor-It. Just push your template up against the raised metal rail, as shown in photo. This gives you the perfect line to score on without any thought or measuring — just run the tool straight on down to score the paper. Done — Perfect!!!
  • Round your corners, fold the flap up, securing sides with red sticky tape to form pocket. Decorate as desired.

All the entries for this swap will start being uploaded at SCS today, 3/03, so if you’d like to check them out, click here. The keyword is jswap208.

And here’s a complete Supply List:

  • Stamps: Tart and Tangy, It’s Your Birthday
  • Paper: Bashful Blue, Real Red, Whisper White, Summer Picnic Designer Paper
  • Ink: Black Stazon, Markers in Real Red and Old Olive
  • Accessories: 5/8″ Grosgrain Ribbon, Stapler, Brad, Dimensionals, Scor-It, Crafter’s Tool Kit. Punches used: 1 1/4″, 1 3/8″, Scallop, Corner Rounder, Round Tab

Hope all the swappers who got this enjoyed it — it was fun to make!!! Thanks so much, everyone, for stopping in — truly appreciate it!!! I have a full agenda this week and should have regular uploads. See you later!

44 responses so far

Feb 25 2008

Seashell Gift Set

Published by

Well, this isn’t complete, but it will be a Gift Set when done! I only have 1 card to show you, and there will eventually be 6, all with the same layout, just very slight variations. AndI madea small desk top box to store/display them in. This box is wider than the last box I did in a similar design. At 1.5″ wide this box will easily hold 6 cards and envelopes.

cb-shells-both-540-wm-notime.jpg

I’ve had this gift set idea in my head for a few weeks, and when I spotted Beate’s Weekend Sketch Challenge this week, I instantly KNEW it was the layout that would work for thisproject. So, my card is for Beate’s WSC36. This is also the project I will use for a Cuttlebug class I will teach later this week. Girls sure love their Bugs!!!!

cb-shells-card-540-wm-notime.jpg

I used the new folder called Shell Collage for the Cuttlebug and another small folder in a set of 4 called Collage. I think this one is a sand dollar — how perfect. The stamp set is a new SU set called Seaside. That interesting open weave fiber is something I’ve had for many years. When our local Hallmark store went out of business, this was on clearance, so I picked up what they had. I don’t use it often, but I think it’s just great for the seaside theme!!!

cb-shells-box-540-wm-notime.jpg

And here’s a closer view of the box — no top, just holds the cards on a desk or table for convenience and display. The starfish is stamped on Vanilla, colored, cut out, mounted to Chocolate Chip and cut out again with anarrow frame. It is adhered to the box with mounting tape.

To make this box start with a sheet of cardstock cut 7 x 7.5. With the 7″ side pushed up against the rail of your Scor-It, score 2 3/4″ from each edge. Turn the paper so the 7.5″ side is pushed up against the rail and score 1.5″ from each edge. Cut on the lines as shown in the photo of my template below. Again, I like to slightly angle cut those center pieces so they tuck up inside nicely when the box is folded.

cb-shells-template-notime.jpg

Hope showing the template helps — it’s a quick and simple little box! Fun!!! I am totally addicted to simple, little boxes!!!

  • Stamps: Seaside and Season by Season (might be retired?)
  • Paper: River Rock, Soft Sky, Chocolate Chip, Very Vanilla
  • Ink: Timber Brown Stazon, Chocolate Chip, Soft Sky
  • Accessories: Aquapainter, Mesh Ribbon, Hemp, Eyelet, Cropadile, 1.5″ Round Punch, Cuttlebug and Shell Collage and Collage Embossing Folders, Mounting Tape, Pop Dot.

Guess that’s it on this one! Hope you all had a wonderful weekend!!! My next upload should be a sample from the Occasions Mini, if all goes as planned — LOL — and we know that never happens!!! But that’s my goal!!! As always, thanks so much for stopping in!!!

37 responses so far

Feb 14 2008

Index Card Box

Published by

Finally!!! I got my box made to hold the index cards I am doing for the Divine Design Bible Verse Challenge. Now, I’m all caught up and can just post with the rest of them on the 8th of each month!!! Here’s a photo of my index box with the 2 index cards in it that I’ve done already.

index-box-filled-540-wm-notime.jpg

This is an open box, no cover — works perfectly to store my Bible Verses, plus it shows them off as well!!! Wouldn’t this be just adorable done in a kitchen theme and with recipes — hhhmmm, I do have some nice kitchen stamps!!!! Just maybe —

These index cards are 4 x 6, so my box is 6 1/4″ wide, 2 3/4″ high, and 2″ deep. You can make it with 1 sheetof cardstock, cut to 10 1/4″ x 7 1/2″. It is scored on the Scor-it. Here’s a picture of my template with the score marks and measurements on it:

index-box-540-wm-notime.jpg

Lay your paper up against the ruler so the longest end of the paperis along the ruler markings. Score 2″ in from each end — very easy as you have a ruler on each side of center.You will be left with a 6 1/4″ strip in the middle. OK, now turn your paper so the shortest end is up against the ruler markings, and score 2 3/4″ in from each end. You will be left with a 2″ strip in the middle. That’s it for scoring — how simple!!! At this point I just like to fold it on all the score lines so everything is easily defined. Now cut on the two lines as shown in the photo, allowing your box to fold.

I used paper from a 6 x 6 pad of Periphery by Basic Grey, and being 6″ it works perfectly for this size box. To cover the exposed sides of the box, cut 2 pieces of DP 6 x 2 1/2. Cut 2 more pieces 2 1/2 x 1 3/4. These are for the 2 ends. I thenDTP’d (direct to paper – apply ink to paper directly from the pad) the edges of all 4 of those DP pieces first with ColorBox Chalk Ink in Ice Blue and then with Tim Holtz Distress Ink in Vintage Photo. Here’s a picture of the actual box as I am decorating it:

index-box-flat-adj-540-wm-notime.jpg

Before I go any further — do you see how I’ve cut those center pieces at slight angles on the sides? I like to do that just because it makes the box work better. There are no edges that might bind or no edges that might stick out a tad when you go to fold and adhere it together — it will fold perfectly, no binding, nothing sticking out — guaranteed!!!

OK, the 2 sides and back are ready to be adhered to the box, but the front first needs to be punched out. Punch the box itself, center front, with the 1 1/4″ SU punch, centered. Then punch the DP in the same position, but with the 1 3/8″ punch — you’ll now need to DTP the edges of the DP you just punched out. Now do any stamping you like on this DP piece. My Bible Verse is computer generated: I have hidden your word in my heart that I might not sin against you. Psalm 119:11 I thought this verse was very appropriate for a box containing verses for memory. The *Forever* in the copper label holder is also computer generated, and I thought the word *Forever* was appropriate as God’s Word is the same yesterday, today, tomorrow and Forever! I punched two holes with the Cropadile that I ran the ribbon through. Oh, the verse is on Paper Trey white, which I love because it *rags out* (LOL!! my own word) so easily and nicely when I want to distress and curl my edges. There is a strip of coordinating striped paper behind it, just because it needed *something* — LOL!!! It is also adorned with a photo turn on top. I guess that about does it!!!

  • Stamps: Flourished Elements and Many Sentiments, both by Flourishes
  • Paper: SU Chocolate Chip. Periphery 6 x 6 pad by Basic Grey
  • Ink: Versa Fine Onyx Black, ColorBox Chalk Ink in Ice Blue, Tim Holtz Distress Inks in Vintage Photo.
  • Accessories: Computer, Aged Copper Hodgepodge Hardware by SU, Cropadile for holes, Distressing Tool on Cutter Kit by SU, 1 1/4″ and 1 3/8″ round punches by SU.

These little boxes really are very easy, and FUN, to make!!! Try one out, whether it be for Bible Verse cards, recipes, names and addresses, oh!, a listing ofbirthdays by month, wouldn’t that be fun — whatever — they just look so pretty out on display!!! If you decide to try one, please link back here so I can see it — I’d just love to see what anyone else would come up with.

Again, thanks much for looking!!! I surely do appreciate it!!! Tomorrow I’ll have my Stamp Simply Challenge up — and it’s a little different than usual this time, but still super simple!!! And I’m using brand new uninked SU rubber to make my sample — can’t wait!!! See you then!!!

49 responses so far

Jan 29 2008

Score Board Comparison

Published by

Four months ago I didn’t even know a score board existed. Today I own two of them — the Scor-Pal and the Scor-It, and I’ll tell you, I’ll never again be without one. As far as I am concerned a score board is every bit as essential to the card maker and paper crafter as is a paper cutter. I have had about 3 months experience with the Scor-Pal and about a month with the Scor-It. Both boards do essentially the same thing — score and straight line emboss paper — but they just function in different ways to accomplish this.

scorpal-540-notime.jpg

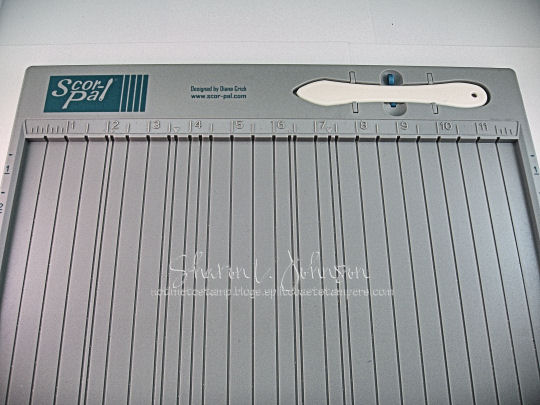
The Scor-Pal is a board with numerousgrooves right in the board. You lay your paper on the board, select the groove you want,and run the scoring toolalong the groove. It presses a groove, or embossed or scored line, in your paper, the embossed side being on the underside and the debossed, or dented side, being on top as you are pressing into the groove.

scorit-3rd-540-notime.jpg

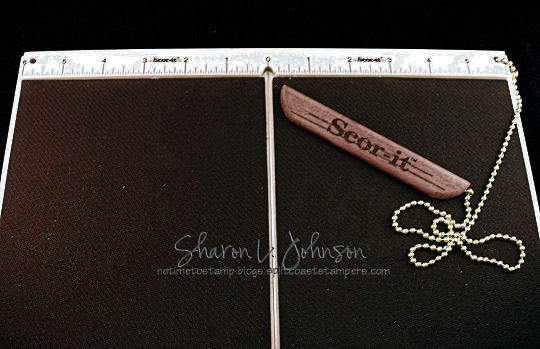
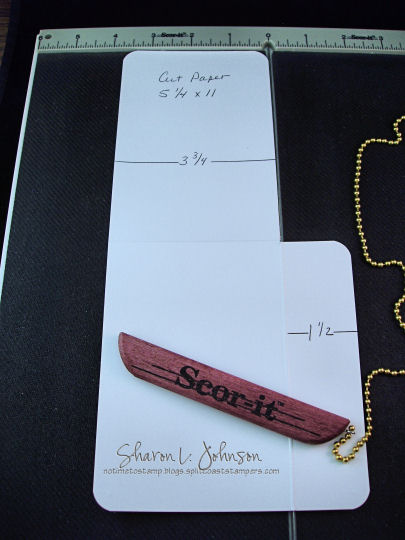
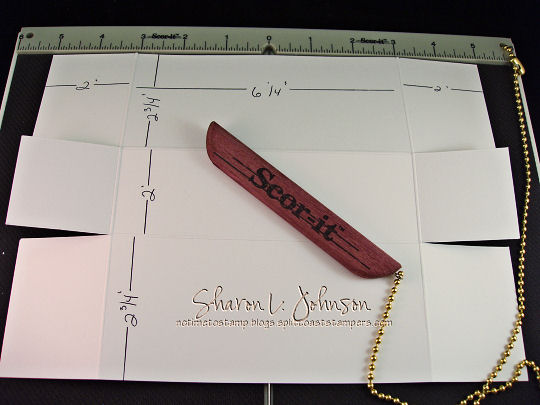
The Scor-it is a board that has one center rail on which you score, or emboss. It is a metal rail that is raised up a bit higher than the board. When you lay your paper on the board you then run your scoring tool along this raised rail. The tool has a groove in it, so as it passes along the rail the paper on top of the rail is left raised, or embossed, leaving the scored line, or embossed line on the top of the paper, with the debossed, or dented in side, on the underside.

Size/Weight/Construction

Scor-Pal: Measures 12 7/8 x 14 1/4″, weights exactly 1 #, is completely plastic, has 4 rubbery feet, has a plastic scoring tool that snaps into the frame of the board for safe keeping when not in use.

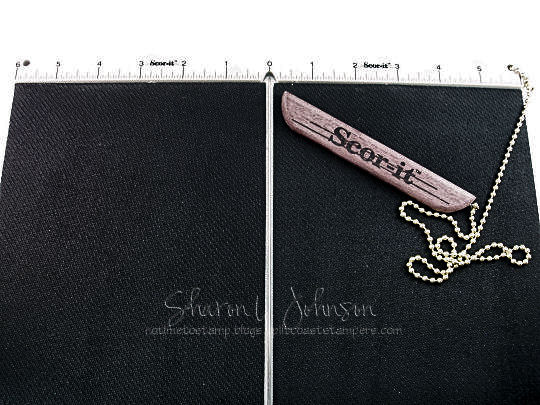
Scor-it: Measures 12 3/8 x 13 3/8″, weighs 3# 7 oz., is mostly plastic but the bed/table is much thicker than the Scor-Pal, accounting for the extra weight, has 6 rubbery feet, has a wooden scoring tool that is attached to the board with a chain. The rail that you actually emboss on is metal. There is also a metal stop guide that you can easily attach which you would use if you were mass producing an item anddoing repeated scores on the same mark.

Ruler Markings/Bed/Function

Scor-Pal: The table where you lay your paper is plastic and has a raised fence on the top where the ruler is and the sides, and the idea is that you push your paper up into the corner, hold it with one hand (it can’t move because of the raised fence), and score with the other. The grooves basically go in 1/2″ increments, with some additionalgrooves for common scores required by card makers (4 1/4, 2 1/8 , etc.,as well as markings for the 1/3 points on an 11″ sheet).There are additional ruler markings,without grooves, for the 1st inch and the last 1/2 inch of the ruler. As long as you are doing scoresusing standard and common measurements, you push your paper into the corner and score on your desired mark. And as long as you want to score on the standard measurements that have grooves, you can score multiple scores onone sheet without movingthe sheet. If you want to score on an increment not accounted for on the board, you do some quick math in your head, and move the paper out from the left edge, pulling it away from the fence. If you want to score at 5 3/4, you would pull your paper away from the left edge and line it up with the 1/4″ mark, then you would score on the 6″ groove (6 minus 1/4 = 5 3/4).

Scor-it: The table where you lay your paper is rubbery, so once you position your paper where you want it, it won’t move one bit. There is only one place on this board to score, and that is on the metal rail right in the center. The ruler, which has all standard ruler markings, measures out in both directions from center, centering being 0. It is very easy to find center on any size piece with the ruler running in both directions from center. To score 2″ from an edge, you merely place your edge on 2″ and score. If you want your next score at 4″, move your paper to the 4″ marking and score again, etc. Your paper must be moved for each score. The non-slip surface makes this very easy. There is a fence on the top along the ruler edge to butt your paper up against. There are no fences along the sides, allowing you to use any size paper and have your paper extend over the edges as you place it where needed. You can score at any increment desired, just place your paper edge at that ruler marking. Also, on the rail where you run the scoring tool, it is notched up into the ruler, allowing you toget your tool up above the paper so you never miss that very top portion as you begin your score.

Performance

Information taken from the product packaging:

Scor-Pal: “When possible, always score with the grain of the paper to avoid cracking. This is very important when using textured or heavy weight card stock.”

Scor-it: “Score with or against the paper grain. It can handle up to 24 pt board. It will also score thin metals, plastics, synthetic and hand-made papers, metallic coated papers and much more!”

The following are results from tests I did with papers I had at home:

Standard Cardstock: Both scored equally as well.

Mirrored Metallic Cardstock: Both scored equally as well.

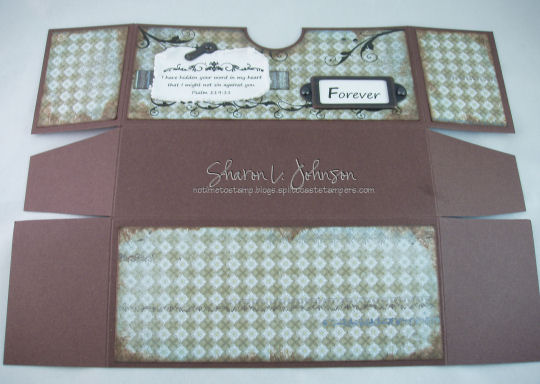
Backing Board from SU 12 x 12 DP package: The Scor-Pal score was light, but suitable. The Scor-it score was noticeably deeper.

Thin Chipboard Coaster: I had problems with the Scor-Pal. The scoring tool would not follow the groove well, it wanted to run off track. It seemed to follow better in one direction than the other. The score was effortless and perfect with the Scor-it.

I wish I had metal to try, but I didn’t.

That pretty much wraps up the facts — hope I didn’t forget anything. If I did, just ask and I’ll see if I know. If anyone reading this has comments or any experience they care to share, those comments are welcome. The sole purpose of this post is to answer questions that readers have had about both these score boards. Which board anyone might choose will depend on their needs and preferences.

Hope those of you considering a score board will find this helpful!!! As always, thanks for stopping!!!

Editing to Add: The question I have been repeatedly asked these last few weeks is if I could only keep one, which would it be. I see that has come up again in the comments, so just let me say, it’s a decision I don’t have to make, and I’m glad for that. Both of these score boards live happily, side by side, in my stamp room. I use them both every day. I have the best of both worlds. There are2 major differences I see here, and each of you must decide for yourselves what is important to YOU and the way YOU work.

The ruler — do you want to have the convenience of scoring within the grooves on the standard measurements; or do you prefer the flexibility of moving your paper to the exact position you need on a well marked ruler. The answer to this, in large part, will depend on the type of work you do most often.

The item being scored — do you strictly use standard cardstock, or do you venture off into other projects requiring some more non-standard or heavier materials?

I can not and will not endorse one product over the other — like I’ve said before, it’s like being asked which child is your favorite — you don’t have a favorite child — you love them each for what they are!!! I love both my score boards and I know you’ll be happy with which ever one you choose!!!

Both boards are available for purchase at The Stamp Simply Ribbon StoreScor-It, Scor-Pal.  Both boards are available in 2 sizes.

70 responses so far

Jan 21 2008

Always, Plus Bundle

Published by

This card was made for Sunday’s FeaturedStamper Challenge at SCS,Kathyc. I’m a day late, but that’s OK. I have always loved Kathy’s work — what a great featured stamper!!! Here is her gallery.And here is her card that I chose to case. Here’s my card: Continue Reading »

25 responses so far

Jan 20 2008

A Dirty Challenge

Published by

I did this project for Jami’s monthly challenge to all Dirty Girls, present and alumni. This month’s challenge is called *Girls Just Wanna Have Fun*! We were to use a girl in our project, and something *sweet*, and it could NOT be a standard A-2 sized card. Well, I don’t have many girl stamps, so I used my Elzybell from our original challenge 2 months ago. And as far as *sweet*, well, let’s just say that Elzy herself is *sweet*!!! And this is not a standard sized card, it is a 5 x 5 pocket book that I made from scratch, and in the pockets are several dozen stamped images of Elzy and some sentiments to go with. I only have 3 Elzy stamps, and they are all related to the winter theme, thus the *Winter* on my book cover. This is a little gift for a friend who loves all the Elzy’s but doesn’t have any stamps of her own. Thought she might have fun with some images!!!

All of the uploads to this challenge will start coming in on Sunday morning, 1/20, and they will be coming in all day, so check back frequently for some fun cards. The keyword for this challenge is DCG108 (DirtyChallenge GirlsJanuary 08), and if you click hereyou’ll be able to see all the uploads.

jami-dg108-540-wm-notime.jpg

I received a gift in the mail the other day and wanted to try it out, so this is my first project using the Scor-It. Yes, it is a scoring tool, similar to, but still quite different from the Scor-Pal which I have been using for the past couple of months. As soon as I received my Scor-It, I went to their site to check out the projects they showed. Wow, they had alot of projects and a book made in a similar fashion to this caught my eye. Well, wouldn’t you know it, but today when I went back there to read the instructions, I couldn’t find it anywhere, so I just winged it — LOL!!! — and it came out great. It works well, functions properly and I will definitely be doing a book like this again.

jami-dg108-540-wm-inside-notime.jpg

I do not have a tutorial here for youbut I am sure I can findone for this type of book somewhere that I can come back later and link for you — but just basically the spine of this book is scored in 1″ increments and accordion folded. It is attached to the book front and back, and the way it is taped together it forms a really nice spine giving you nice tabs inside the book to which you adhere your pages. My pages are merely pieces of 2-sided DP, scored 2″ from the bottom, and then this 2″ flap is folded up to form the pocket. The covers of the book are 5 x 5″ pieces I cut from the backing cardboard that comes in the SU DP packages. They are a great weight for this type of project. They were then covered, inside and out, with the DP I used, Twirl Collection by Crate. I adhered the DP with Mod Podge.

And as far as my new Scor-It, well, it worked wonderfully for this project. It was used to score the spine of the book and the 2″ flaps to form the pockets of the pages. It is a 12 x 12 bed that is lined with a black rubbery pad that holds your paper very tightly. There is ABSOLUTELY no slippage at all!!! To make the score marks, there is one runner in the center of the board that you run the tool over to score. With this board you must move your paper for every score, but I found it to be quite easy to do. The ruler markings at the top of the board are very clear, giving you every marking, just like on a ruler, so there is no guessing at to whether or not you are on the right spot. And with the rubbery mat, there is never a problem with the paper moving or slipping. I will say, on my first pass over my test paper with the scoring tool, I cut my paper right in half — LOL!!! Good thing it was a test piece!!! It requires a much lighter hand than I had expected it would. In 2 or 3 passes I had the *feel* down pat. I really enjoyed the Scor-It, found it to make nice sharp score lines and feel it’s strong points (for me anyway) are the well marked ruler at the top and the non-slip surface. So, that was my first experience withmy latest new toy!!!

OK, now back to how I decorated my book cover — well, I will be the first to admit that I am not at all pleased with what I did here — it is definitely a case of not knowing when to quit!!! I really debated not uploading this as I am so displeased with it’s outward appearance, but I buried my pride and decided to upload it anyway as I really do like the pocket book idea and how the book itself came out! It’s so fun to have all those little pockets to fill up with whatever!!! I will make another one of these as soon as I’m able and do a better job on the cover — and provide links and/or some mini tutorial photos to follow. And this was not a super time consuming project — it really does go together rather quickly!!!

  • Stamps: SU Season by Season. Elzybells by AMuse.
  • Paper: Papertrey White, SU Black, Twirl Collection by Crate Paper.
  • Ink: VersaFine Onyx Black. SU Pretty in Pink and Blush Blossom. Spica Clear Glitter Pen.
  • Accessories: Crate Paper punchout strips, Nestabilites Rectangle and Rectangle Scallop Dies by Spellbinders, SU Ticket Corner Punch, unknown Star Punch, Black Organdy, Red Sticky Strip, Mod Podge, Mounting Tape.

Thanks much for looking! Please click here to check out the other uploads!!!

38 responses so far

« Newer Entries