Search Results for "Cotton Scraps"

Jul 08 2009

Buttons and Bows for Baby Boys

Published by

Today I have a Buttons and Bows card for a baby boy!  And even with buttons and bows it does look boyish enough — for a newborn anyway!   The card is quite simple, using a Cuttlebug embossing folder for the background and machine stitching on the focal image.

eli-anderw-480-wm-notime.jpg

I made this for our newest great-nephew, Eli Andrew, who came into the world on July 1.  We hope to see him this weekend!  The image is from the Baby Boy Cotton Scraps, cut with Fiskars Pinking Sheers, matted onto cardstock which is stitched at the sewing machine.  The Taupe Silk Ribbon is a good match to the SU Close to Cocoa cardstock and the bow is made with the Bow Easy.

eli-andrew-detail-386-notime.jpg

A fun and quick way to prepare a focal image panel at the sewing machine.  It is elevated on foam mounting tape.  The button is threaded with Ivory Jute String.

Stamps:  None

Paper:  SU Soft Sky, Close to Cocoa; PTI Vintage Cream

Ink:  ColorBox Chalk Creamy Brown

Accessories:  Baby Boy Cotton Scraps, 1.25″ and 1/4″ Silk Taupe Ribbon, Bow Easy, Ivory String, Cuttlebug and Embossing Folder, Pinking Shears, Button, Sewing Machine and Thread, Aleene’s Fast Grab Tacky Glue, Mounting Tape, Glue Glider (from Joan’s Garden).

Shopping:  The Stamp Simply Ribbon Store has the Cotton Scraps, Pinking Shears, Silk Ribbon, String and Bow Easy.

I’m so glad you stopped in again today!  Next up is our Stamp Simply Challenge for the week, and this week proves to be a fun one, so please do try to  check back in late Thursday night or Friday if you can!!! Thanks much — and have a GREAT day!

21 responses so far

Jul 06 2009

Buttons and Bows…

Published by

… and new found friends from afar and fun and games on top of it all! I was thrilled when a few weeks back I received an invitation to play with some very talented girls *across the pond* in the United Kingdom.  As a result I’ve run across some blogs that are new to me and seen some awesome creations that I’d like to share with all of you today.

The Next Level is relatively new.  Each week they put forth a challenge, their talented DT creates projects, and the public is invited to play.  Sponsors are also involved each week, which means a chance for the participants to win some wonderful merchandise.  This week’s theme is *Buttons and Bows*.  I was invited to play along with their DT this week and all of you are also invited to play and link your creations.  Of those playing,  multiple winners will be drawn for prizes!  How fun! Click here to see the prize offerings this week.  Click here to get to the challenge page of The Next Level and read the details and see all the cards created by the DT with links to their blogs.  Be sure to click into their blogs to get all the fun details on their projects!

Here is my Buttons and Bows creation:

buttons-bows-480-wm-notime.jpg

What’s more appropriate for a Buttons and Bows creation that a Sweet Baby Girl card!  I made this card quite simply by using many little pretties — Cotton Scraps (Baby Girl) for the focal image, cut with Fiskars Pinking Shears and stitched onto a pink mat which was then distressed.  My background is done with the Cuttlebug and an embossing folder, my ribbon is 1.25″ wide May Arts Pink Silk, the bow being made on the Bow Easy, and my little buttons are from Wal-Mart, the larger one being tied with 100% Jute String by May Arts.  And that’s about it — just a matter of putting a few pretty things together — my FAVORITE way to make a card!!!

Stamps and Ink:  None

Paper:  PTI Vintage Cream, SU Pink Pirouette

Accessories:  Cotton Scraps Baby Girl, 1.25″ and 1/4″ Pink Silk Ribbon, Ivory Jute String, Bow Easy,Fiskars Pinking Shears and Scor-It, all from the Stamp Simply Ribbon Store; Buttons and Aleene’s Fast Grab Tacky Glue from Wal-Mart; Glue Glider from Joan’s Garden; Cuttlebug and Swiss Dots Embossing Folder; SU Corner Rounder; Sewing Machine and Thread; Scissor Blades to distress.

Thanks so much for stopping in today.  I hope you take the time to check out The Next Level Buttons and Bows Blog Challenge for this week and play along if you have the time.  Playing and linking your creation will enter you in the drawing for prizes, and what could be more fun!!! 

Thanks all — see you real soon!

30 responses so far

May 05 2009

Bows Made Easy with Bow-Easy

Published by

I am so excited with what I have to share with you today! I think it’s a given that everyone loves a beautiful bow, but many of us struggle making them. Well, we will struggle no more!!! Thanks to my friend, Jenny Gropp, I was turned on to the Bow-Easy. Jenny has been using this little bow-making template for a long time and for those familiar with her work, you will instantly recognize her beautiful little bows in the sample boards below. I just got in my order of the Bow-Easy templates and I’m so happy to be able to share them with you all. They are NOW listed at the Stamp Simply Ribbon Store.

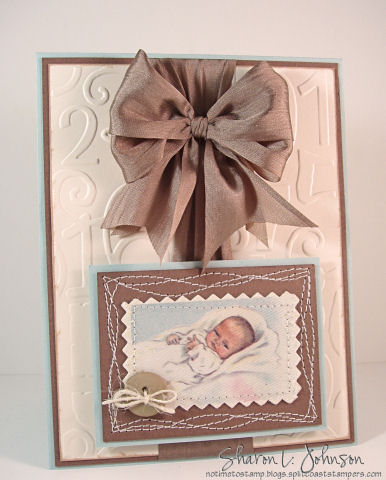
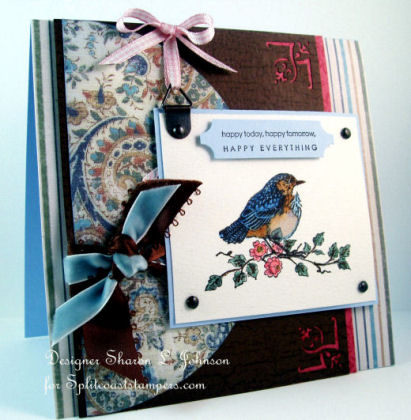
Here’s a card with a bow made using the Bow-Easy, and it WAS so easy!!! I am just jumping for joy! It’s the same double 1.25″ wide silk bow that I made on yesterday’s Dirty Laundry card. But I think I cut my tails a bit differently, giving it a slightly different look:

bow-easy-hello-480-wm-notime.jpg

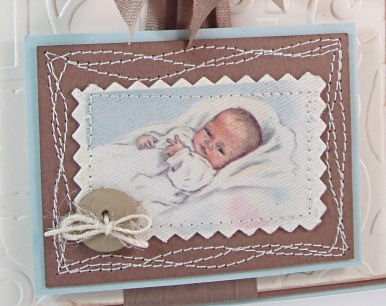
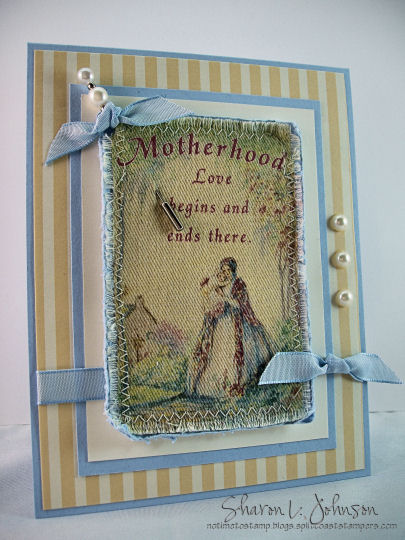
Just another simple card to put together, making use of my beloved Cotton Scraps. Today I cut them with my brand new dressmaker pinking shears by Fiskars and adhered to the Soft Sky base with my Glue Glider (my FAV adhesive for card making). A few buttons on top (sewn on with the May Arts String), my beautiful silk bow using 1.25″ Silk Ribbon by May Arts and a simple sentiment finish it off. Maybe it’s hard to see, but I used a black Kaiser pearl for my birds eye. Even on the Cotton Scraps, adding an eye to a bird just brings him to life. I know I keep saying this, but that one little detail makes SUCH a diff in the image!!! OK, now on to the bow:

bow-easy-attach-360-wm-notime.jpg

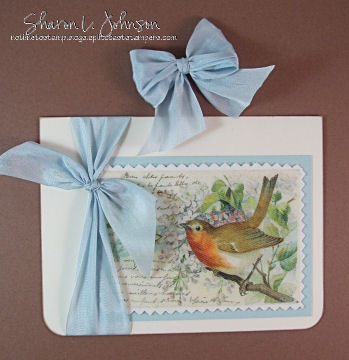
My bow was made using the Bow-Easy. When making bows on the Bow-Easy, they are always independent bows that need to be attached to your project. Think how fun it would be to sit and watch TV some night and make up a ton of gorgeous bows, all ready and set to go for when you need them – now THAT’S an idea!!! LOL!!! As you can see, I’ve been wrapping my ribbon around my card and just tying it into a tight knot. I’m using the May Arts Silk Ribbon (1.25″ wide) and it is SUCH a thin and light weight ribbon thatit works beautifully in this application. I then just attach my bow with some Zots (glue dots). (I’ve been told of another adhesive product that is supposed to be super-duper for adhering on bows. I have some on order and if it turns out to be as good as reported, I’ll be sure to let you know what it is and where to get it — this may take a couple weeks yet, but I’ll be sure to share once I can try it out myself)!!!

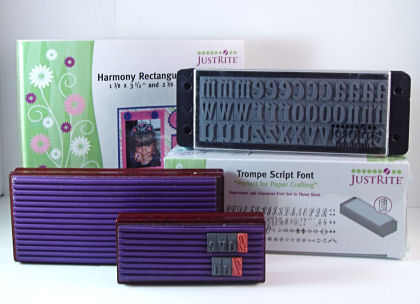
OK, so what’s the Bow-Easy? Here it is:

packaged-mini-240-notime.jpgbow-easy-mini-template-240-notime.jpg

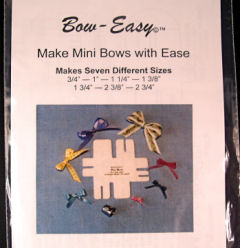
The Bow-Easy is a heavy plastic template with 7 leg configurations that allows us to make bows in 7 sizes ranging from 3/4 to 2 3/4, using a variety of ribbon widths. And we can easily do a standard single bow, double bows, triple bows, etc. with no extra effort. And both ribbon tails ALWAYS end up on the back side of the bow!!! The Bow-Easy is available on Page 2 Tools of the Stamp Simply Ribbon Store.

And I’d like to share with you the creations of some great designers who are also totally hooked on the Bow Easy:

Jenny Gropp who got us all hooked! She’s offering BLOG CANDY TODAY!!!

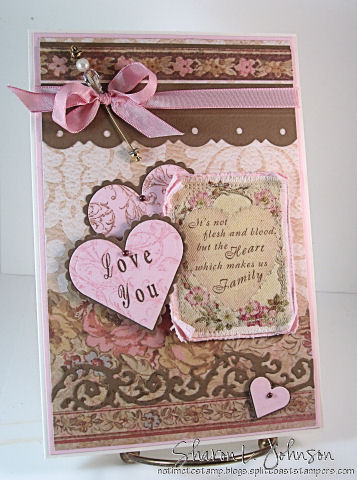
Jerri Kay Jimenez — her work just DEMANDS these beautiful, dainty bows. Here is Jerri’s creation for today in a style ONLY Jerri can do!

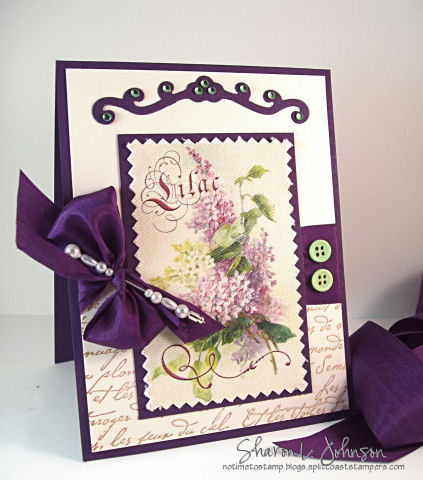
Joan Fricker, who fell in LOVE with the ease of the Bow-Easy — what a gorgeous creation she made to share with us today! I’m ga-ga over all that purple!!!

Below aresome sample boards that Jenny so kindly made up for me to share with all of you. As you can see, you can do bows with single loops, double loops, triple loops, etc. Instructions come with each Bow-Easy and I will also provide you with a photo tutorial on using the Bow Easy. It is SO easy once you do it just once. You will be amazed!!! Now let’s check out Jenny’s beautiful sample boards:

jennys-samples_c_large_web_view.jpg

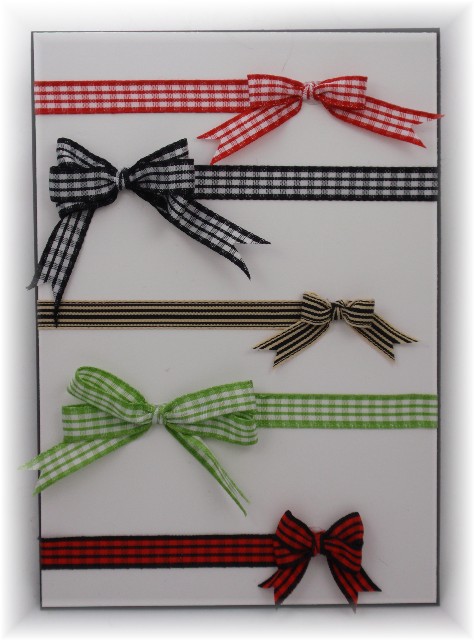
These were all made with 3/8″ wide ribbon. You can see both single loops and double loops on the bows. And they are all so neat and perfect!!!

jennys_samples_b_large_web_view.jpg

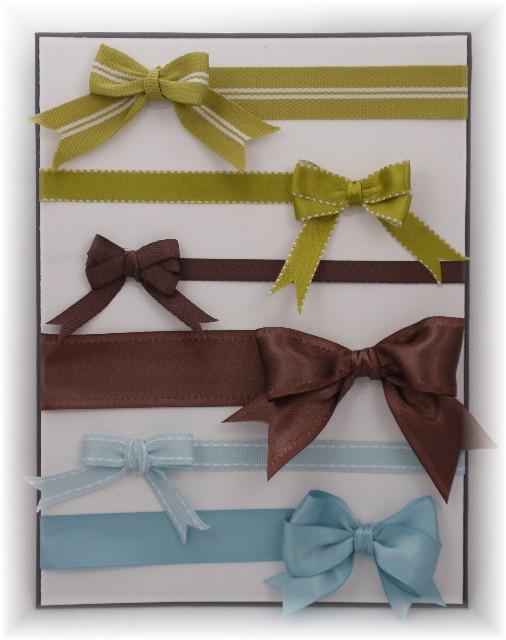
Here we have a variety of ribbon widths and weights. Again there aretriple, double and single loops. Personally, I am swooning over the luscious double bluebow on the bottom!

jennys_samples_a_large_web_view.jpg

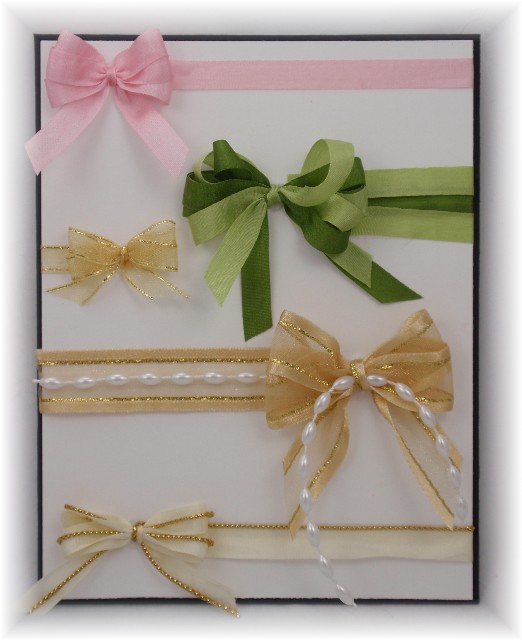
And here are more of Jenny’s beautiful samples of bows made on the Bow-Easy — double loops, triple loops, more loops than I can count, pearls and cording added — WOW!!! The options are endless!!! I am just so excited at the thought of easily creating these bows with my new Bow-Easy.

To see more samples in use on cards, I’d like to share these lovely creations with you:

Jerri Kay used the Bow-Easy on this unbelievable creation, Happy Easter.

Jenny’s blogis overflowing with creations using the Bow-Easy, but here are just a few for you to check out now, and then you can hop on over to her blog for more eye candy:

Crazy Quilt, Happy Holidays, Naughty or Nice, Wild Spring Sprinkle

Hope you enjoyed the Bow-Easy creations we all put together for you today! If you haven’t yet, make sure to check out all the links — some GREAT ideas! Bow-making has NEVER been easier!!! Available here.

Oh, and I almost forgot — how does a Bow-Easy Blog Candy offering sound?Jenny Gropp is sharing today, so make sure you stop in to sign up!!!

Thanks much for stopping in here again, everyone — truly appreciate it!!! Many thanks!!!

Stamps: Glamour Girls by Crafty Secrets

Paper: PTI Vintage Cream, SU Soft Sky

Ink: ColorBox Chalk Creamy Brown, Versa Fine Vintage Sepia

Accessories: Bow-Easy, Cotton Scraps (Flowers) by Crafty Secrets, Wide Silk Ribbon and String by May Arts, Wal-Mart Buttons, Kaiser Pearls and Rhinestones, SU Corner Rounder and Large Oval Punch, Zots , Glue Glider, Fiskars Pinking Shears.

Shopping:

The Stamp Simply Ribbon Store carries the Bow-Easy, May Arts Silk Ribbon and String, Crafty Secrets Cotton Scraps, Fiskars Pinking Shears.

Joans Garden carries Glamour Girls by Crafty Secrets, Glue Glider, Kaiser Pearls and Rhinestones.

35 responses so far

Apr 29 2009

Blog Candy and Winner!

Published by

The winning number picked by random.org for the Blog Candy offered here is #116, who is Jean. Congrats! Jean!!! Here’s what Jean had to say:

“Sharon, oh, where to begin..first of all I ALWAYS love your work. I think the lilac card is fabulous, along with the other cards you made with the cotton scraps. I too am a ribbon lover and would love to buy one of everything you have. When I am near a ribbon counter, I am like a child looking in a candy store window.Anyway to get back to your original request, I could not pick just one color scrap so I will tell you the ones I really love.flowers, winter, and feathered friends. Once again Sharon, thanks so much so sharing your fantastic work. Happy Day! Jean”

Well, Jean, you’ll have some Silk Ribbon and some Cotton Scraps to play with real soon!!! And thank you to everyone else who played along!

And FYI, the most favored Cotton Scraps were Flowers, Feathered Friends and Winter as the three top picks. The rest all got pretty much equal billing, but these 3 were undoubtedly the top preferences!!!

Another FYI, most of you are missing out on another Blog Candy I have offered — but you had to read to find it — I always love a good game — LOL!!! That one is up on Thursday night. It’ll be announced in the Stamp Simply Challenge post!!! Good luck!!!

One last FYI — I actually got a card made tonight, after like 6 nights — boy, has it been busy around here –it’sposted above, or click here — thanks much!!!

One response so far

Apr 19 2009

Violet Silk Lilacs

Published by

On the surface this card may not look like a quick card, but it was! My beautiful lilac image is a Cotton Scrap by Crafty Secrets andthe lovely, rich Violet Silk Ribbon is one of five new deep and rich colors I’ve stocked in the Stamp Simply Ribbon Store, and with the addition of a few embellishments, I called it done! Here it is:

violet-silk-lilacs-480-wm-notime.jpg

The stamping was minimal — only the retired SU French Script background. I most often sew my Cotton Scraps, but today I really did want a faster card (what’s new – LOL!), so rather than doing any machine sewing I opted to cut out my lilac image with dressmaker pinking shears and mounted it onto the eggplant cardstock. MyViolet Silk is a perfect match to SU’s Elegant Eggplant, one of my long-time favorite colors — very rich! I used a Spellbinders die to cut my top flourish, added Kaiser Pearls, a couple buttons and a corsage pin with beads. Lots of pretty embellishments, but all quick and easy — truly a no-fuss card, and I really love it! I chose to leave this with no sentiment. This is a good type of card to keep on hand for any variety of occasions. When I need it, then I can add an appropriate sentiment either on a small hanging tag or on the inside.

Stamps: SU retired French Script

Paper: PTI Vintage Cream, SU Elegant Eggplant

Ink: SU Creamy Caramel

Accessories: 1.25″ May Arts Silk Ribbon from the Stamp Simply Ribbon Store, Cotton Scraps (Flowers) by Crafty Secrets, Flourish Accent dies by Spellbinders, Corsage Pin and Beads from Michaels, Buttons from Wal-Mart, Dressmaker Pinking Shears, Zots, Kaiser Rhinestones, Glue Glider. (Spellbinders, Rhinestones and Glue Glider from Joan’s Garden)

Thanks so much for stopping in to visit today. For those of you who read though my last post and have been praying for and/or asking about my Dad, things went well on our Doctor visit. No new problems were discovered (that was the fear), and it’s just a matter of managing the old problems, so that was VERY GOOD news!!! Praise the Lord and THANK YOU all for your prayers and kind words. Much appreciated!!! And now we are predicted to have snow for the next few days — can you believe!!! Oh my — I guess we just wait and see if it really comes — LOL!!! Nothing else we can do!!! Hope you are all off to a good week and that youwill have nice spring weather — enjoy it for all of us here in the northwoods!!! See you soon!!!

37 responses so far

Jan 15 2009

Stamp Simply #70 – Senior Citizens Rule!!!

Published by

Keyword ssnotime70 -There is no time limit. You can play this challenge and upload yourproject at Splitcoastand/or your Blog, anytime at all! You (and that means anyone and everyone, blogger or not!)can play as many times as you like!!! The point is to keep it simple, quick and have fun!!! Please link back here.

This weeks challenge is all about having fun with ourselves!!! And I hope no one takes offense with this challenge as it certainly was not intended that way — the intent is merely to have fun and be able to enjoy where we are in life — wherever that may be!!!

Today is my birthday, my 55th birthday!!! Oh good gracious, how did that happen!!! I don’t feel a day over 25 (most of the time)!!! So today we will make a card that is suitable to give to a Senior Citizen!!! Yes, I know Senior Citizens like ALL types of cards, but today let’s try to make a card that when we look at it we think — gee, that sure looks like an *Old Lady* card — LOL!!! (or Old Man, if you prefer). This is totally open to your interpretation — you could go vintage, you could go humorous, or anything else you can dream up — WHATEVER strikes your fancy!!! Most importantly, have fun!!! Can’t wait to see what you do!!!

Some great samples for the Stamp Simply Challenge today can be seen on the blogs of these designers:Julie, Janine, Jennifer, Tammy, Dee, Becky, AJ,and Deb. Please bear with us as we are all uploading and linking tonight.

You can see all Gallery Submissions here.

What wonderful samples!!! Thank you girls!!! Much appreciated!!!

Heres myproject for todays challenge:

old-lady-480-wm-notime.jpg

Think an Old Lady would like this — LOL!!! I had fun making it. I used one of my favorite products that I just don’t use all that often — Cotton Scraps by Crafty Secrets — FUN little swatches of fabric with all these gorgeous images. Today I fringed mine and sewed it onto the pink panel behind it, then distressed the paper edges.

The *Love You* on the heart was made using the new lower case font being introduced by JustRite at CHA next week. I LOVE that we now will have lower case font to add to our upper case font, giving us so many more options for sentiments!!!

old-lady-product-420-notime.jpg

I used Trompe Script Font for my first letters and then switched to the new Times New Roman Lower Case Font for the remaining letters — fun to do!!! They are mounted on the smaller of the rectangle stampers in the Harmony Rectangle Stamper Set. Here’s a closeup look at the sentiment:

old-lady-closeup-420-wm-notime.jpg

Isnt’ it pretty AND Old-Ladyish — LOL!!! The elements I incorporated into this card that I thought would appeal to an older woman are:

A larger sized card (this is 5.25 x 7.75″)

Soft Pinks and Browns

Stick Pin and Pearls

Cotton Scraps & Sewing (reminds me of quilts)

Vintage Style (though clean vintage)

Pretty Designer Paper with vintage feel

Lace and Scallop Borders

Stamps: Trompe Script Font, Times New Roman Lower Case Font, used on the Harmony Rectangle Stamper, all by JustRite. Anna Griffin Background by All Night Media.

Paper: PTI Vintage Cream; SU Pink Pirouette, Prism Suede Brown Medium, Crafty Secrets Classic Heartwarming Vintage Collection Pad.

Ink: Color Box Chalk in Chestnut Roan; Palette in Burnt Umber; SU Pretty in Pink.

Accessories: Crafty Secrets Cotton Scraps (Family); SU Taffeta Ribbon; Spellbinders Classic and Scalloped Heart Nestabilities; Cuttlebug Border Die; Martha Stewart Scallop Punch; 1/8 hand held punch; Stick pin, pearls (JoAnns and SU); Kaiser Pearls; SU Distressing Tool; Sewing Machine and Thread; Glue Pen; Glue Glider; SU Dimensionals , Mounting Squares , Scor-It.

Again, I just want to say thanks for stopping in!!! I hope you can find time to play if this challenge interests you — I can’t wait to see what all the players feel are Old Lady cards — LOL!!! We are having very, very cold temps — wishing for a bit of a warm up! Hope you are warm and cozy and off to a safe weekend!!!

100 responses so far

Aug 10 2008

Woman to Woman

Published by

I’ve had the pleasure of running into Joan Fricker twice in the last month, and seeing as she is from Indiana and I’m from Michigan’s Upper Peninsula well, that’s pretty amazing! On our second visit we had much more time to sit and talk, and I learned so many fun things about Joan.

joan-fricker-notime.jpg

Joan has a long history in sales that I found quite fascinating. She’s done a lot of what I would consider *fun* things along the way, requiring hard work and dedication, leading up to where she is today — just having fun in Blogland, creating, posting, making friends, and still — selling!!! Yes, Joan has anEvery Monday Sale on her blog — low key, easy to manage and, most importantly, a project she considers fun!!! More detailson her Every Monday Sale will follow, but first, a bit aboutJoan.

  • Joan’s first job was at age 5, selling potholders door to door
  • As a school girl Joan worked in her parents grocery store attached to their home in Teegarden, IN
  • After marrying at age 17 and adopting a daughter,Joan sold Avon for 7 years
  • After DH’s motorcycle accidentJoanneeded more income, soshe began selling toys for a season, which was her start in the party plan business
  • Joan’s love for interior decorating led her to a company called HODA (similar to Home Interiors), where she managed 30 women for about 14 years, always placing in the Top 10 in sales (#1 in sales 1 year!). Joan had found her niche! Interior decorating was her love!
  • Joan purchased a Decorating Den Franchise and became a full fledged interior decorator selling draperies, furniture, wallpaper, carpeting and accessories. Within 2 years Joan was ranked #2 in the state of Indiana. Her 80 hour work weeks were fun, but extremely stressful.
  • 6 months after purchasing her Decorating Den Franchise, Joan’s husband was diagnosed with cancer and passed on 18 months later. Joan continued working, but the joy was gone. She sold her business by the time it was 4 years old.
  • Still needing an income, Joan started selling jewelry for a party plan company, shortly becoming manager with 30 girls under her. Joan did this job merely for an income, not for love of the job.
  • After a few years, a new manenters Joan’s life, they were married, and he asked her to quit the jewlery job and be home evenings, much to Joan’s delight!
  • Joan and DH now become involved in a company selling natural products and together they developed an organization of over 200 people.
  • Joan became tired of trying to keep 200 people motivated and felt she needed a hobby. She started making soap, and soon decided she needed to sell some of it to support her habit (sound familiar — LOL!)
  • In short order, Joan had 11 employees in her soap business and had accounts across the nation as well as internationally. Candles and other toiletries were added to her line. After 9 years of again 80+ hour work weeks, the fun was gone. Once again, it was time to sell her business and take control of her life.
  • Joan is loving the stress-free days of her retirement. She enjoys canning, flower gardening and making cement leaves. Thecement leaves are AMAZING — check them out here. She also started scrapbooking, fell in love with digital scrapping and spent time learning Adobe Photoshop. Then enters card making, rubber stamps, etc. — and I think you can all get the picture after this point — LOL!!!

joans_gardens_shop-adj-480.jpg

No matter how busy Joan stays, her love of selling just won’t quit! She loves going to trades shows (thus her CHA trip) and searching out new and exciting things. Joan has an adorable little shop at her home (pictured above) and this fall she plans to develop that into a small local business where card makers can gather, create, share and enjoy those simple pleasures that are inherent with this hobby. And given Joan’s history, I just have a hunch her latest venture will be a smashing success!!!

Joan is slowly, but surely, stocking her little store, and in the meantime she runs a fun and simple Every Monday Sale onher blog. She only lists a handful of items each Monday, ships them out promptly, and then she’s done — until next Monday!

So, what lines does Joan carry? Well, some really GREAT lines that we all know and love. Joan currently has:

Joan will soon be receiving:

So, if you’d like, stop in to see Joan and check out what she’s got for sale today. Her prices are certainly very reasonable and her shipping beyond compare! You just never know what you might find at Joan’s Garden. Keep scrolling down once you get there asitems are all listed separately.

And being a huge fan of beautiful vintage images, I’d like to leave you today with some creations made using Crafty Secrets images.

pretty-bird-notimetostamp-adj-420.jpg

I made this card in May 2007 for the Fan Club Gallery at SCS. Itis 5.5″ square andusesBird Notes by Crafty Secrets. If you are are a Fan Club Member, you may view all details here. If not, you may want to consider joining. You can read all aboutthe Fan Clubhere.

pie-and-coffee-notimetostamp-adj-520.jpg

This card was also made in May, 2007 for the Fan Club Gallery at SCS. This card is very large at 8.5 x 5.5, and it uses bothStickers and Cotton Scraps by Crafty Secrets. And, yes, that is a real cookie cutter hanging there and a doily that I cut and added seam binding to in order to create a mini apron!!! Again, details may be seen in the Fan Club Gallery here.

Thanks so much for stopping in today and getting to know Joan a bit better!!! I truly enjoyed preparing this article and sharing these fun facts about Joan with you!!! Hope you are all off to a wonderful and fun-filled week ahead.

20 responses so far

Jan 29 2008

Twice Challenged

Published by

This is a card I did for today’s Color Challenge at SCS — YoYo Yellow (oh my!), Going Gray and Basic Gray. It is also for the Sketch Challenge the girls are running on the Crafty Secrets Member Comany Forum at SCS. The sketch was tall and thin – I like that!!! Here’s my double challenge card:

cc151-friend-540-wm-notime.jpg

I have NEVER used YoYo Yellow before — good thing I had a few sheets in a multi pack of paper — LOL!!! And honestly, paired with these grays, it really isn’t too bad!!! Actually, I rather like this card!!! I went down to stamp and pulled together some things left on my tablefrom the last couple day’s projects — the Cotton Scraps by Crafty Secrets were still out, so I chose a flower image with yellow, and my wide black gingham ribbon was out from yesterday’s little 3 cards and box project. I quickly sewed my Cotton Scrap onto a base of Basic Gray cardstock –again, 3 times around in my meandering stitch, added a corsage pin and ribbon and mounted it on a YoYo Yellow frame. That was then mounted on a Basic Gray panel which was corner punched on the bottom with a favorite punch of mine — Ornamental Brackets by Anna Griffin. I put a yellow piece behind so the pretty punched design would show up well. My sentiment is from Card Sentiments by Crafty Secrets, circle punched, then mounted with a Pop Dot onto a Designer Label Punched piece. Wrapped more gingham around this panel, adhered to Going Gray card, and done!!! I do like the color combo and may actually use it again — it has lots of POP, and I like that!!!

This card will fit in a standard business sized envelope. It measures 4″ x 7 3/4″. A standard business sized envelope will hold a card up to 4″ x about 9 1/4″.

  • Stamps: Card Sentiments by Crafty Secrets; Floral background by SU
  • Paper. SU: Basic Gray, Going Gray, YoYo Yellow
  • Ink: Going Gray by SU; Versa Fine Onyx Black
  • Accessories: Cotton Scraps by Crafty Secrets, Ribbon, Distressing Tool, Designer Label Punch, 1 1/4 and 1 3/8″ Round Punches, Anna Griffin Ornamental Bracket Punch, Sponge, Corsage Pin.

I have many plans for uploads this week — wish me luck finding time — a tutorial on an accordion spine book with inside pockets, some Flourishes pretties, some SU workshop cards, and I’ve been tagged a few times so I’ll try to get to that as well, plus my usual Friday Stamp Simply Challenge!!! Thanks for taking a peek!!! See you soon!!!

22 responses so far

Nov 30 2007

Stamp Simply Challenge #11 – Stick It On!

Published by

Challenge #11 – Keyword ssnotime11-There is no time limit. You can play this challenge and upload yourproject at Splitcoastand/or your Blog, anytime at all! You can play as many times as you like!!! The point is to keep it simple, quick and have fun!!! Please link back here.

Todays challenge is actually more than stickers – it is to USE ANY PRE-PRINTED IMAGE as your main image. You can NOT stamp your main image, though you may stamp backgrounds and/or sentiments if you wish. Here are some things that would be great items to use as your main image, but anything pre-printed goes:

Stickers, cut-outs from booklets made for that purpose, Cotton Scraps, any type of fabric, pictures cut from magazines or old books, parts taken from store-bought cards, rub-ons, chipboard type stickers — basically, any imageyou can just stick on without stamping — all in the spirit of creating a quick card!

Today’s challenge was inspired by SmilynStef. She participated in a challenge from 2 weeks back, and the moment I saw her card I had a light bulb moment — it was the PERFECT challenge for this week!!! She had used a sticker as her main image and her card was GORGEOUS!!! You can check it out at SCS here or on her Blog here. Thank you, Stef, for this great idea and gorgeous sample!!!

Remember when you upload to use the keyword above, followed by a comma.Please come back here to post (as a comment) that youve played, and provide a linkso I can check out your card right away. You can find all cards uploaded for this challenge by clicking Gallery Submissions Here.

Some wanting to play said they have never uploaded before. If thats you and you need help uploading, just go to my Challenge No. 1 here.

11-stickers-540-wm-notime.jpg

Here’s my sample. I used an image from a sheet of Cotton Scraps by Crafty Secrets. I just LOVE the Cotton Scraps. I was lucky enough to have a friend recently give me a few sheets — thanks much, JoAnn (sarahzoe)!!! These Cotton Scraps are also available through Sweet Miss Daisy’s store, Sassy and Sweet Crafts.

I chose to go the easy route and did NO stamping on this card!!! Now that’s a switch!!! My Cotton Scrap was sewn onto a piece of blue cardstockcut just a tad bit larger than the cotton. My sewing machine NEVER gives me problems but, of course, tonight it did — skipping stitches like crazy — probably needs a new needle — but I didn’t stress over it too much as I was going for a somewhat vintage look on the scrap anyway, so that’s just how it goes sometimes!!! The Cotton Scrap panel is on mounting tape. Everything else is just simply layered. The striped panel is actually a card from Michael’s that I cut in 1/2 to use. I wanted to use my Pretties Kit, but the stick pin in it was actually a bit too large for this image, so I resorted to my corsage pins from Michaels (in the bridal section). They are a good inch short and a bit daintier, which worked better here. I did use the pearl and spacer on it from the Pretties Kit, as well as the stopper on the bottom. The 1/2 pearls are also from the Pretties Kit, adhered with Crystal Effects.

  • Stamps: None
  • Paper: Bashful Blue, Very Vanilla, Card front from The Paper Company (Michaels)
  • Ink: None
  • Accessories: Cotton Scraps (Family), Blue Taffeta, Corsage Pin (Michaels), Pretties Kit, Crystal Effects, Distressing Tool on Cutter Kit, Mounting Tape, Mini Glue Dots, Dimensionals, Sewing Machine and Thread.

Hope you get a chance to play — this is another fun one!!! And once again, thanks so much for stopping in!!!

28 responses so far

« Newer Entries